Showing posts with label Stampin' Up. Show all posts

Sunday, November 22, 2020

Reindeer Head Tag

Here's my second set of tags for Christmas this year.  I used Cookie Cutter Christmas by Stampin' Up along with the matching punch.  I CASE'd it from an idea I found on the internet, but the photo is not watermarked, so I have no idea who to credit for it.  I used a different sentiment stamp set and tag die, but the basic idea is the same.

I cut a tag with the Tag,You're It die by My Favorite Things from Crumb Cake cardstock.  I stamped the reindeer image on the same cardstock so the edges would blend into the background and then colored it with Copic markers.

I used Ebony Black Nuvo Crystal Drops to give shiny dimension to the eyes.  For the nose, I used Glossy Accents over the red marker.

On the tag, I glued a strip of green patterned paper from the Warmth & Cheer pad by Stampin' Up.  I stamped the sentiment from Christmas Cheer by Avery Elle using Dark Chocolate ink.  Then I popped up the reindeer head with foam tape and tied on some narrow green ribbon.


Simple and cute!

Stamps:  Cookie Cutter Christmas (Stampin' Up); Christmas Cheer (Avery Elle)
Ink:  Tuxedo Black (Memento); Dark Chocolate (Papertrey Ink)
Paper:  Crumb Cake, Warmth & Cheer pad (Stampin' Up)
Copic:  E57, E59, R59, RV17
Misc: Cookie Cutter Builder punch (Stampin' Up);  Tag, You're It die (My Favorite Things); Ebony Black (Nuvo Crystal Drops); Glossy Accents (Ranger); green ribbon

Saturday, November 21, 2020

Poinsettia Tag

I just completed this year's Christmas tags.  We're in the middle of a huge basement remodel and our lives have been a little chaotic for the past two months.  My son and his family are coming to spend December with us, so I have to move most of the stuff in my studio down to the basement storage room when it's ready.  My little two-year-old grandson would have a heyday with my ink pads, scissors, stamps, and other assorted paraphernalia if I don't.  My studio will be converted into a guest bedroom temporarily while they are here.  Therefore, I needed to get all the Christmas tags done before December 1st.

My first tag uses the Poinsettia dies from Stampin' Up.  I had some pieces left from the Deck the Halls patterned paper and decided to cut layered poinsettias from this pretty red text print.

I usually make a set of four tags, but I had just enough paper to make a fifth poinsettia so I made an extra tag.  I'm sure I'll find a reason to use it.  It's always good to have tags on hand!

I stacked the three layers of the poinsettia and slightly curled each petal to add dimension.  I adhered the flower to a tag cut using the Berry Wreath Tag die from Papertrey Ink and Early Espresso cardstock, along with pine sprigs cut from the Funky Festive dies by Tim Holtz with Always Artichoke cardstock.

As a final step, I added Stickles to the center of the poinsettia to create a flower center.  It gives a pretty touch of sparkle!  Then I tied on some narrow gold ribbon.

 
Paper:  Always Artichoke, Early Espresso, Deck the Halls dsp (Stampin' Up)
Dies:  Poinsettia (Stampin' Up); Berry Wreath Tag (Papertrey Ink); Funky Festive (Tim Holtz)
Misc:  Tidings Stickles; gold ribbon

Tuesday, July 7, 2020

Thanks a Million

This is absolutely my favorite card of the three designs in the party pack from my Stampin' Up demonstrator.  I adore the new Magenta Madness color!  It takes me right back to my early days of stamping when the color Pink Passion was in the Brights Collection.  It was one of the very first colors I bought!  This card makes me so happy.


I also fell in love with the Blossoms in Bloom bundle when I first saw the catalog and seeing these gorgeous diecuts in person just cinched it.  Bright pink and beautiful flowers - what's not to love?  The biggest surprise for me was the background panel.  It's actually done using a new embossing folder called Tasteful Texture.  I didn't even notice it in the catalog before.  I like how it looks like purchased textured paper.  Lovely and subtle.  Another must-have for me!

Since everything was already embossed and diecut, this card was easy to put together.  Just a challenge to glue without making a mess.  My demonstrator had provided a different sentiment, but the embossing on it was spotty, so I pulled a sentiment from Bitty Birthday Thanks by My Favorite Things and embossed it on black cardstock for my card.  It was handy to grab and I didn't feel like digging through all my stuff for a sentiment at the time.  I also left off the linen thread and ribbon that was in the kit because I preferred the simple look of the black strip by itself.

I actually signed up as a demonstrator last week just so I could take advantage of the free stamp and die bundle deal to get this for myself.  I also ordered the new in-colors.  I can't wait to play more with this beautiful pink!

Stamps:  Bitty Thanks & Gratitude (My Favorite Things)
Ink:  VersaMark
Paper:  Magenta Madness, Whisper White, vellum (Stampin' Up); True Black (Papertrey Ink)
Misc:  white embossing powder (Filigree); Tasteful Texture embossing folder (Stampin' Up); Many Layers Blossoms dies (Stampin' Up); Skinny Strips die (My Favorite Things)
 

Monday, July 6, 2020

Let's Celebrate You

Here's the second card from the catalog party pack.  It uses all five of the new Stampin' Up in-colors this year and the new Celebrate Sunflowers stamp set.  Everything was precut and stamped, so all I had to do was glue everything together.  Super fast card!


I wouldn't personally choose to use all five of these colors together, but it's a neat-looking design.  Definitely a quick and easy one!

Stamps:  Celebrate Sunflowers (Stampin' Up)
Ink:  Archival Black (Stampin' Up)
Paper:  Cinnamon Cider, Just Jade, Bumblebee, Magenta Madness, Misty Moonlight, Basic Black (Stampin' Up)
 

Sunday, July 5, 2020

Jar of Flowers

It's been a weird year, hasn't it?  My Stampin' Up demonstrator usually does a new catalog party at her home in June to show off the new products, but since most of us weren't comfortable with that this year due to the COVID-19 virus, she made party packs with three card projects and dropped them off at our homes instead.  Mine even included an unopened pack of patterned paper that went with the Eastern Beauty stamp set that I bought used from her at the party last year.  Bonus!  I finally got the cards made last week and photographed today.  Here's the first one.


This card uses the new Jar of Flowers set by Stampin' Up, along with a matching punch.  Everything was precut and prestamped so all I had to do was color the flowers with my Copic markers and fussy cut them out.  It's hard to see in the photo, but I added some light shading around the edges of the jar to make it a little less flat-looking.  Nice and simple!

Stamps:  Jar of Flowers; Band Together (Stampin' Up)
Ink:  Onyx Black (Memento); Rococo Rose (Stampin' Up)
Paper:  Rococo Rose, Whisper White, Seaside Spray, Blushing Bride, In Good Taste dsp (Stampin' Up)
Copic:  B91, B93, B95, 0, C1, RV32, RV34, Y00, Y32, G40, G43, YG13, YG17, YG45
Misc:  Jar punch (Stampin' Up); Misty Moonlight/Silver baker's twine (Stampin' Up)  

Friday, January 24, 2020

Holly Joy Tag

Here's the third and final Christmas tag from last year.  I used the Spruce & Sprigs stamp set and dies from Papertrey Ink to stamp holly images.  I have some other holly images, but at this point, I didn't want to do any more fussy cutting.  I was making these on Christmas Eve and just wanted to get the presents wrapped and under the tree.  Did I mention that December was a crazy month?  I definitely need to plan ahead better this year.


I cut some tags from Dark Chocolate cardstock with the Tag Sale #5 die by Papertrey Ink and then embossed them in the Woodgrain folder by Stampin' Up.  I love the texture!


After stamping the holly leaves and berries in Pinefeather and Pure Poppy inks, I added Glossy Accents to the berries for dimension.  (hard to see in the photos)  I cut the layered JOY word with the Holiday Double Cuts dies by Papertrey Ink using Pinefeather and white cardstock and adhered them to the tag with foam tape.


The finished tags were very striking!  I added some red ribbon to match the berries.

Stamps:  Spruce & Sprigs (Papertrey Ink)
Ink:  Pinefeather, Pure Poppy (Papertrey Ink)
Paper:  White, Dark Chocolate, Pinefeather (Papertrey Ink)
Misc:  Tag Sale #5 die, Holiday Double Cuts die (Papertrey Ink); Glossy Accents (Ranger); Woodgrain embossing folder (Stampin' Up)

Tuesday, January 21, 2020

Simple Gift Box

A friend owns a mountain cabin and invited several of us to spend a weekend there last November.  It was a lovely time and I made this little gift box for her at the last minute to bring with me.  I filled it with several bite-sized Snickers bars.


I used a sheet of Springtime Vintage patterned paper by Stampin' Up  to make it using the Curvy Keepsake Box die.  I then added a simple tag stamped with a sentiment from the Tag-Its #12 set by Papertrey Ink.  Simple and easy!  My friend really liked it.  :)

Stamps:  Tag-Its #12 (Papertrey Ink)
Paper:  Baja Breeze, Springtime Vintage (Stampin' Up)
Ink:  Onyx Black (VersaFine)
Misc:  Curvy Keepsake Box dies (Stampin' Up); twine

Monday, January 14, 2019

Arcos Wrap Bracelet

I love to make things.  If fear didn't get in the way so often, my whole home and wardrobe would be handmade things.  I've been wanting to try bead-weaving for years.  If you don't believe me, just look at my bookshelf full of jewelry magazines such as Bead & Button, BeadStyle, and BeadWork.  I've daydreamed about it for ages.  I really admire all the beautiful jewelry designs.

I subscribe to Potomac Bead's channel on Youtube and when the Arcos Wrap Bracelet popped up, I immediately saved the link.  I loved the design and it looked simple enough for a beginner like me.  After stalling for months, I finally ordered the beads and took the plunge.  It was super easy to make!


I love how the design hints of butterflies.  I picked some gorgeous mottled blue/silver beads for my project.  I made the wrap bracelet twice, once for myself and once for my sister as a birthday gift.  She really loves bracelets and knew it would be a fun surprise for her when we went to visit family in August.


Well...technically, I made it three times.  When I gave it to my sister, it was just a bit too short.  I added an additional motif repeat and that solved the problem.  Glad it was an easy pattern!


Of course, I had to make a pretty gift box to hold the bracelet.  I used the same design as the one for my mom, just in different colors.  (see the previous post for more details)


Now I just need to pick my next bead project!  I had planned to make my mom a necklace and earrings set for Christmas, but completely ran out of time.  Life was pretty busy last year!

Stamps:  Hardwood (Stampin' Up)
Ink:  Dark Chocolate, Blueberry Sky (Papertrey Ink)
Paper:  Cocoa Bean, Blueberry Sky (Papertrey Ink)
Misc:  Gerbera Daisy dies (My Favorite Things)

Sunday, January 13, 2019

Two Earring Designs...Double the Fun

I've had these two earring designs photographed since last August when I made them for my mother's birthday.  It's about time I got on here and posted them!  Look for several additional posts this week as I catch up with some of last year's projects.

I purchased a strand of lovely floral circle beads at either Michaels or A.C. Moore and they were languishing in my bead drawer for months.  I made simple earrings with the addition of some tiny clear crystal faceted beads.  I love this design and need to make a pair for myself!


I made an additional pair of earrings using some cool mottled green beads that I bought at A.C. Moore a couple of years ago.  I strung them with simple silver ball spacers.  Both earrings have a great summer vibe.  My mom really liked them!


Naturally, I had to create some packaging to gift the earrings, so I pulled out a nugget box pattern I got from Splitcoaststampers.  The depth is perfect for earrings once you add a little batting.


I stamped the Cocoa Bean cardstock in Dark Chocolate ink with the Hardwood background stamp from Stampin' Up.  It's one of my favorites!  I cut a layered flower from Raspberry Fizz cardstock using the Gerbera Daisy dies from My Favorite Things.  I then inked the edges to define the petals, as well as the flower center, using the matching inks.  Simple, but it makes a striking box.


Stamps:  Hardwood (Stampin' Up)
Ink:  Dark Chocolate, Raspberry Fizz (Papertrey Ink)
Paper:  Cocoa Bean, Raspberry Fizz (Papertrey Ink)
Misc:  Gerbera Daisy dies (My Favorite Things)

Tuesday, May 15, 2018

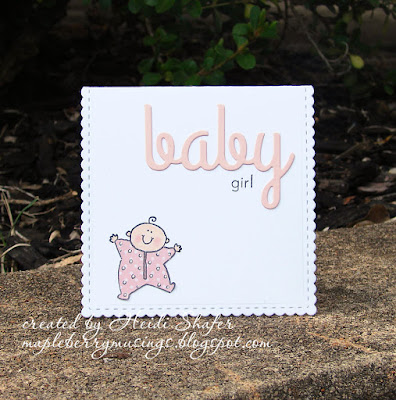
Baby Girl Card & Gift Wrap

I made this card and gift wrap for a baby shower present several months ago.  I used an old set by Stampin' Up called Baby Firsts.  It's one of my personal favorites for baby cards.


For the gift wrap, I stamped baby images repeatedly on kraft paper with black ink.  Soft pink ribbon added the perfect touch to match the card.


After stamping the baby image on a scalloped notecard and coloring it with Copic markers, I paper-pieced the little pink onesie with Sweet Blush Bitty Dot patterned paper by Papertrey Ink.  I added little details to the dots with a white gel pen and colored the zipper with a silver Wink of Stella pen.

I cut the word "baby" using the Wonderful Words: Baby die by Papertrey Ink and stamped the word "girl" underneath with the matching stamp set.  Simple and super cute!

Stamps:  Baby Firsts (Stampin' Up); Wonderful Words: Baby (Papertrey Ink)
Ink:  Tuxedo Black (Memento)
Paper:  White, Sweet Blush Bitty Dot (Papertrey Ink); unknown pink
Copic:  E000, E00, R20
Misc:  Wonderful Words: Baby die, Don't Forget to Write dies (Papertrey Ink); white gel pen; silver Wink of Stella pen

Wednesday, January 24, 2018

Cookie Cutter Rudolph Tag

Here is the second tag I created for Christmas last year.  I only had two of my children home for the holidays.  Next year, however, will be a different story!  Everyone will be here and I simply cannot wait.  :)  For this one, I used Cookie Cutter Christmas by Stampin' Up and Holiday Trimmings by Wplus9 Studios.


I opted for simple designs last year because I waited until the last minute.  Honestly, I was tempted to skip making them altogether.  The last few months have been a real struggle creatively, but I couldn't let my kids down.  It's a family tradition and they look forward to seeing the new tags each year and guessing whose is whose.  I admit that it's fun for me too.  Next year, I will need to make five designs so I had better start much earlier!


This cute little reindeer is from the Cookie Cutter Christmas set.  It has a matching punch that makes it super easy to use.  I stamped and colored my reindeer with Copic markers, adding little black Nuvo drops eyes and a glossy nose for dimension.

On the black tag cut using dies from the Holiday Tag-Along kit by Papertrey Ink, I repeatedly stamped and embossed a sentiment from Holiday Trimmings in white powder.  I cut a red glitter strip using a die from Blueprints 8 by My Favorite Things and glued it to the tag.  I adhered the reindeer with foam tape.


It's simple, but I like the bold black and white with pops of red.  It makes a striking tag!

Stamps:  Cookie Cutter Christmas (Stampin' Up); Holiday Trimmings (Wplus9 Studio)
Ink:  VersaMark; Tuxedo Black (Memento)
Paper:  White, True Black (Papertrey Ink); red glitter
Copic:  E55, E57, E59, RV13, R29, R59
Misc:  Holiday Tag-Along die (Papertrey Ink); Blueprints 8 die (My Favorite Things); Cookie Cutter punch (Stampin' Up); white embossing powder (Filigree); red ribbon; Glossy Accents (Ranger); Ebony Black Nuvo Crystal Drops

Friday, August 25, 2017

Mom's Birthday Gift

My mom's birthday is now past, so I wanted to post the photos of her birthday gift.  I made two pairs of earrings and a fancy gift box using a nugget box template from Splitcoaststampers.


I have misplaced my notes, so I don't remember all of the cardstock colors I used, but I will do my best to recall details.  I punched the petals from two different purple cardstocks and a yellow cardstock with the Blossom Builder punch by Stampin' Up.  I sponged each petal with matching ink to add shading and then spritzed them with Perfect Pearls mist.  It gave them lots of shine!  It did the same thing with the leaves and bent all of the pieces for dimension.


I layered my large flower, staggering the petals, and glued a metal button in the center.  I love how it turned out!  After constructing my box, I stamped it with a long birthday sentiment from Around & About Sentiments by Papertrey Ink in a diagonal pattern.  I also added some small flowers from the same set.  You can see it best in the picture of the back of the box further down.


Inside the box, I placed a bit of quilt batting and then hooked my earrings through it so they wouldn't slip around inside.


I used beads that I purchased at AC Moore and Michaels to create the earrings.  Tiny clear crystal beads dangle from a flower for one of the designs.


The other design has floral ceramic beads and silver flower bead caps.  Both earring sets were fun and super easy to make.  My mom really liked them!  Since I was out visiting family this summer for my son's wedding, it was a rare opportunity to give her a birthday present in person.  (ahead of time though - I had to leave before her actual birthday)


I really enjoyed making the box too.  It's a snazzy way to present a gift!  It takes extra time, but it is always worth it.


Stamps:  Around & About Sentiments (Papertrey Ink)
Ink:  unknown
Paper:  unknown
Misc:  Blossom Builder punch (Stampin' Up); nugget box template; metal button; Perfect Pearls Mist (Ranger) 


Saturday, July 15, 2017

Brooke's Bridal Shower Gift

This morning is the bridal shower for Brooke, the fiance of my nephew Ryan, so I'm sure it's safe to post pictures of her gift.  I don't know her very well since I just met her last Sunday.  I decided to duplicate the gift I made for Meghan and use Brooke's wedding colors for the gift box.  I figured most girls like jewelry, right?   :)


Again, I used a fourteen-nugget box pattern that I had saved from Splitcoaststampers about ten years ago.  It's the perfect size for gifting jewelry.


I cut two pieces of Dark Indigo cardstock according to the pattern instructions and stamped the wrap-style cover in silver ink with a heart border from the Simple Valentine stamp set by Papertrey Ink.  I did it on an angle to draw the eye to the large butterfly.


Like I stated for Meghan's gift box, I absolutely love how the butterfly turned out.  I used two different die sets by Stampin' Up - Butterflies and Bold Butterfly.  I also used the Bitty Butterfly punch by Stampin' Up.  For the large detailed butterfly on the bottom, I cut it from Crisp Canteloupe cardstock and covered the entire thing with glitter.  Hopefully you can see the sparkle in the pictures.
 

The second butterfly layer, also detailed, is cut from silver glitter paper.  Have I mentioned before how much I love sparkle?  lol  On a smaller solid butterfly die cut of Crisp Canteloupe cardstock, I stamped a butterfly from Butterfly Basics by Stampin' Up in Crisp Canteloupe ink and added a detailed vellum butterfly on top. The smallest and final butterfly layer is from silver glitter paper using the Bitty Butterfly punch.  All those pieces make an absolutely gorgeous butterfly!


I die cut a circle from Dark Indigo cardstock and stamped it with Background Basics: Text Style by Papertrey Ink using Dark Indigo ink.  I glued my layered butterfly directly to the circle and used foam tape to adhere it to the box to give it some dimension, adding some sheer white ribbon underneath.

I cut a piece of Dark Indigo cardstock with the Building Blocks die by Papertrey Ink and stamped a sentiment from Custom Tee by Stampin' Up, embossing it with white powder.  Isn't that sentiment perfect for a bridal shower gift?  I mounted the piece with foam tape directly over the ribbon.


The wrap-style box cover slides off and inside is the necklace and earrings that I made for Brooke. (same design as Meghan's with a different monogram, of course)  I cut a piece of batting to fit the box so the jewelry would be protected and stay in place inside.


The necklace itself is a simple design.  I added an initial charm to the center of the chain and created four different dangles so there would be two on each side.


One charm is a tiny silver flower, one is a rhinestone ball, one is a butterfly, and one is a silver ball with a faceted crystal underneath.  I used the butterfly charms and faceted crystals to create matching earrings.


Brooke's gift took me a lot less time since I had already done the design work for Meghan's gift.  It was just a matter of changing the colors.  I love the pairing of navy blue and coral.  Very striking!  I hope Brooke appreciates the time spent to create something unique for her.  I'm very proud of both of these bridal shower gifts.  They are a labor of love!

Stamps:  Butterfly Basics, Custom Tee (Stampin' Up); Simple Valentine, Background Basics: Text Style (Papertrey Ink)
Ink:  VersaMark; Dark Indigo (Papertrey Ink); Crisp Canteloupe (Stampin' Up); Silver Ultimate Metallic (Encore)
Paper:  Dark Indigo, vellum (Papertrey Ink); Crisp Canteloupe, Silver Glimmer (Stampin' Up)
Dies:  Butterflies dies, Bold Butterfly dies (Stampin' Up); Building Blocks die (Papertrey Ink); Standard Circles Large die (Spellbinders)
Misc:  Bitty Butterfly punch (Stampin' Up); Sugar Cube glitter (Martha Stewart); Opaque Vanilla White embossing powder (Wow); ribbon; glue pen; foam tape