Showing posts with label Halloween. Show all posts

Sunday, March 5, 2023

Ghost Earrings

I made these fun ghost earrings today.  There are a few small flaws, because it was my first time trying to do this stitch, but they turned out adorable.  I started making them initially several days ago using the supplies I had on hand.  That attempt ended in disaster when I could no longer get my needle through the seed beads.  Can I just say that thread type matters?  Today I started again after getting some One-G thread and this time I succeeded.  They are a simple design, but it did take me about 4-1/2 hours to complete the pair.

They are so so cute!  I followed a tutorial on Youtube by Beauty Beads Land that was posted five months ago.  I had promised to make them for my daughter for Halloween, but ended up doing a theatrical production at the last minute that took up a lot of my time, so it never happened.  She'll wear them any time of year so better late than never!  She loves them!


Wednesday, October 19, 2016

Haunted Jars and 400 Blog Posts

Can you believe it?  I'm celebrating 400 posts here on my blog today!  It may be a drop in the bucket to some, but for me it feels like a huge accomplishment.  It represents a determination to keep creating through self-doubt, fear, and the big old comparison monster.  I enjoy creating my little works of art.  They make me smile!  Scrolling through my blog is like taking a trip through time.  Today, I'm sharing my favorite card from the Stampin' Up workshop I attended two days ago.


It uses the super cute Jar of Haunts stamp set.  This has been on my wish list since I first laid eyes on it.  I want it even more now.  lol   I stamped the jars on watercolor paper and used markers with a waterbrush to add color.  I also used markers for the eyeballs.  Just a bit creepy!  I cut the jars out with the matching dies.

I stamped the drippy goo image repeatedly across the top of text print paper and colored it in with a Pear Pizzazz marker.  To get the shiny effect, I colored it again with a VersaMark marker and embossed with clear powder.  It looks really cool in person. 


I stamped two spiders directly on the text paper and drew the web lines using a ruler.  I did the same thing inside the card.


I stamped the sentiment and punched it out using the old Word Window punch by Stampin' Up.  After matting the text print, I adhered the jars and sentiment using foam dots for dimension. 

Like I said, this card was my favorite to make at the workshop.  I will be back tomorrow to post another one from the same day.  Here's to many more creative projects and posts!

Stamps:  Jar of Haunts, Teeny Tiny Wishes (Stampin' Up)
Ink:  Basic Black (Stampin' Up)
Paper:  Basic Black, Tangerine Tango, Very Vanilla, Newsprint dsp (Stampin' Up)
Misc:  Everyday Jars dies, Word Window punch (Stampin' Up); Pear Pizzazz, Pool Party, Wisteria Wonder, Tempting Turquoise, Smoky Slate markers (Stampin' Up); VersaMark marker; waterbrush; clear embossing powder

Wednesday, September 28, 2016

Ink It Up with Leigh Penner: Boo


I had trouble finding my mojo yesterday.  After two weeks of run-throughs, tech rehearsals, and four performances of Little Women: The Musical, I've been flat-out tired the past two days.  I puttered around in my studio all afternoon, even cleaning out my scrap drawer, before finally coming up with this card.  I would have quit if I didn't need something for Ink It Up!  Leigh Penner and I post a project every second and fourth Wednesday using uninked stamps.  Thanks for the push, Leigh!  :)


I had this black scalloped notecard already cut in my stash and noticed that the ghost I cut during an earlier attempt fit perfectly.  My daughter Emily suggested the googly eyes.  I added some shading with gray Copic markers.  Then I embossed the word BOO in a vertical line on the left side.  Both the die and the sentiment come from Dress Up Dolls: Halloween by Papertrey Ink.  Simple, but fun!

Stamps:  Dress Up Dolls: Halloween (Papertrey Ink)
Ink:  VersaMark
Paper:  White, True Black (Papertrey Ink)
Copic: 0, N0, N2
Misc:  Dress Up Dolls: Halloween die, Noted: Scalloped Square die (Papertrey Ink); Googlies (Stampin' Up); white embossing powder (Filigree) 

Monday, February 23, 2015

You are Faboolous


I'm excited to be part of the first ever Krafty Friends Blog Hop featuring Kraftin' Kimmie Stamps' Krafty Friends!  The blog hop is filled with creations by customers, design team members, and friends of KKS.  I'm a big fan of their Moonlight Whispers line that is designed by Annie Rodrigue and have quite a few of those images.  I chose Horace, a deliciously ghosty character, for my blog hop card.


In keeping with his ghostly ambience, I colored Horace in shades of gray with Copic markers.  I only have a few gray markers, so I used three different gray color families:  neutrals for the body, toners for the vest and hat, and warms for the pocket watch, belt, and hat band.  It was quite fun to stick to such a monochromatic color scheme.   I used a cool gray to lightly shade around the entire image.  (difficult to see in the photo)  Once I finished the coloring, I added clear Wink of Stella over his body for a delightfully spooky shimmer. (also difficult to see)


It was overcast outside when I took pictures of my card, so I tried to get a shot under a lamp so you can see the sparkle.  Click on the closeup picture to see it better.  It's subtle, but it looks really cool in person!  Almost otherworldly.   :)


I used an old Sweet Sunday sketch, #227, for my layout.  I really liked the three diagonal strips.  The patterned papers are from the Neutrals Collection Designer Series Paper Patterns Stack by Stampin' Up, along with Basic Gray cardstock for mats.  I popped up the main panel, added three neutral Candy Dots in the corner, and mounted everything on a white card base.

I don't make monochromatic cards often, but I love how this one turned out!  The sentiment is from the Ghoulfriends stamp set by Paper Smooches.  Absolutely perfect!  Horace has just the dashing (and ghostly) personality to say it.  I look forward to the right occasion to send out this card.


Feel free to start the hop from the beginning at the Kraftin' Kimmie Stamps Blog, then hop around and check out all the fabulous designs. Be sure to leave a comment at each stop because there will be prizes and giveaways to some random commenters!

Not only can you comment to win, we'd love to have you JOIN the blog hop by posting your own design.  Just post a new creation featuring a Kraftin' Kimmie Stamp and link it up to the main blog post.  You'll not only be a part of this fun hop, but you'll be entered to WIN more goodies! You have until February 28th.

Stamps:  Horace (Kraftin' Kimmie); Ghoulfriends (Paper Smooches)
Ink:  Tuxedo Black (Memento)
Paper:  White (Papertrey Ink); Basic Gray, Neutrals Collection DSP Patterns Stack (Stampin' Up)
Copic:  0, C1, N0, N2, N4, T1, T4, T6, W1, W3, W5
Misc:  Neutrals Candy Dots (Stampn' Up); clear Wink of Stella pen; foam tape

Thursday, October 31, 2013

Happy Halloween!

I wanted to pop in and post a picture of the Halloween tags in action.  I made some molded candy pretzel broomsticks to give my seminary students.  I used a Wilton kit that I purchased at Michaels.  It came with this fun broomstick candy mold as well as a witch hat mold.  Those little candy spiders were included too.  Aren't they just too fun?


You'll have to pardon the indoor pics.  I took them before the sun comes up since seminary class starts at 6am.  A light tent would sure be nice for moments like that.  Check the two previous posts for details about the stamped tags.  I just had to post a pic today of the finished product.  After all, it is Halloween!   :)

Monday, October 28, 2013

Another Halloween Tag

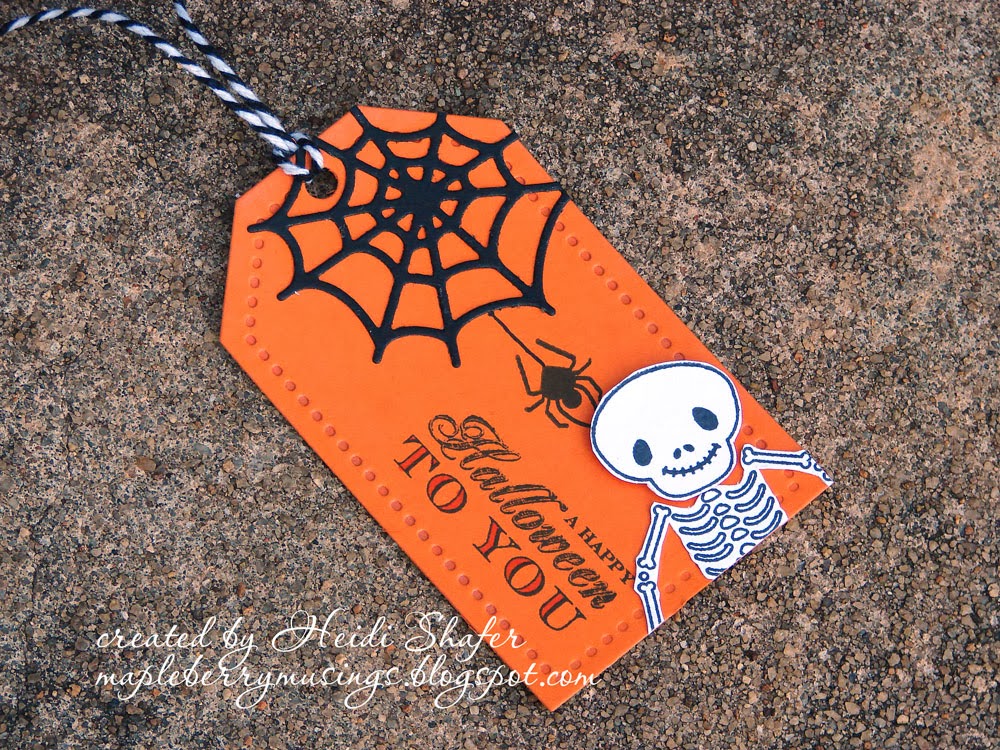
I made another Halloween tag since I need six of them.  This time I used a large spider from Spooky Sweets.  It's a natural choice since the web is already there.  :)


Yes, I hand cut the spider.  That was a bit tricky with those skinny legs!  Thankfully the spiderweb itself is a die!  :)


This tag makes a great addition to the set of five tags that I posted last Friday.  (just scroll down to the previous post)

Stamps:  Spooky Sweets, Trick or Treat (Papertrey Ink)
Paper:  Orange Zest, White, True Black (Papertrey Ink)
Ink:  Tuxedo Black (Memento)
Misc:  Spider Web Trio die (Papertrey Ink); pop-dots, Copic YR18 marker

Friday, October 25, 2013

Halloween Tags

It's time for the monthly Papertrey Ink blog hop!  The challenge was to make a set of five tags.  All of the tags in the inspiration photo were for Christmas, but I really wanted to make some Halloween tags.  I plan to give my seminary students a little treat next week and these tags will be perfect.  :)

Warning:  lots of photos ahead.  I went a little crazy with the camera.


Aren't they cute?  I got my inspiration from tags done by Audrey Tokach and posted on her blog Pink Ink Originals here.  She used stamps by Mama Elephant, but I pulled out several of my Halloween sets by Papertrey Ink.  As I was putting these all together, I was squealing over the cuteness.  I really love how they turned out!  Here are closeups of each tag.


So much fun!  I mixed up images from five different stamp sets.  I may have a weakness for Halloween sets.  Just sayin'.  :D  I popped up parts of them for dimension.


The tags are pretty straightforward.  I diecut the spiderwebs and adhered them in the upper right corner.  I diecut and stamped my various Halloween images, although the bats and skeleton were hand cut.  I used Copic markers to color one of the pumpkins and also to add a little color to the sentiment on each tag.

It felt so good to be creating again.  This year has been tough on me and studio time has been rather sporadic.  I really need to be in there more often.  It's my happy place!  :)


You can find the other blog hop entries here.  Plenty of great ideas for Christmas!  I appear to be the only rebel.  lol

Stamps:  Mr. Bones, Polka Dot Parade #7, Polka Dot Parade #8, Spooky Sweets, Trick or Treat (Papertrey Ink)
Paper:  White, Limeade Ice, Orange Zest, True Black, Dark Chocolate (Papertrey Ink)
Ink:  Tuxedo Black (Memento); Orange Zest (Papertrey Ink)
Dies:  Tag Sale #3, Mr. Bones, Polka Dot Parade #7, Polka Dot Parade #8, Spider Web Trio (Papertrey Ink)
Copic:  YG11, YR12, YR15, YR18, E57, E59
Misc:  black and white baker's twine, pop-dots

Wednesday, October 31, 2012

Happy Halloween!

I've got one last Halloween card to share.  I had big intentions of making a lot more cards and projects with all my cute Halloween stamps, but somehow the month got away from me.  I'm cutting it close on my SFYTT card too!  Here it is using October's sketch:


sketch post here
It's a pretty straightforward card.  I stamped small webs on the white card base and then added orange panels that were embossed with polka dots.  On top of that, I added a brown mat that was embossed with pumpkin vines.  I cut vellum spiderwebs using a Papertrey Ink die for the angled side pieces in the sketch, along with two autumn leaves colored using Copic markers.  I colored my jack-o-lantern using the same colors and distressed the edges.  Then I just stamped "Happy Halloween" inside the card.  Quick and easy!

Stamps:  Autumn Harvest (Stampin' Up); Spooky Sweets II (Papertrey Ink)
Paper:  White, Orange Zest, Dark Chocolate (Papertrey Ink)
Ink:  Rich Cocoa (Memento)
Copic:  0, T1, E55, E57, E59, YR12, YR15, YR18
Misc:  Spiderweb die (Papertrey Ink); Pumpkin Harvest, Polka Dots embossing folders (Cuttlebug);distress tool

Monday, October 1, 2012

From Our Patch to Yours

I made a quick little Halloween card this morning.  It's a simple design with lots of white space, as you can see.


I dashed outside to take a picture during a lull in the rain.  lol  I have another card to share too, but I want to wait until the recipient gets it.  For this one, I added an outline using a marker and ruler.  It just adds a little bit of framing without additional layers.  The pumpkins were stamped, cut out, and then placed on top of a strip of grass.  Once I added the banners with my sentiment, the card was finished!

Stamps:  Pumpkin Patch (Stampin' Up)
Paper:  White, Canyon Clay, Dark Chocolate, Ripe Avocado (Papertrey Ink)
Ink:  Canyon Clay, Dark Chocolate (Papertrey Ink); Tuxedo Black (Memento)
Misc:  Early Espresso marker (Stampin' Up); Fresh Cut Grass die (My Favorite Things); Double-Ended Banner die (Papertrey Ink)

Monday, September 24, 2012

More Skeletons

I started flipping through a pad of Halloween paper I purchased a year or two ago and came across this skeleton paper.  I immediately thought of Mr. Bones and made another card using this adorable skeleton stamp.


Fun, huh?  One skeleton is peeking out from behind the center panel since two is always better than one.   :)  I used Smokey Shadow instead of black, because the shade blended better with the patterned paper.  I embossed the sentiment in white and used my herringbone folder to texture the strip of white cardstock.  I like the finished result!

Stamps:  Mr. Bones (Papertrey Ink)
Paper:  White, Smokey Shadow (Papertrey Ink); Halloween paper pad (Recollections)
Ink:  Tuxedo Black (Memento); VersaMark
Misc:  Labels Twenty-Two die (Spellbinders); Herringbone embossing folder (Cuttlebug); white embossing powder (Filigree)

Sunday, September 9, 2012

Halloween Greetings

Boy, this was a challenge!  I decided to try my hand at the latest Mojo Monday sketch.  I always look at the sketches every week, but don't often participate because all the layering is a little intimidating.  (at least for me)  This post, however, is something special and I wanted to stretch myself a bit.

Drum roll please....

Today marks the 100th post on this blog.  To quote one of my all-time favorite movies, "Inconceivable!"  :)  It may seem like a small thing, but it's a big accomplishment to me.  It is the result of pushing past fears, feelings of inadequacy, and perfectionism.  The result of allowing myself to play and make mistakes.  To let it all go and just create.  It's wonderful to have a place to share the process.

I'm pretty proud of this card.  It was not an easy sketch and I considered quitting several times.  To push past all that and end up with this fabulous card (if I do say so myself) is something definitely worthy of a one hundredth post!  :)


This card actually pairs really well with the small gift bag I posted last month.  You can see it here.  It's one of those happy coincidences since I didn't plan it at all.  In fact, I started with completely different papers and stamps.  When I couldn't get it to work, I turned to the Basic Grey Eerie pad I happened to have out on my desk and everything evolved from there.

I used three different patterns and layered everything with black for contrast.  The only exception is the Kraft inverted scalloped circle, since my patterned paper was already black and it needed to pop against the web-textured black layer.  Speaking of, I rubbed my VersaMark Dazzle Frost inkpad over the raised web lines to add some subtle sparkle and definition.

I colored the pumpkins with Copics and used them in place of the flowers on the sketch.  I added some grey shading to the ghosts as well.  The leaves were hand cut using a scrap of Ripe Avocado cardstock.  Everything was mounted on an Orange Zest card base to add a great big splash of Halloween color.

Once I figured out what I was doing with all the patterns and layers, this card was quite fun to make.  I may add a little something to the inside, maybe a couple strips of the Eerie papers, but I am very satisfied with the finished card.

So happy I persevered!  I'm giving myself that proverbial pat on the back.  Both for the card and making it to 100 posts!   :)

Stamps:  Boo to You (Verve)
Paper:  Orange Zest, Black, Kraft, White, Ripe Avocado (Papertrey Ink); Eerie 6x6 pad (Basic Grey)
Ink:  Tuxedo Black (Memento); VersaMark Dazzle Frost
Copic:  0, T1, T4, YR12, YR15, YR18, E57, E59
Misc:  Spiderweb embossing folder (Cuttlebug); Standard Circles, Lg Classic Inverted Scalloped Circles (Spellbinders); Double-Ended Banners die (Papertrey Ink); Scallop edge punch (Stampin' Up); 7/8" square punch (EK Success); pop-dots


Wednesday, September 5, 2012

Pumpkin Smiles

You know how you get an idea in your head and try to translate it to paper?  Yeah, it doesn't usually work for me either.  lol  This card isn't quite what I envisioned, but I like it nonetheless.  I just kept messing with it until I was satisfied.   :)


I cut the pumpkin base out of Canyon Clay cardstock.  Believe it or not, the pumpkin sections started as white cardstock.  I sponged them liberally with Canyon Clay ink and then stamped over it with text, using the negative cutout as a stencil.  Some parts stamped darker than others, which gave it a cool mottled look.  Then I glued the sections to the pumpkin base and added a stem.  The face was cut separately and sponged with Dark Chocolate ink

I cut two pieces of grass edging and layered them for fullness.  I cut a spiderweb out of vellum and then stamped a spider below, adding a trail with a white gel pen.  Note to self:  don't stamp the spider over a seam next time!!!  Oops.  Then I just added my sentiment in the opposite corner.  (sponged, of course)  I also sponged the card base with some Fine Linen ink to soften it up.  What can I say?  There's a lot of sponging on this card!

I'm adding this to the Mr. Bones' Halloween Spook Out over at Papertrey Ink.  It's the last day so go check out the rest of the projects linked up.  Too fun!   :)

Stamps:  Spooky Sweets, Background Basics: Text Style (Papertrey Ink)
Paper:  Vintage Cream, Canyon Clay, Dark Chocolate, White, Ripe Avocado (Papertrey Ink)
Ink:  Dark Chocolate, Fine Linen, Canyon Clay (Papertrey Ink)
Misc:  Shape Up Pumpkin die, Shape Up Pumpkin Sections die, Double-Ended Banners die, Spiderweb Trio die (Papertrey Ink); Fresh Cut Grass die (My Favorite Things); white gel pen; 1-1/4" square punch (EK Success)

Monday, September 3, 2012

Dancing Skeletons

I'm popping in to share another Halloween card.  Remember, I did warn you!  lol  I'm also linking it to the Mr. Bones' Halloween Spook Out over on the Papertrey Ink blog.

This card is the result of sheer experimentation.  I had no real plan in my head at all.  I started with embossed diecut skeletons and didn't align them very well, so I used them as masks instead.  I spritzed some pearl spray over the skeleton masks on some black cardstock and ended up with a cool shadow look.  Then I embossed some skeletons in the unspritzed areas.  That's where I got stuck.  lol  I wasn't sure what to do with it!


I ended up matting it with black on a white card base, and then added a black piece from a Top Note diecut on the right side.  (got it out of my scraps!)  After adding some embossed spiders in the left corner, I used my white Distress Marker to add web trails.
  

Last spring, I picked up a set of uppercase alphabet dies at a used sale for a great price.  I wanted them to make my own chipboard letters.  About time I used them, huh?  I covered the letters with graphite glitter to add lots of sparkle.  It looks very different than the spritzed piece, but they complement each other nicely.  One is more subtle, the other not so much!  :)


For having no real vision at the start, the card turned out great.  I really love these skeletons.  So cute!  I will definitely be using them again.   :)

Stamps:  Mr. Bones (Papertrey Ink)
Paper:  True Black, White (Papertrey Ink)
Ink:  VersaMark
Misc:  Mr. Bones dies (Papertrey Ink); Top Note die (Stampin' Up); Fun Serif Uppercase dies (Sizzix); white embossing powder (Filigree); black embossing powder (Embossing Arts Co), Perfect Pearl mist (Ranger); Graphite glitter (Martha Stewart); Picket Fence Distress Marker (Ranger)

Saturday, September 1, 2012

Ghostly Greetings

Confession time.  I have a thing for Halloween stamps.  My collection of Halloween images rivals my Christmas collection, which leads to another confession.  I haven't used them very much.  I'll pause now for a collective gasp.  Yes, it's true.  Therefore, I have decided to change all that.  My new (unofficial) goal is to use every Halloween set I own to make a card.  Ambitious, I know.  I thought it was only fair to warn you!  Expect lots of adorable ghosts, witches, and other assorted creatures over the next two months.  :)


This one's pretty simple and self-explanatory.  I die cut a few ghosts, added a splash of patterned paper, and embossed the sentiment.  (speaking of, I think my VersaMark inkpad is dying since the embossing turned out patchy - kind of works with the ghostly thing anyway)  I decorated the inside of the card to match.  I'm not sure what purple I used for the ghost.  I used a piece from my scrap drawer and can't seem to find the match.  Oops.

I'm linking this to the Mr. Bones Halloween Spook Out here.  Check it out if you dare!  lol

Stamps:  Happy Haunting (Papertrey Ink)
Paper:  True Black, White, Simply Chartreuse, Orange Zest (Papertrey Ink); Spooky Treat digital paper (Betty Lynns Design)
Ink:  Tuxedo Black (Memento); Fresh Snow (Papertrey Ink); VersaMark
Misc:  Happy Haunting die (Papertrey Ink); white embossing powder (Filigree)

Thursday, August 23, 2012

Anni-VERVE-sary 2012 Challenge: Day Five

Anything but a card is the challenge for day five of the Anni-VERVE-sary celebration.  I know that it's a little early for Halloween, but work with me, okay?  :)


This time I used Boo to You, a small Halloween set by Verve Stamps.  (check out their store here)  I pulled out my favor it box die and cut it out with black cardstock.  Then I simply embellished the front with some ghosts, a bit of fence, and a cute little pumpkin.  The tendrils are just tiny slivers of cardstock that I curled slightly.  I embossed the sentiment so it would pop off the black.  It turned out quite cute!   :)

Stamps:  Boo to You (Verve)
Paper:  White, True Black, Dark Chocolate, Simply Chartreuse (Papertrey Ink)
Ink:  Tuxedo Black (Memento); VersaMark
Copic:  0, T1, E44, E57, YR12, YR15, YR18
Misc:  Favor It Box 6 die (Papertrey Ink); Woodgrain Fence die (My Favorite Things); white embossing powder (Filigree)