Showing posts with label Birthday. Show all posts

Thursday, July 13, 2023

Birthday Florals

Are you ready for this?  I am posting cards.  Yes, really!  I haven't done much stamping for an entire year.  I've been more involved in theatre and jewelry lately, so while I haven't stopped buying new stamping goodies, I haven't been using them at all.  Sad, I know.  I've felt creatively blocked for quite a while and it was just easier to do other things.  Besides, I have a lot of different hobby interests.

I popped in on the tail end of a stamping class four weeks ago and got the chance to make these two cards.  I don't have all the details of the supplies, unfortunately, but these were quick and easy to make.


It was fun to put ink to paper again!  I think this was a Simon Says Stamp set and we embossed the large image with a gold Brutus Monroe embossing power before cutting it in half to make two cards.  So easy!

Now for another shocker.  I made two more cards today!!!  I know, right??  I'll post those tomorrow.

Friday, July 8, 2022

Gamer Birthday

My son Benjamin's birthday is today and he is a big video game fan, so I just had to use the Level Up stamp set by My Favorite things to make him a card.  This is not my design.  I copied a card from Amy Rysavy because I was in a hurry to get it done.  (of course!) 


The card was super quick and easy to make.  I pulled out the Game Controller dies by My Favorite Things, which I've had for ages and never used, so it was about time!  I simply stamped the sentiment in Onyx Black ink on white cardstock and layered it on True Black before adding it to a white card base.  I cut the controller out of Smokey Shadow cardstock and then glued on the little pieces using various colors of cardstock.  I used foam tape to pop it up for dimension.

I like how it turned out and I think my son will love it.  :)

Stamps:  Level Up (My Favorite Things)
Dies:  Game Controller (My Favorite Things)
Cardstock:  White, True Black, Smokey Shadow, Bright Buttercup, Pure Poppy, New Leaf, Hawaiian Shores
Misc:  Onyx Black (VersaFine); foam tape

Sunday, July 5, 2020

Jar of Flowers

It's been a weird year, hasn't it?  My Stampin' Up demonstrator usually does a new catalog party at her home in June to show off the new products, but since most of us weren't comfortable with that this year due to the COVID-19 virus, she made party packs with three card projects and dropped them off at our homes instead.  Mine even included an unopened pack of patterned paper that went with the Eastern Beauty stamp set that I bought used from her at the party last year.  Bonus!  I finally got the cards made last week and photographed today.  Here's the first one.


This card uses the new Jar of Flowers set by Stampin' Up, along with a matching punch.  Everything was precut and prestamped so all I had to do was color the flowers with my Copic markers and fussy cut them out.  It's hard to see in the photo, but I added some light shading around the edges of the jar to make it a little less flat-looking.  Nice and simple!

Stamps:  Jar of Flowers; Band Together (Stampin' Up)
Ink:  Onyx Black (Memento); Rococo Rose (Stampin' Up)
Paper:  Rococo Rose, Whisper White, Seaside Spray, Blushing Bride, In Good Taste dsp (Stampin' Up)
Copic:  B91, B93, B95, 0, C1, RV32, RV34, Y00, Y32, G40, G43, YG13, YG17, YG45
Misc:  Jar punch (Stampin' Up); Misty Moonlight/Silver baker's twine (Stampin' Up)  

Wednesday, July 11, 2018

MFT Summer School 2018: Repetition


Here's my card for the Repetition challenge over at My Favorite Things Summer School.  My stamp positioner was invaluable in making it!  No way I would have gotten all those sentiments even otherwise.


I used the Radiating Rays stencil by My Favorite Things and sponged Broken China Distress Oxide ink through it onto white cardstock.  I then stamped multiple lines of a sentiment from Sow Much Cuteness by My Favorite Things in black ink.  After I finished stamping, I cut the piece with a stitched rectangle from the Blueprints 20 die set.

I stamped a cute pig image from Sow Much Cuteness on white cardstock and colored it with Copic markers.  I went over the whole thing with a clear Wink of Stella pen for lots of sparkle.  Then I added Glossy Accents to the belly, nose, and hooves.  Hopefully you can see it in the close-up picture.  I fussy cut the image.  Again...note to self...get the matching dies.   lol


I popped up the pig with foam tape and adhered it to the center of the sentiment block.  Doesn't he look so happy about a birthday?  I love how the stenciled lines make it look like he's singing out loud.  Or dancing.  Perfectly natural!

I glued the white panel (raised slightly with additional cardstock) and a piece of Perfectly Plaid: Rainbow patterned paper by Lawn Fawn onto a black card base.  Finally, I added a few clear sequins by Pretty Pink Posh for additional sparkle.

It's sow cute!  (pun intended)  This card really makes me smile.  It was a lot of fun to make!

Stamps:  Sow Much Cuteness (My Favorite Things)
Ink:  Tuxedo Black (Memento); Broken China (Distress Oxide)
Paper:  White, True Black (Papertrey Ink); Perfectly Plaid: Rainbow (Lawn Fawn)
Copic:  C1, C3, R01, R20, R30
Misc:  Blueprints 20 die (My Favorite Things); Radiating Rays stencil (My Favorite Things); Glossy Accents (Ranger); clear Wink of Stella pen; Sparkling Clear sequins (Pretty Pink Posh); stamp positioner; sponge tool

MFT Summer School 2018: Primary Colors


It's nice to be back creating in my studio again.  Lately, I've been doing more organizational projects rather than stamping.  I decided to participate in the My Favorite Things Summer School challenges to get me going again.  Here is my card for the Primary Colors day.


I pulled out these adorable monsters from the Monster Sized stamp set by My Favorite Things.  They look great in bold, bright colors!  I colored the images with Copic markers and added Glossy Accents to the eyes for dimension.  (hopefully you can see it in the close up photo)  I also jazzed up the teeth with a clear Wink of Stella pen. 

Note to self:  get the matching dies.  These images were a challenge to fussy cut!


I glued strips of Bright Buttercup, Enchanted Evening, and Pure Poppy cardstock to a white panel for a fun backdrop.  The sentiment is from another My Favorite Things stamp set called Monster Love.  I thought it went perfectly with my crazy stack of monsters.  I popped them up slightly with a couple layers of cardstock underneath.  I then glued the whole panel to a black card base.

Isn't it fun?  It's a bright and happy birthday card that works for any gender!

Stamps:  Monster Sized, Monster Love (My Favorite Things)
Ink:  Tuxedo Black (Memento)
Paper:  White, True Black, Bright Buttercup, Enchanted Evening, Pure Poppy (Papertrey Ink)
Copic:  0, C1, C5, Y11, Y13, Y15, Y17, R24, R29, R59, B34, B37
Misc:  Glossy Accents (Ranger); clear Wink of Stella pen

Monday, February 12, 2018

PTI 11th Anniversary Day 4: Floral Challenge


I'm back with my card for the floral challenge as part of the Papertrey Ink 11th anniversary festivities.  I chose to use a retired set called Embellishments and a limited edition mini set called One Big Happy.  I love the color Simply Chartreuse paired with black and white.  It's very striking! 


I stamped a large flourish from Embellishments on white cardstock and then added two tiny flowers in Simply Chartreuse.  I stamped the big flower from One Big Happy in black ink and cut it with the matching die.  I then stamped the smaller flower in Simply Chartreuse ink with a black center.  After cutting it out as well, I layered the two flowers together with extra cardstock in between for a just little bit of dimension.  I put black Nuvo drops around the flourishes and used Glossy Accents in the center of the flower.  I love the extra shine they both add to the card.

I cut the word 'happy' from black cardstock using the One Big Happy dies and glued it in place.  I stamped the word 'birthday' in Simply Chartreuse ink just above the die cut word.  I layered the whole panel on a small strip of black and a piece of Simply Chartreuse cardstock that was punched with a scallop border.  I glued a small piece of striped Simply Chartreuse pattern paper on a white card base and then added everything on top.


I really love how this card turned out!  I think it would be a pretty design in other colors.  Go to the Papertrey Ink blog here to see many cards for the floral challenge.

Stamps:  One Big Happy, Embellishments (Papertrey Ink)
Ink:  Tuxedo Black (Memento); Simply Chartreuse (Papertrey Ink)
Paper:  White, True Black, Simply Chartreuse, Simply Chartreuse Pattern Pack (Papertrey Ink)
Misc:  One Big Happy dies (Papertrey Ink); Scallop Border punch (Stampin' Up); Ebony Black Nuvo Crystal Drops; Glossy Accents (Ranger)

Thursday, January 25, 2018

Glitter Garden


I have a card for the Papertrey Ink blog hop this month.  I was inspired by the pretty colors in the picture provided and decided to use the Garden Gild cover plate die with glitter.  Lots of glitter!  It's so sparkly seeing it in person.


After cutting the Garden Gild die from white cardstock, I used a glue pen and a variety of glitter colors on the flowers and leaves.  Very simple technique, but definitely messy!  I glued the panel to a white card base and then stamped my sentiment in Lovely Lady and black ink.


Hop over to the Papertrey Ink blog to see other projects in the blog hop.  Lots of fun inspiration!

Stamps:  Garden Gild (Papertrey Ink)
Ink:  Tuxedo Black (Memento); Lovely Lady (Papertrey Ink)
Paper:  White (Papertrey Ink)
Misc:  Garden Gild die (Papertrey Ink); Limeade, Crystal Mint, Sugar Plum, Cotton Candy, Jelly Bean, and Lemon Drop glitter (Martha Stewart; glue pen

Friday, July 7, 2017

Daisy Birthday

This is the final card from the Stampin' Up workshop.  Daisy Delight is a sweet new floral set that comes with a matching punch.  We used it along with the Happy Birthday Thinlits die.


Wisteria Wonder is such a pretty color.  I layered a wonky piece of it on a white card base and then added a piece of Delightful Daisy patterned paper also at an angle.  I cut the words from Wisteria Wonder and glued them down.  After stamping and punching two daisies, I layered them together, bending the petals for dimension.  I also added Wink of Stella to the flowers.  It's a simple, but sweet card for a birthday!

Stay tuned for some jewelry and handcrafted gift boxes I made for two upcoming bridal showers and my mom's birthday.  I'll post them after the events.  One of the gifts is for my soon-to-be daughter-in-law!  Yep.  My oldest son is getting married in two weeks.  Lots of excitement in the Shafer household!   :)

Stamps:  Daisy Delight (Stampin' Up)
Ink:  Wisteria Wonder (Stampin' Up)
Paper:  Whisper White, Wisteria Wonder, Delightful Daisy dsp (Stampin' Up)
Misc:  Daisy punch (Stampin' Up)

Monday, January 30, 2017

Beautiful Birthday

Here's the last card from the workshop I attended recently.  I love this new stamp set by Stampin' Up!  It's called Beautiful You and it reminds me of the old retired Summer by the Sea and Seaside Sketches sets.  I'm pretty sure there's a third one, but I can't remember the name offhand.  I still have them all, but haven't used them in ages.  I need to remedy that!


I stamped the girl on white cardstock and cut her out with the Layering Ovals dies.  I stamped her again on a floral patterned paper and cut out just the dress and hat, gluing them in place on the white oval.  I love the look of paper piecing!  I matted the stamped oval with a scalloped oval cut from Mint Macaron cardstock.  To dress her up, I placed three tiny pearls along the neck.  Looks pretty, doesn't it?


Using the So Detailed dies, I cut a lacy floral piece from Mint Macaron cardstock and adhered it along the edge of floral patterned paper from the Blooms & Bliss dsp.  I also stamped a sentiment from Beautiful You in the lower corner.  I then glued the whole piece to a Mint Macaron card base.  Finally, I popped up the oval in the center with dimensionals.

I love the finished card.  It's gorgeous!

Stamps:  Beautiful You (Stampin' Up)
Ink:  Black Archival (Stampin' Up)
Paper:  Whisper White, Mint Macaron, Blooms & Bliss dsp (Stampin' Up)
Misc:  So Detailed Thinlits dies, Layering Ovals Framelits dies (Stampin' Up); pearls

Sunday, January 29, 2017

Birthday Balloons

I'm popping in to post the next card from the Stampin' Up workshop I attended.  I really like these fun dies!  This time I used the Balloon Adventures stamp set and the Balloon Pop-Up dies.


Isn't that fun?  I stamped the three balloons on white cardstock using Cucumber Crush, Dapper Denim, and Pumpkin Pie inks.  Then I added the confetti images all around them with Smoky Slate ink.  I glued matching balloon die cuts over top of the stamped balloons.  It's a cool look!  Naturally, my favorite part is the silver glitter bows..  :)


For the sentiment, I stamped it in Smoky Gray ink on white cardstock, cut it out with a Stitched Shapes die, and matted it with a scalloped Pumpkin Pie oval.  I added three little rhinestones as an accent.  The whole sentiment piece was popped up with dimensionals.


Inside the card, I stamped two balloons in Dapper Denim and Pumpkin Pie ink, adding the balloon strings and another sentiment with Smoky Slate ink.  Everything is adhered to a Cucumber Crush card base.  Fun and colorful!  Drop in tomorrow to see the last workshop card.

Stamps:  Balloon Adventures (Stampin' Up)
Ink:  Cucumber Crush, Dapper Denim, Pumpkin Pie, Smoky Slate (Stampin' Up)
Paper:  Whisper White, Cucumber Crush, Dapper Denim, Pumpkin Pie, Silver Glimmer (Stampin' Up)
Misc:  Balloon Pop-Up Thinlits dies, Layering Ovals Framelits dies; Stitched Shapes Framelits dies (Stampin' Up); rhinestones

Saturday, January 28, 2017

Sweet Purple Cupcake

Here's another card from the Stampin' Up workshop!  I love these pretty purples.  It was interesting using the Sweet Cupcake stamp set for the first time.  Lots of layers.


I stamped the cupcake frosting with Elegant Eggplant, Rich Razzleberry, and Sweet Sugarplum ink.  I stamped the cupcake base with Tip Top Taupe, Soft Suede, and Sahara Sand ink.  Both pieces were then cut with the Cupcake Cutout dies.  I also stamped the candle in Elegant Eggplant ink and cut it with the matching die.  After putting a small slit in the frosting, I inserted the candle and glued the cupcake together.

I stamped the white panel with a sponge dauber to get those soft-looking polka dots.  I think I used Sweet Sugarplum ink for them.  At that point, I accidentally dropped one of the brown inkpads on it so I chose to ink the edges.  That way it looks like a deliberate choice!  lol  I adhered that panel to Elegant Eggplant cardstock.

After cutting a doily in half, I glued it to the card along with some burlap ribbon.  I placed my cupcake on top with dimensionals.  I tied a bit of linen thread through my sentiment tag, also stamped in Elegant Eggplant, and glued it in place.  It makes a sweet birthday card!

Stamps:  Sweet Cupcake (Stampin' Up)
Ink:  Tip Top Taupe, Soft Suede, Sahara Sand, Elegant Eggplant, Rich Razzleberry, Sweet Sugarplum (Stampin' Up)
Paper:  Whisper White, Elegant Eggplant (Stampin' Up)
Misc:  Cupcake Cutout dies (Stampin' Up); burlap ribbon, linen thread (Stampin' Up); 1/16" Circle Punch; white doily, sponge dauber

Friday, January 27, 2017

Avant Garden Birthday

I love the colors on this card from the workshop.  I used a new set called Avant Garden in the Sale-a-Bration catalog.  It reminds me of an old retired set called Paint Prints, which I still have.  I rarely use ribbon, but it looks darling on this card.


I stamped the flowers using Peekaboo Peach and Flirty Flamingo inks, stamping off each flower on the card a second time for a lighter color.  I added leaves and dots with Pear Pizzazz ink, again varying the color with generational stamping.  Quick and easy!  I brushed on some sparkle with a Wink of Stella pen.


I stamped two of the borders from Delicate Details (another Sale-a-Bration set) onto Peekaboo Peach and Flirty Flamingo cardstock in the matching ink.  I glued those strips to a white card base and then added the flower panel over top with dimensionals.

I stamped my sentiment in Pear Pizzazz ink and cut it out with the Layering Ovals dies, adding a Pear Pizzazz scalloped oval mat.  Underneath the sentiment, I glued two pieces of ruched ribbon and popped up the ovals so there would be room.  Sweet and simple!

Stamps:  Avant Garden, Delicate Details (Stampin' Up)
Ink:  Peekaboo Peach, Flirty Flamingo, Pear Pizzazz (Stampin' Up)
Paper:  Whisper White, Peekaboo Peach, Flirty Flamingo, Pear Pizzazz (Stampin' Up)
Misc:  Layering Ovals dies (Stampin' Up); 3/8" Peekaboo Peach and Flirty Flamingo ruched ribbon (Stampin' Up); clear Wink of Stella pen

Thursday, January 26, 2017

Party Hat

I treated myself to a workshop at my Stampin' Up demonstrator's house last week.  I've struggled with my mojo since Christmas, so I knew that just doing the fun stamping part without the design part would give me a jumpstart.  We made five birthday cards and I'll be posting them over the next few days.


This was fun to make, although it's definitely of the hand-deliver variety.  I used the Biggest Birthday Ever stamp set and the Wish Big dies.  I stamped the hat in Bermuda Bay ink.  Love that color!  The dotted border and the little flower were stamped in Calypso Coral.  The three hat pieces were scored down the center and then glued together to make it dimensional.


I stamped the background using Crumb Cake ink.  Very simple!  The sentiment is from Butterfly Basics, embossed with white powder.  The little twine tassel is a fun touch.  I adhered the Crumb Cake and Calypso Coral layers to a Crumb Cake card base.  See you tomorrow with the next one!

Stamps:  Biggest Birthday Ever, Butterfly Basics (Stampin' Up)
Ink:  VersaMark; Crumb Cake, Calypso Coral, Bermuda Bay (Stampin' Up)
Paper:  Crumb Cake, Calypso Coral, Whisper White (Stampin' Up)
Misc:  Wish Big dies (Stampin' Up); white embossing powder; rhinestone; Calypso Coral baker's twine (Stampin' Up)

Wednesday, October 12, 2016

Ink It Up with Leigh Penner: Moon Blast


This year is just flying by.  How are we already into October?  It was downright cold outside this morning when my daughter left for the bus.  The trees are starting to show their autumn colors.  It's my favorite time of year!  My son Benjamin received his mission call two weeks ago and we are getting him prepared to leave.  He reports to the MTC (missionary training center) on Nov 9th and will be serving in the Utah Salt Lake City East mission.  Change is in the air.

It's also time for the newest Ink It Up post with Leigh Penner.  We share a project on the second and fourth Wednesdays of each month using uninked stamps.  When cleaning out my scrap drawer recently, I found this piece of metallic star paper already cut to size.  I simply adhered it to a white card base.  There it sat for a couple of days until the Half Pint Heroes set by Waltzingmouse caught my attention.  Sadly, that company is out of business now.  I saw the fun rocket ship and decided to re-create a card design I made several years ago. (found here)


Waltzingmouse made such wonderful stamps!  Thankfully, several of Claire's designs are now available through Gina K Designs.  Not the Half Pint series at this point, but you never know what will come in the future.  I stamped the rocket ship on a piece of white cardstock and colored it with Copic markers.  I added Wink of Stella on the flames and Glossy Accents over the boy's head.  Hopefully you can see it in these close-up photos.


I used the Mini Bubbles embossing folder by Paper Studio on a gray cardstock circle, shading it with Soft Stone ink, and then spritzing it with Perfect Pearl Mist.  And there you have it - a moon.  I love the shimmer!  It's almost otherworldly.  I stamped the sentiment on white cardstock and cut it apart into words.  The rocket ship is hand-cut and popped up for dimension.


This card was fun to make.  It's about time I got these darling stamps inked!  Once I got an idea, it came together very quickly.  Make sure you pop over to Leigh's blog, To the Full, to see her Ink It Up card!

Stamps:  Half Pint Heroes (Waltzingmouse)
Ink:  Tuxedo Black (Memento); Soft Stone (Papertrey Ink)
Paper:  White (Papertrey Ink); Rockstar Stack dsp (DCWV)
Copic: 0, C1, C3, C5, E00, E30, E42, R05, R20, R24, R29, BG72, BG75, BG78, BG99
Misc:  Standard Circles Large die (Spellbinders); Mini Bubbles embossing folder (Paper Studio); Perfect Pearl Mist, Glossy Accents (Ranger); clear Wink of Stella; ink sponging tool

Thursday, July 21, 2016

Camp Create: HB2U


Here's my last Camp Create card for the second session!  This one is for the Background Bonanza challenge and was so much fun to make.  Who wouldn't love little glittery cupcakes?  Apparently, the teensy bug captured in my photo thought so.  (top edge of the card)  lol


I stamped the tiny cupcake from Hog Heaven by My Favorite Things all over a piece of white cardstock that was cut with a die from Blueprints 4.  I colored each one with Copic markers and then added lucious yellow glitter to the frosting.  I mounted the panel to a True Black card base.

I cut the HB2U tag from Tag Talk out of white cardstock and the solid tag from True Black cardstock, gluing them together.  I then stamped two cupcakes on either end, following the same coloring and glitter process as before.  That piece is adhered with foam tape for dimension.  Isn't it just darling?  I love the sparkle!

Here's my final Camp Create badge for this second summer session.


Stamps:  Hog Heaven (My Favorite Things)
Ink:  Tuxedo Black (Memento)
Paper:  White, True Black (Papertrey Ink)
Copic:  C1, Y15, R29, E42, E44
Misc:  Blueprints 4 die, Tag Talk die (My Favorite Things); Lemon Drop glitter (Martha Stewart); glue pen

Wednesday, July 13, 2016

Ink It Up with Leigh Penner: Forget-Me-Not


Leigh Penner and I were chatting a while back about having uninked stamp sets lying around and we decided to challenge each other to actually use them.  We're going to post a card twice a month on the second and fourth Wednesdays.  I'm excited to do this!  I'm feeling some nervousness about having a regular commitment like that, but I'm squelching the self-doubt monster and diving in.  I have plenty of uninked stamps from which to choose.  For many years, I was more of a collector than a stamper.  Sets still often sit around for some time before they get used.  Time to change that!  I've been following Leigh's blog, To the Full, for a long time, so this is going to be fun.  Let's get those stamps inky!  :)

My first Ink It Up card uses the brand new Forget-Me-Not set by Papertrey Ink.  I purchased the Don't Forget to Write kit when it came out in May and have been using it like crazy.  This new set totally has the same vibe.  I love the darling flowers and dies, so I couldn't resist ordering it along with the new Noted dies.  I'm notorious for forgetting birthdays till the last minute, so I knew exactly what I needed to make.


Isn't it sweet?  I was going for a vintage style.  I cut the Noted: Scalloped A2 card die from Spring Rain cardstock and layered a piece of white cardstock that I embossed with the Dotted Lattice embossing folder by Taylored Expressions.  (also unused)  On the matching die cuts, I stamped the forget-me-not flower bunches in Spring Rain, Blueberry Sky, Summer Sunrise, and Simply Chartreuse ink.  I double-layered them for dimension.  I also double-layered the word "forgot" cut from Blueberry Sky cardstock.  I stamped the sentiment on Spring Rain cardstock using Smokey Shadow ink and cut it into pieces.  Then I simply adhered everything together.

This is going to my sister who got a last-minute birthday wish on Facebook.  {blush}  My only defense is that several family birthdays happened while I was super focused on helping my son finish his Eagle Scout project before his 18th birthday.  Now to work on my next goal of actually sending cards to people...preferably on time.   :)

Hope you like my card!  Head over to Leigh's blog here to see her card for the Ink It Up challenge.  She's a very creative and prolific stamper so you'll want to follow her blog if you don't already.  Thanks for dropping by Mapleberry Musings!

Stamps:  Forget-Me-Not (Papertrey Ink)
Ink:  Spring Rain, Blueberry Sky, Simply Chartreuse, Summer Sunrise, Smokey Shadow (Papertrey Ink)
Paper:  Spring Rain, White (Papertrey Ink)
Misc:  Forget-Me-Not dies, Forget-Me-Not Sentiments die, Noted: Scalloped A2 die (Papertrey Ink); Dotted Lattice embossing folder (Taylored Expressions)

Sunday, February 14, 2016

Papertrey Ink 9th Anniversary: Birthday Blooms

This card is for the Create Along with Us challenge over at Papertrey Ink during their anniversary celebration.  I loved Amy Sheffer's card she posted using the new Tulip Time stamp set and just had to make one myself.   Using the frames from Tag Sale #10 as a background is a wonderful idea!  By the way, I must have those new tulips.  They are my favorite flower anyway, but the three-step layer design is so pretty.  Love!


I stamped a Kraft card base with Background Basics: Text Style in VersaMark ink to create a soft background.  I love how it looks!  I guess I was channeling a vintage vibe during my crafting session yesterday.  I added several white scalloped frames that I had cut using the Tag Sale #10 die.

After die cutting a few flowers from white cardstock, I stamped some cheerful blooms using Harvest Gold, Summer Sunrise, and Dark Chocolate ink using the matching Petite Pots stamps.  For the stems, I inked up first with Spring Moss and then rolled the leaf edges in Ripe Avocado.  I smile every time I look at these flowers!  You'll see them in my next post too.

I adhered two flowers to my card and then added a narrow Dark Chocolate banner that I embossed with a happy birthday sentiment from Father Knows Best.  Isn't it sweet?  I really love this card!  You can see other cards for the challenge here.  Thanks to Amy for the inspiration!

Stamps:  Petite Pots, Father Knows Best, Background Basics: Text Style (Papertrey Ink)
Ink:  Harvest Gold, Summer Sunrise, Dark Chocolate, Spring Moss, Ripe Avocado (Papertrey Ink); VersaMark
Paper:  White, Kraft, Dark Chocolate (Papertrey Ink)
Misc:  Tag Sale #10 die, Petite Pots die (Papertrey Ink); white embossing powder (Filigree)


Friday, February 5, 2016

Papertrey Ink 9th Anniversary: Hip Hip Hooray

It feels so good to get inky again!  I've been steadily working on labeling the stamped images in my category inventory binders for the past three weeks and I'm still not finished.  Who knew I had so many stamps??  Well actually, I did know.  lol   :D  But it's been interesting to look at each image so closely.  I just didn't think it would take this long.  It will certainly be worth it in the end!

I set that on-going project aside to make a card for the first day of the Papertrey Ink anniversary festivities.  They are celebrating nine years in business this month.  Today was the showcase of the design team with a feature of their favorite card creation from this past year.  We were given a choice of thirteen color combos based on those cards for today's challenge.  Here's the one I selected:


Isn't that a pretty color combination?  I rarely ever use Melon Berry or Lavender Moon, so this combo gave me an opportunity to pull them out.  When flipping through my die inventory book, I saw the Phrase Play #11 die and decided it would be fun to do a little color blocking.  


Maile Belles tends to do CAS-style cards, so I kept my design simple as a tribute to her.  I cut the Phrase Play #11 die from black cardstock and adhered it directly to my white card base.  Then I cut Melon Berry, Harvest Gold, Aqua Mist, and Lavender Moon cardstock with the same die.  I used small pieces of each color to fill in parts of the Hip Hip Hooray sentiment.  I stamped "it's your birthday" from the Phrase Play #11 stamp set in black ink on the bottom panel.  That's all there is to it!

I love it!  Simple and colorful.  I need to whip up a bunch of these to have on hand for birthdays.  If you want to see other cards made for this challenge, check them out here.  I look forward to the rest of the PTI anniversary announcements and challenges.

Stamps:  Phrase Play #11 (Papertrey Ink)
Ink:  Tuxedo Black (Memento)
Paper:  White, Melon Berry, Harvest Gold, Aqua Mist, Lavender Moon (Papertrey Ink)
Misc:  Phrase Play #11 die (Papertrey Ink)

Monday, August 31, 2015

Stamp-a-Faire 2015: Stamped & Stitched Challenge

I really like this card.  Am I allowed to say that?  lol  I love the color combo and pattern prints I used, not to mention I adore this stamp set, Quilted: Spring.  I still need to get the summer and autumn editions.  This card is for the Stamped & Stitched challenge by Heather Nichols.  Obviously, I used Kraft cardstock in her honor.  :)


I embossed a stitched image from Background Basics: Needlepoint directly on my Kraft card base.  I layered two different patterned papers from the Primrose pad by Bo Bunny.  So pretty!  I stamped the flowers using Close to Cocoa, Rose Romance, and Sweet Blush inkpads.  Having matching dies sure made this easier.  I stamped my sentiment on a white banner and added a stitching line using an image from Button Boutique.  Love the result!

Stamps:  Quilted: Spring, Background Basics: Needlepoint, Button Boutique, Petite Pots (Papertrey Ink)
Ink:  Rose Romance, Close to Cocoa (Stampin' Up); Sweet Blush (Papertrey Ink); VersaMark
Paper:  White, Kraft (Papertrey Ink); Primrose 6x6 pad (Bo Bunny)
Misc:  Quilted: Spring dies, Double-Ended Banner die (Papertrey Ink); white embossing powder (Filigree)

Friday, July 10, 2015

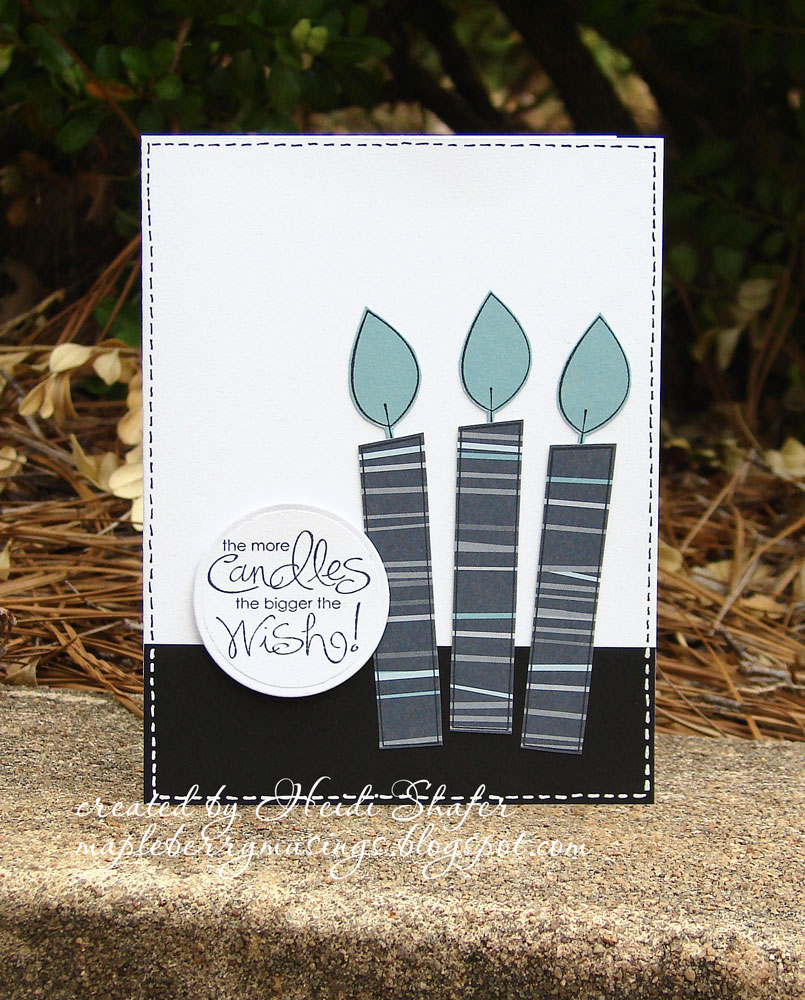
Urban Candles

Okay, this card is a bit of a throwback.  I used an old retired stamp set called Big Birthday Candle by Stampin' Up.  Not a lot of patterned paper on this one, but you'll see that striped Urban Garden pattern yet again.


It makes fun candles, doesn't it?  I used Baja Breeze cardstock for the candle flames.  I added faux stitching on the white card base and the black cardstock using a black marker and white gel pen.  That used to be pretty popular in the stamping world.  lol  Then I added my sentiment from Whimsical Words on a white circle, popped up slightly for dimension.

Stamps:  Big Birthday Candle, Whimsical Words (Stampin' Up)
Ink:  Tuxedo Black (Memento)
Paper:  White (Papertrey Ink); Basic Black, Baja Breeze, Urban Garden dsp (Stampin' Up)
Misc:  Circle STAX Set 2 die (My Favorite Things); Basic Black marker (Stampin' Up); white gel pen (Signo Uni-ball)