Showing posts with label Winter. Show all posts

Tuesday, December 27, 2016

Penguin Tag

Here's another set of tags that I made for this year's gifts.  Two of my kids suggested a penguin, so I used this one from Punch Pals by Stampin' Up.  Other than the hand cutting, this is a quick design.


I cut a tag base using the Tag Sale #2 die by Papertrey Ink.  I also cut it out of patterned paper from the Winter Frost dsp stack and glued them together.  I cut another piece from white cardstock, first with the tag die, and then with the In the Meadow die by Papertrey Ink to get the snowy slope.  I covered it with Crystal glitter and glued it to the bottom of the tag.


I stamped the penguin on white cardstock and colored it with Stampin' Up markers.  I added glitter to the scarf using a glue pen.  After fussy-cutting the penguin, I adhered it to the snowy hill on the tag.  Using the Tag Sale #10 die, I cut banners from both white and Pool Party cardstock.  I stamped the sentiment from Winterberry with black ink, layered them together, and glued them to the tag.


As a final touch, I tied on some white satin ribbon.  The tags turned out darling!  My kids really loved this one.  I'll be back tomorrow to post the last tag design for this year.


Stamps:  Punch Pals (Stampin' Up); Winterberry (Papertrey Ink)
Ink:  Tuxedo Black (Memento)
Paper:  White (Papertrey Ink); Pool Party, Winter Frost dsp stack (Stampin' Up)
Markers:  Pool Party, Going Gray, Tangelo Twist (Stampin' Up)
Misc:  Tag Sale #2 die, Tag Sale #10 die (Papertrey Ink); Crystal fine glitter (Martha Stewart); white ribbon

Thursday, August 18, 2016

Camp Create: Ombre Snow


Here's my card for the Awesome Ombre challenge at Camp Create, the third and final session.  I love the Snowfall Background stamp by My Favorite Things.  It's so pretty on its own, so I sponged an ombre background to complement it.


First, I embossed the Snowfall Background on white cardstock using white embossing powder.  I sponged Sno Cone, Summer Splash, and Blue Raspberry inks over top, doing the resist technique like one of the other challenges.  I adhered the panel to a white card base.

I cut the word snow with the Wonderful Words: Snow die by Papertrey Ink from white cardstock and sponged Sno Cone ink over the top half.  Then I added Sugar Cube glitter over the whole word.  I love the glittery ombre effect!  See the close-up pic below.  I stamped a sentiment from Holiday Hugs with black ink and cut a narrow strip to place under the glittered word.  Both are popped up with a second layer for dimension.


Here's the badge I earned!  Only the monochromatic challenge left to do now.  :)


Stamps:  Snowfall Background, Holiday Hugs (My Favorite Things)
Ink:  Sno Cone, Summer Splash, Blue Raspberry (My Favorite Things); Tuxedo Black (Memento); VersaMark
Paper:  White (Papertrey Ink)
Misc:  Wonderful Words: Snow die (Papertrey Ink); white embossing powder (Filigree); Sugar Cube glitter (Martha Stewart); glue pen; sponge tool

Friday, July 22, 2016

Warm Wishes Redux

Remember the sponged snowflake background I posted yesterday?  I'm back to share the card I created using the leftover mask.  In fact, I love this background the best.  The colors are more vibrant and exciting!


I cut the Snowflake Fusion Cover-Up die from cheap white cardstock that was thinner than my usual choice and used it for a mask to sponge several colors of Distress Ink onto my previous card.  This gorgeous piece was left over and I just had to use to make another card.  I glued it directly to a white card base.  I really love it!

I stamped this cute Pure Innocence girl called Warm Wishes onto white cardstock and colored her with Copic markers, sticking to cool greys so as not to compete with the background.  I added crystal glitter to all the fur trim for some sparkle.  You know I can't resist glitter!  I hand cut the girl and popped her up with foam tape on the card.  For my sentiment, I stamped "warm wishes" on a Fishtail Flags Layers STAX die cut.  This card really makes me smile!   :)

Stamps:  Pure Innocence: Warm Wishes (My Favorite Things)
Ink:  Tuxedo Black (Memento); Tumbled Glass, Broken China, Mermaid Lagoon, Hickory Smoke (Distress Inks)
Paper:  White (Papertrey Ink)
Copic:  N0, N2, N4, BV29, E00, E30, E42, E57, E59, R20
Misc:  Snowflake Fusion Cover-Up die, Fishtail Flags Layers STAX die (My Favorite Things); Crystal glitter (Martha Stewart); glue pen

Thursday, July 21, 2016

Camp Create: Warm Wishes


Oh my goodness, it is crazy bright outside!  You'll have to pardon the stark shadows on my last two Camp Create cards.  I need to get these posted before the deadline tonight.  This card is for the Magnificent Masking challenge.  I pretty much followed the instructional video to create my background.


I cut a piece of cheap white cardstock with the Snowflake Fusion Cover-Up die to use for a mask.  After taping it down, I sponged Distress Inks over it onto a white card base.  It looks really cool in person!  I didn't want to cover it up, so I cut a snowflake from glitter cardstock using a Snowflake Splendor die.  I also cut a Dimensional Banner from white cardstock and embossed my sentiment from PI Warm Wishes in silver embossing powder.  Both are mounted with foam tape for a bit of dimension.

The mask looks really cool all sponged with ink, so I'm in the process of making another card with it.  Look for it soon!  Here's the bade I earned.


Stamps:  Pure Innocence Warm Wishes (My Favorite Things)
Ink:  Tumbled Glass, Broken China, Mermaid Lagoon, Hickory Smoke (Distress Ink); VersaMark 
Paper:  White (Papertrey Ink); glitter cardstock
Misc:  Snowflake Fusion Cover-Up die, Snowflake Splendor die, Dimensional Banners die (My Favorite Things); silver embossing powder; sponges (Tim Holtz); foam tape

Saturday, December 19, 2015

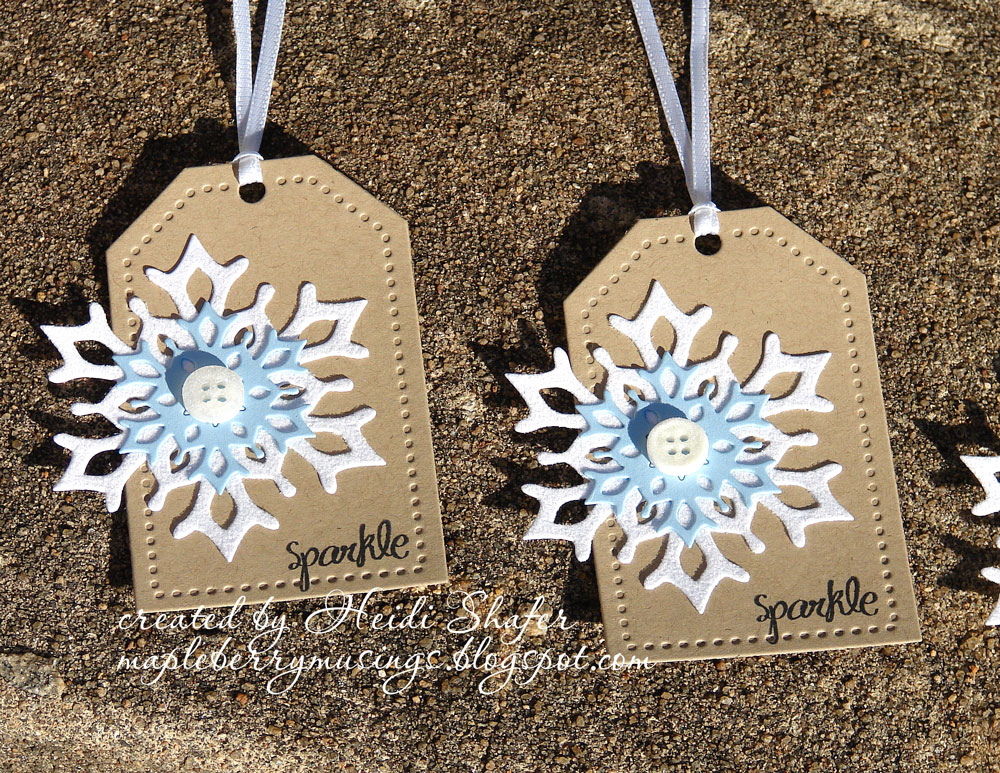
Sparkle Tag

I love these tags!  They are not my original idea, by any means.  Vanessa Menhorn posted a snowflake tag on her blog two years ago here.  I just used the dies I own and put my own spin on the design.


Can you see the sparkle?  If not, scroll down to the close-up pics.  There is lots of glitter, of course!  I made these tags earlier this week when my friend Shannon came over to stamp.  They are a quick design and so very pretty.


I used my Fancy Flakes dies by Papertrey Ink, cutting the medium-size snowflake from white cardstock and the small one from Spring Rain cardstock.  I used a glue pen to add crystal glitter to the white snowflake.  I pulled white buttons from my stash and used Glossy Accents to glitter them as well.


I layered the snowflakes and buttons on a Kraft tag cut with the Tag Sale #3 die by Papertrey Ink, offsetting it slightly to go off the edge.  Then I stamped the word "sparkle" from Snowfall Additions in black ink.  Once I added white ribbon, these tags were complete!


I really love these tags!  It would be so easy to whip up a bunch of these.  They are the last of my Christmas mystery tags, but I still have one more single tag to post tomorrow.  I've had a lot of fun in my studio the past couple weeks!   :)


Stamps:  Snowfall Additions (Papertrey Ink)
Ink:  Tuxedo Black (Memento)
Paper:  White, Kraft, Spring Rain (Papertrey Ink)
Misc:  Fancy Flakes dies, Tag Sale #3 die (Papertrey Ink); Crystal fine glitter (Martha Stewart); Glossy Accents (Ranger); glue pen; Cream buttons (Papertrey Ink); white ribbon 


Tuesday, December 15, 2015

Merry & Bright Tag

I love this sweet, wintry tag!  Of course, I'm partial to cardinals and the bright pop of red in a snowy landscape.  It's one of those projects that made feel giddy while creating it.   :)


I cut my base tag using the Tag Sale #4 die by Papertrey Ink.  I've used this one a lot, since it's one of my favorites.  Notice anything?  Your eyes aren't deceiving you.  I made one tag first and when I made the other three tags a week later, I used a different color of cardstock.  Oops!  I didn't even realize it until I was nearly finished.  The original tag is Spring Rain and the other tags are Aqua Mist.


I cut some pieces of white cardstock with the Stitched Hillside Borders dies by Lawn Fawn, cut them again with the Tag Sale #4 die, and then glittered them to mimic snow.  I love doing that!  Glitter makes me happy.  Sparkly too.  I went to church last Sunday with glitter on my skirt and probably my face as well.   lol   It's all over the house right now.


I stamped some small snowflakes from Tag-Its #8 by Papertrey Ink using VersaMark ink for a subtle snowy background.  After gluing the tag pieces together, I stamped a sentiment from the same set in black ink.  The tree trunk is Dark Chocolate cardstock cut with the Branch Out die by Reverse Confetti. 

After stamping the bird from Swanky Snowdudes on white cardstock, I colored it with Copic markers and glittered the white parts of the hat.  Naturally.  :)  Then I just adhered it to one of the branches.  Paper Smooches has such darling images.  I adore this little bird!  I added a bit of white ribbon for a final touch.  Love.  I had so much fun making these tags.


Stamps:  Swanky Snowdudes (Paper Smooches); Tag-Its #8 (Papertrey Ink)
Ink:  Tuxedo Black (Memento): VersaMark
Paper:  White, Aqua Mist, Spring Rain, Dark Chocolate (Papertrey Ink)
Copic:  R29, R59, G46
Misc:  Tag Sale #4 die (Papertrey Ink); Stitched Hillside Borders dies (Lawn Fawn); Branch Out die (Reverse Confetti); Crystal fine glitter (Martha Stewart); glue pen

Monday, December 14, 2015

Warm Winter Wishes

Time to post my Christmas gift tags!  I actually made this one several weeks ago, but life has been really busy around here.  I finally got stuff photographed yesterday.  I used this tag for a hostess gift of one of my glittered nativity ornaments.  Luckily, it matched the snowman gift bag I had in my stash!


Cute, huh?  This tag was really fun to make.  I cut Aqua Mist cardstock with the Tag Sale #5 die by Papertrey Ink.  I cut white cardstock with the Puffy Clouds Borders dies by Lawn Fawn and then cut them again with the tag die.  After I added glitter, I simply layered them on top of the tag which was stamped with a tiny snowflake in VersaMark ink.


I stamped the cute snowman and snow shovel from Frozen Friends by Newton's Nook on white cardstock and then colored them with Copic markers.  To match the snow underneath, I glittered the bit of snow by the shovel.  I cut the images out with scissors and then glued them in place.  I stamped the sentiment from Tag-It's #8 by Papertrey Ink directly on the tag in black ink.


As a final touch, I stamped white tissue paper with snowflakes using Hawaiian Shores and silver ink.  I used Rustic Snowflakes by Papertrey Ink.  I love coordinated tissue paper for gifts and stamping is such an easy way to custom-make your own!


I'm happy to say the gift was well-received!  I love it when people appreciate the hand-crafted touches and understand the time that goes into such a gift.  Be looking for more new tags over the next few days.  I've been having lots of fun in my studio!

Stamps:  Frozen Friends (Newton's Nook); Tag-It's #8, Rustic Snowflakes (Papertrey Ink)
Ink:  Tuxedo Black (Memento); Hawaiian Shores (Papertrey Ink); Silver (Encore Ultimate Metallic); VersaMark
Paper:  White, Aqua Mist (Papertrey Ink); white tissue paper
Copic:  0, C1, R24, R29, R59, G28, E30, E42, E57, E59, YR15, YR24
Misc:  Tag Sale #5 die (Papertrey Ink); Puffy Cloud Borders dies (Lawn Fawn); glue pen; Crystal fine glitter (Martha Stewart)

Tuesday, November 10, 2015

Silver Snowflake

I have a weakness for snowflakes.  Snowmen too.  I just love wintry images.  I purchased the Festive Flurry set from Stampin' Up last year along with the matching dies, but hadn't used them.  Yesterday, I was in the mood to make a simple card and these large gorgeous snowflakes are perfect for that.


On a white card base, I adhered a strip of scalloped Going Gray cardstock and a strip of Winter Frost dsp.  I embossed the snowflake with silver embossing powder, one of the quickest ways to add lots of impact to a card.  Then I cut it with the matching die and popped it up with a bit of foam tape.  I stamped the sentiment from Holiday Button Bits by Papertrey Ink in Basic Gray ink.

I could easily make a lot of these.  It's a quick design, but still very elegant!

Stamps:  Festive Flurry (Stampin' Up); Holiday Button Bits (Papertrey Ink)
Ink:  Basic Gray (Stampin' Up)
Paper:  White (Papertrey Ink); Going Gray, Winter Frost dsp (Stampin' Up)
Misc:  Festive Flurry die (Stampin' Up); Scallop border punch (Stampin' Up); silver embossing powder

Thursday, February 12, 2015

PTI 8th Anniversary: Ready, Set, Snow

Another day, another challenge.  Today we needed to do a blue ombre effect.  After trying to sponge an ombre background, I scrapped it and moved in a different direction.  Glad I did!

 
You'll have to pardon the less-than-ideal picture.  It has been crazy windy here all day and this is the only shot I managed to get outside.  I couldn't get the card to stay up long enough!  It was a bit amusing.  There's a lot of shadow on the picture, so I'll try to get a better shot tomorrow.  I took a pic inside using the kitchen window's light and cropped it for a close-up.  The color is off, but you can see the texture better on the die cut. 


I cut strips of cardstock in Spring Rain, Blueberry Sky, and Enchanted Evening using the Building Blocks dies and carefully glued them onto a white card base.  It's definitely a quick, easy way to do ombre!  I stamped snowflakes from Snowflake Serenade onto the pieced blue strip using VersaMark Dazzle Frost ink.  Then I used a white gel pen to add additional tiny, random snowflake dots.

I cut the large word using the Wonderful Words: Snow die and impressed some texture using the Linen & Canvas plate from Papertrey Ink.  I stamped a sentiment from the matching set directly on the card in black ink and then popped up my die cut word below.

I really love the result!  The VersaMark ink makes the snowflakes look ombre too, as if I had used three colors of ink.  Pretty cool!  You can see other cards for the challenge at Nichole Heady's blog here.

Stamps:  Wonderful Words: Snow, Snowflake Serenade (Papertrey Ink)
Ink:  Tuxedo Black (Memento); VersaMark Dazzle Frost
Paper:  White, Spring Rain, Blueberry Sky, Enchanted Evening (Papertrey Ink)
Misc:  Wonderful Words: Snow die (Papertrey Ink); white gel pen

Thursday, January 15, 2015

Winter Bella

I felt like coloring yesterday so I pulled out this adorable Uptown Girls image by Stamping Bella.  I recently got a few new colors of Copic markers, including these pretty yellows.  It was fun to get them out and play with no predetermined result in mind.


I picked this pretty patterned paper from the Retro Fresh pack by Stampin' Up for my background.  I thought the color and pattern had a wintry feel, which was perfect for this girl.  After coloring, I carefully cut her out and glued a few scrap pieces of cardstock underneath to raise her up just slightly. (mainly to keep her level with her boots, but it also adds a tiny bit of dimension)

I glittered a piece of white cardstock that I cut with the In the Meadow die by Papertrey Ink.  Of course, I realized afterwards that I forgot to shade under the girls' boots.  Oops!  I stamped my sentiment on a white pierced fishtail flag and added a pretty rhinestone brad.  I removed the prongs before sticking it down with a glue dot.

I love how it turned out!  This wintry girl really makes me smile.


Stamps:  Uptown Girl Quinn in Her Boots (Stamping Bella); Fillable Frames #9 (Papertrey Ink)
Ink:  Tuxedo Black (Memento)
Paper: White (Papertrey Ink); Retro Fresh dsp (Stampin' Up)
Copic:  0, C1, C3, C5, E00, E30, E42, E55, E57, E59, B91, B95, B97, B99, R20, Y00, Y02, Y06
Misc:  In the Meadow die (Papertrey Ink); Pierced Fishtail Flags STAX die (My Favorite Things); Crystal fine glitter (Martha Stewart); crystal brad (Making Memories)

Thursday, December 25, 2014

Stamped Art: Snow Frame

I'm popping in to post the second stamped frame art from the workshop.  Did you like the Santa one?  It's fun and festive, but I think this snow-themed one is my personal favorite.  I love the soft colors and that pretty glitter snowflake!


Again, this project uses multiple stamp sets and a variety of embellishments.  The patterned papers are from the All is Calm designer paper in the Stampin' Up holiday mini.  It's a good thing I made this at home because it took me many hours.  I thoroughly enjoyed every minute!


The present image in the first square is from last year's Color Me Christmas set.  I colored it with markers and glittered the Soft Sky stripes.  I threaded a button with twine to place next to it.


I love this darling snowman with the singing birds.  It's from the Snow Much Fun stamp set.  I colored the image with markers and glittered the Soft Sky shading on the snowman.  I added a rhinestone to the center of the metal charm.


I wish I could remember the name of this set!  I'm pretty sure I own it too, but I can't seem to find the name in my inventory list or even the set itself.  {face palm}  edited to add:  It's called Punch Pals!  I colored the penguin with Smoky Slate and Pumpkin Pie markers, making his scarf Soft Sky this time and glittering it like before.  I surrounded him with silver sequins and a "snowflake" cut from silver glitter paper.


This little car is from White Christmas.  I colored it with markers and glittered the windows.  I added touches of "snow" on the tree with a white gel pen.  The road is a strip of All is Calm designer washi tape.  The final touch is a snowflake sequin.


These trees are from Punch Pals.  I colored them with markers, and then glittered the swirls and star.  I added tiny dots of glitter to the Soft Sky square.  Subtle, but so pretty in person, like teeny snowflakes.


The large snowflake was cut from silver glitter paper.  I think it's a Stampin' Up die, but I'm not totally sure.  A rhinestone brad was put through the center.  Don't you love how my demo cut the patterned square?  It lines up perfectly with the snowflake.


This tree is from Color Me Christmas.  I colored it with markers, added two sizes of rhinestones, and a silver glitter paper star.


For the large sentiment, I colored the stamp with Lost Lagoon and Pear Pizzazz markers before stamping.  I knotted a piece of ribbon around the square.


The little bear and banner are from White Christmas.  Naturally, the bear is glittered!  Again, I cut the banner pieces apart to make it easier to arrange them how I wanted.


For this snowman (from Punch Pals), I added shading with a Soft Sky marker and colored the hat.  I added dots of white enamel for berries.  Glitter is added over the shading on the snowman.


This stocking from Color Me Christmas was colored with markers and the white sections were glittered.  A small faceted acrylic button was threaded with twine for an accent.


This tree was punched from designer paper with the Tree punch that matches the Festival of Trees set.  I wrapped it with silver tinsel twine and topped it with a silver glitter paper star.


All of the stamped images were popped up with dimensionals, as well as each layered square.  There are so many little details in this project!  I love the finished result.


Stamps:  Color Me Christmas, Snow Much Fun, White Christmas, Punch Pals (Stampin' Up)
Ink:  Tuxedo Black (Memento)
Paper:  Whisper White, Lost Lagoon, Pear Pizzazz, Soft Sky, Smoky Slate, All is Calm dsp, silver glitter (Stampin' Up)
Markers:  Lost Lagoon, Pear Pizzazz, Soft Sky, Smoky Slate, Pumpkin Pie (Stampin' Up)
Misc:  Crystal fine glitter (Martha Stewart); various ribbon/embellishments (Stampin' Up); white gel pen; white shadowbox frame

Tuesday, November 25, 2014

Winter Wishes


I wasn't sure I'd be able to get a card done for this month's Papertrey Ink blog hop, but I managed to do it despite dinner planning, shopping, and house cleaning in preparation for Thanksgiving company this week.  Woot woot!


The theme was snow, so I pulled out my Damask Snowflakes dies and a few other wintry-themed things.  I glued a piece of blue snowy paper to a white card base for my background.  I die cut a snowflake from silver glitter paper and centered it over a double-ended banner that was embossed with phrases from Rustic Snowflakes and Snowfall.  I embossed a snowflake medallion from 2008 Holiday Tags Collection and punched it out with a 1-3/4" circle punch, centering it on the large snowflake.  As a final touch, I added a small rhinestone in the middle.

I love how it turned out!  Unfortunately, the sun was down when I got the card done, so you get an indoor picture.  I'll get a better one tomorrow.  Hopefully you can still see all the pretty shimmer.  Go here to see other projects in the blog hop.  I adore snowflake images, so this was a fun theme for me.  :)

Stamps:  2008 Holiday Tags Collection, Snowfall, Rustic Snowflakes (Papertrey Ink)
Ink:  VersaMark
Paper:  White (Papertrey Ink); silver glitter (Stampin' Up); Jack Frost 6x6 pad (American Crafts)
Misc:  Damask Snowflakes die; Double-Ended Banner die (Papertrey Ink); 1-3/4" circle punch (EK Success); silver embossing powder, rhinestone