Saturday, November 21, 2020

Poinsettia Tag

I just completed this year's Christmas tags.  We're in the middle of a huge basement remodel and our lives have been a little chaotic for the past two months.  My son and his family are coming to spend December with us, so I have to move most of the stuff in my studio down to the basement storage room when it's ready.  My little two-year-old grandson would have a heyday with my ink pads, scissors, stamps, and other assorted paraphernalia if I don't.  My studio will be converted into a guest bedroom temporarily while they are here.  Therefore, I needed to get all the Christmas tags done before December 1st.

My first tag uses the Poinsettia dies from Stampin' Up.  I had some pieces left from the Deck the Halls patterned paper and decided to cut layered poinsettias from this pretty red text print.

I usually make a set of four tags, but I had just enough paper to make a fifth poinsettia so I made an extra tag.  I'm sure I'll find a reason to use it.  It's always good to have tags on hand!

I stacked the three layers of the poinsettia and slightly curled each petal to add dimension.  I adhered the flower to a tag cut using the Berry Wreath Tag die from Papertrey Ink and Early Espresso cardstock, along with pine sprigs cut from the Funky Festive dies by Tim Holtz with Always Artichoke cardstock.

As a final step, I added Stickles to the center of the poinsettia to create a flower center.  It gives a pretty touch of sparkle!  Then I tied on some narrow gold ribbon.

 
Paper:  Always Artichoke, Early Espresso, Deck the Halls dsp (Stampin' Up)
Dies:  Poinsettia (Stampin' Up); Berry Wreath Tag (Papertrey Ink); Funky Festive (Tim Holtz)
Misc:  Tidings Stickles; gold ribbon

Wednesday, August 5, 2020

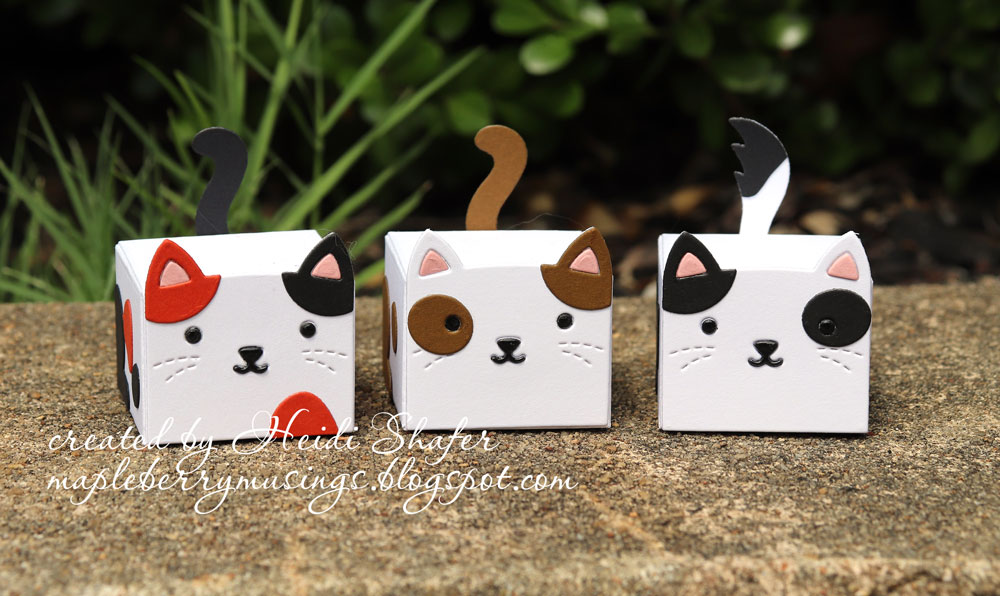
Tiny Cat Gift Boxes

I needed some small gift boxes to hold the earrings I am giving to my friends this weekend, so I pulled out the Tiny Gift Box dies by Lawn Fawn.  They were the perfect size and since all three friends are cat owners, I decided to use the Cat Add-On dies to dress them up.  They turned out super cute!


I just love them!  I chose three different color-ways for the cat boxes and added Glossy Accents to the eyes/noses for a bit of shine.  Then, I used an oversized cotton ball for filler and laid the earrings on top inside the box.  I hope they make my girlfriends smile!  It's been a rough year for everyone.


Paper:  White, Cocoa Bean, True Black, Terracotta Tile, Pale Peony (Papertrey Ink)
Dies:  Tiny Gift Box, Tiny Gift Box Cat Add-On (Lawn Fawn)
Misc:  Glossy Accents (Ranger)

Friday, July 31, 2020

Flower Cap Dangle Earrings

Hello again!  I wanted to make a simple gift for some girlfriends of mine and decided that earrings would be perfect.  I puttered around with the beads in my stash over the last couple of days and settled on this simple design.


I originally planned to do three separate designs, but after experiencing some anxiety over it, I went with just the one design for all three women.  I love the dainty look of these dangle earrings.  They will go with anything!  So naturally, I made a pair for myself too.


Thursday, July 30, 2020

Butterfly Rose Earrings

I made a bracelet for my sister two years ago, which you can see in a previous post here.  The thread broke last year so she sent all the beads she could find to me and it sat on my forgotten to-do list until a couple weeks ago.  I finally pulled it out to fix it.  Just a few seed beads were missing, thankfully.  This time, I went through the whole thing with a second thread to reinforce it.  I'm crossing my fingers that it holds up this time!  Anyway, since my sister had to wait a whole year to get it back, I decided to make her a pair of earrings as a surprise bonus gift.


I used beads from my stash to make these.  (mostly likely purchased at Michaels)  I was in a hurry to get her package mailed so I didn't spend too long deliberating on the design.  They turned out cute! 

Tuesday, July 7, 2020

Thanks a Million

This is absolutely my favorite card of the three designs in the party pack from my Stampin' Up demonstrator.  I adore the new Magenta Madness color!  It takes me right back to my early days of stamping when the color Pink Passion was in the Brights Collection.  It was one of the very first colors I bought!  This card makes me so happy.


I also fell in love with the Blossoms in Bloom bundle when I first saw the catalog and seeing these gorgeous diecuts in person just cinched it.  Bright pink and beautiful flowers - what's not to love?  The biggest surprise for me was the background panel.  It's actually done using a new embossing folder called Tasteful Texture.  I didn't even notice it in the catalog before.  I like how it looks like purchased textured paper.  Lovely and subtle.  Another must-have for me!

Since everything was already embossed and diecut, this card was easy to put together.  Just a challenge to glue without making a mess.  My demonstrator had provided a different sentiment, but the embossing on it was spotty, so I pulled a sentiment from Bitty Birthday Thanks by My Favorite Things and embossed it on black cardstock for my card.  It was handy to grab and I didn't feel like digging through all my stuff for a sentiment at the time.  I also left off the linen thread and ribbon that was in the kit because I preferred the simple look of the black strip by itself.

I actually signed up as a demonstrator last week just so I could take advantage of the free stamp and die bundle deal to get this for myself.  I also ordered the new in-colors.  I can't wait to play more with this beautiful pink!

Stamps:  Bitty Thanks & Gratitude (My Favorite Things)
Ink:  VersaMark
Paper:  Magenta Madness, Whisper White, vellum (Stampin' Up); True Black (Papertrey Ink)
Misc:  white embossing powder (Filigree); Tasteful Texture embossing folder (Stampin' Up); Many Layers Blossoms dies (Stampin' Up); Skinny Strips die (My Favorite Things)
 

Monday, July 6, 2020

Let's Celebrate You

Here's the second card from the catalog party pack.  It uses all five of the new Stampin' Up in-colors this year and the new Celebrate Sunflowers stamp set.  Everything was precut and stamped, so all I had to do was glue everything together.  Super fast card!


I wouldn't personally choose to use all five of these colors together, but it's a neat-looking design.  Definitely a quick and easy one!

Stamps:  Celebrate Sunflowers (Stampin' Up)
Ink:  Archival Black (Stampin' Up)
Paper:  Cinnamon Cider, Just Jade, Bumblebee, Magenta Madness, Misty Moonlight, Basic Black (Stampin' Up)
 

Sunday, July 5, 2020

Jar of Flowers

It's been a weird year, hasn't it?  My Stampin' Up demonstrator usually does a new catalog party at her home in June to show off the new products, but since most of us weren't comfortable with that this year due to the COVID-19 virus, she made party packs with three card projects and dropped them off at our homes instead.  Mine even included an unopened pack of patterned paper that went with the Eastern Beauty stamp set that I bought used from her at the party last year.  Bonus!  I finally got the cards made last week and photographed today.  Here's the first one.


This card uses the new Jar of Flowers set by Stampin' Up, along with a matching punch.  Everything was precut and prestamped so all I had to do was color the flowers with my Copic markers and fussy cut them out.  It's hard to see in the photo, but I added some light shading around the edges of the jar to make it a little less flat-looking.  Nice and simple!

Stamps:  Jar of Flowers; Band Together (Stampin' Up)
Ink:  Onyx Black (Memento); Rococo Rose (Stampin' Up)
Paper:  Rococo Rose, Whisper White, Seaside Spray, Blushing Bride, In Good Taste dsp (Stampin' Up)
Copic:  B91, B93, B95, 0, C1, RV32, RV34, Y00, Y32, G40, G43, YG13, YG17, YG45
Misc:  Jar punch (Stampin' Up); Misty Moonlight/Silver baker's twine (Stampin' Up)