Wednesday, February 25, 2015

Tweet Hugs


Another month, another Papertrey Ink blog hop!  We were given a picture this time and challenged to let it inspire us to create something.  I loved the watercolor quatrefoil pattern and decided to recreate it for my card.  (click on the picture for the original source)

http://society6.com/product/rainbow-pastel-watercolor-moroccan-pattern_print#1=45


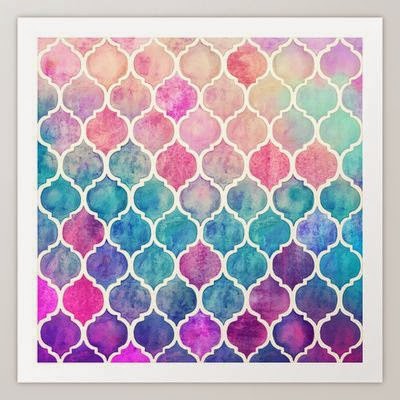
I cut a piece of watercolor paper and embossed it using a folder from the Decorative Tile Set by Cuttlebug.  I tapped a VersaMark pad along the raised quatrefoil lines and embossed it with clear powder.  My hope was that it would resist the watercoloring.  It worked, more or less.  Just not perfectly.

I chose a selection of Distress Ink markers and added color to each little section by first scribbling and then blending it with a waterbrush.  I tried to be fairly random, but also make it look like the colors flowed into each other.  Obviously, the picture inspired my choices.  My pattern turned out more pastel than the original and I had my doubts during the process, but I love the result!

I happened to have a piece of Hibiscus Burst cardstock still on my desk and it matched perfectly, so I adhered my watercolor piece to it for a card base.  There I stalled.  I didn't want to cover up my pretty watercolor quatrefoil pattern!  What to do???

I turned to my word dies seeking a solution and pulled out the Big Hugs dies from my last PTI order.  (I still need to get the stamp set though.  It would have been handy for this card!)  I cut this script-style word from both Vintage Cream and Hibiscus Burst cardstock, layering two pink together for dimension and then off-setting the cream so the pink would look like a shadow layer.

I pulled out my Little Bitty Bird sets and stamped the three smaller words on Hibiscus Burst cardstock.  I cut out each one individually, placing them near the large diecut word.  I stamped the bird on watercolor paper and colored it with the blue markers I had used on my background.  I added dots on the belly and lines on the wings/tail with the darker blue marker.  I also touched up the eye with a Black Soot marker to keep it from getting lost.  I cut out the bird and popped it up to look like it was perching on the word.

This card turned out so cute!  I had no idea where I was going when I started, but I sure had fun in the process.  That's pretty much the point, isn't it?  Embrace the imperfection and allow yourself to play.  You just might like where you end up.  :)  If you want to see more, check out the other cards in the hop at Nichole Heady's blog here.

Stamps:  Little Bitty Bird, Little Bitty Bird Additions (Papertrey Ink)
Ink:  Tuxedo Black (Memento); VersaMark
Paper:  Vintage Cream, Hibiscus Burst (Papertrey Ink); watercolor paper
Distress Markers:  Black Soot, Evergreen Bough, Salty Ocean, Stormy Sky, Tattered Rose, Tumbled Glass, Victorian Velvet, Worn Lipstick
Misc:  Big Hugs die (Papertrey Ink); Decorative Tile Set embossing folder (Cuttlebug); clear embossing powder, waterbrush


Monday, February 23, 2015

You are Faboolous


I'm excited to be part of the first ever Krafty Friends Blog Hop featuring Kraftin' Kimmie Stamps' Krafty Friends!  The blog hop is filled with creations by customers, design team members, and friends of KKS.  I'm a big fan of their Moonlight Whispers line that is designed by Annie Rodrigue and have quite a few of those images.  I chose Horace, a deliciously ghosty character, for my blog hop card.


In keeping with his ghostly ambience, I colored Horace in shades of gray with Copic markers.  I only have a few gray markers, so I used three different gray color families:  neutrals for the body, toners for the vest and hat, and warms for the pocket watch, belt, and hat band.  It was quite fun to stick to such a monochromatic color scheme.   I used a cool gray to lightly shade around the entire image.  (difficult to see in the photo)  Once I finished the coloring, I added clear Wink of Stella over his body for a delightfully spooky shimmer. (also difficult to see)


It was overcast outside when I took pictures of my card, so I tried to get a shot under a lamp so you can see the sparkle.  Click on the closeup picture to see it better.  It's subtle, but it looks really cool in person!  Almost otherworldly.   :)


I used an old Sweet Sunday sketch, #227, for my layout.  I really liked the three diagonal strips.  The patterned papers are from the Neutrals Collection Designer Series Paper Patterns Stack by Stampin' Up, along with Basic Gray cardstock for mats.  I popped up the main panel, added three neutral Candy Dots in the corner, and mounted everything on a white card base.

I don't make monochromatic cards often, but I love how this one turned out!  The sentiment is from the Ghoulfriends stamp set by Paper Smooches.  Absolutely perfect!  Horace has just the dashing (and ghostly) personality to say it.  I look forward to the right occasion to send out this card.


Feel free to start the hop from the beginning at the Kraftin' Kimmie Stamps Blog, then hop around and check out all the fabulous designs. Be sure to leave a comment at each stop because there will be prizes and giveaways to some random commenters!

Not only can you comment to win, we'd love to have you JOIN the blog hop by posting your own design.  Just post a new creation featuring a Kraftin' Kimmie Stamp and link it up to the main blog post.  You'll not only be a part of this fun hop, but you'll be entered to WIN more goodies! You have until February 28th.

Stamps:  Horace (Kraftin' Kimmie); Ghoulfriends (Paper Smooches)
Ink:  Tuxedo Black (Memento)
Paper:  White (Papertrey Ink); Basic Gray, Neutrals Collection DSP Patterns Stack (Stampin' Up)
Copic:  0, C1, N0, N2, N4, T1, T4, T6, W1, W3, W5
Misc:  Neutrals Candy Dots (Stampn' Up); clear Wink of Stella pen; foam tape

Thursday, February 19, 2015

Love Will Keep Us Together

I pulled a couple of things out of my scrap drawer to make today's card.  It's getting too full!  I cut the Framed Love piece ages ago.  When I had it hand, I decided to turn it into a shaker card.  I hadn't made one in quite a while and I've seen them all over the blogosphere lately.


I cut three more Framed Love pieces from Pure Poppy cardstock and glued them together, sandwiching some acetate between the top two layers.  I used Sparkling Clear and Metallic Silver sequins from Pretty Pink Posh for my shaker.  I'm wishing now that I had thrown in a bit of glitter too.  Unfortunately, the acetate I used was pretty flimsy and made this much harder than it should have been, not to mention the static cling.  Lessons learned.  I still love it! (pun intended)  I stamped my sentiment from Wonderful Words: Love in black ink, angling it to match the shaker.  I adhered a black strip of rickrack at the bottom of my card to finish it off.

Stamps:  Wonderful Words: Love (Papertrey Ink)
Ink:  Tuxedo Black (Memento)
Paper:  White, Pure Poppy, True Black (Papertrey Ink)
Misc:  Framed Love die, Rickrack Border die (Papertrey Ink); Sparkling Clear and Metallic Silver sequins (Pretty Pink Posh); acetate

Wednesday, February 18, 2015

My Heart

I think this may be my first time using a Make-It-Monday technique during the same week it is posted.  Usually I forget about it or the deadline for linking has passed.  I've only used embossing paste one other time and that was for Stamp-a-Faire last August.  I really like the technique though and plan to use it again.  Here is my card for Papertrey Ink's Make-It-Monday #201.


Obviously I didn't use a Cover Plate die.  I chose a heart-shaped confetti die from the Shakers & Sprinkles kit and cut a temporary stencil from cardstock.  I smooshed a Pure Poppy inkpad onto a craft mat and mixed the ink with translucent embossing paste to get this pretty pink color.  Then I placed my stencil on a piece of white cardstock and spread the paste with a palette knife.  When I lifted it up, I got this large heart made of little pink hearts.  My paste seeped underneath in a few spots due to my stencil being a bit warped, but not too badly.  Not all of the hearts came out the same thickness, which created a slight color variation.  I like the look!

I stamped a sentiment from Love Lives Here underneath the heart in black ink.  I added strips of 1/8" Scor-Tape along the sides and covered them with Sugar Cube glitter.  The whole panel was then mounted on a Hibiscus Burst card base.  Sweet and simple!

Stamps:  Love Lives Here (Papertrey Ink)
Ink:  Tuxedo Black (Memento); Pure Poppy (Papertrey Ink)
Paper:  White, Hibiscus Burst (Papertrey Ink)
Misc:  Shakers & Sprinkles Make It Market Kit die (Papertrey Ink); translucent embossing paste (Wendy Vecchi); Sugar Cube glitter (Martha Stewart); 1/8" Scor-Tape

Thursday, February 12, 2015

PTI 8th Anniversary: Ready, Set, Snow

Another day, another challenge.  Today we needed to do a blue ombre effect.  After trying to sponge an ombre background, I scrapped it and moved in a different direction.  Glad I did!

 
You'll have to pardon the less-than-ideal picture.  It has been crazy windy here all day and this is the only shot I managed to get outside.  I couldn't get the card to stay up long enough!  It was a bit amusing.  There's a lot of shadow on the picture, so I'll try to get a better shot tomorrow.  I took a pic inside using the kitchen window's light and cropped it for a close-up.  The color is off, but you can see the texture better on the die cut. 


I cut strips of cardstock in Spring Rain, Blueberry Sky, and Enchanted Evening using the Building Blocks dies and carefully glued them onto a white card base.  It's definitely a quick, easy way to do ombre!  I stamped snowflakes from Snowflake Serenade onto the pieced blue strip using VersaMark Dazzle Frost ink.  Then I used a white gel pen to add additional tiny, random snowflake dots.

I cut the large word using the Wonderful Words: Snow die and impressed some texture using the Linen & Canvas plate from Papertrey Ink.  I stamped a sentiment from the matching set directly on the card in black ink and then popped up my die cut word below.

I really love the result!  The VersaMark ink makes the snowflakes look ombre too, as if I had used three colors of ink.  Pretty cool!  You can see other cards for the challenge at Nichole Heady's blog here.

Stamps:  Wonderful Words: Snow, Snowflake Serenade (Papertrey Ink)
Ink:  Tuxedo Black (Memento); VersaMark Dazzle Frost
Paper:  White, Spring Rain, Blueberry Sky, Enchanted Evening (Papertrey Ink)
Misc:  Wonderful Words: Snow die (Papertrey Ink); white gel pen

Wednesday, February 11, 2015

PTI 8th Anniversary: Together Forever

I'm back with a new card for the Papertrey Ink eighth anniversary celebration.  Today's challenge is to use only metallics and neutrals.  This had me stumped a bit at first because I don't have any metallic paper.  Glitter to the rescue!


I laid down strips of 1/2 inch Scor-Tape in a diagonal pattern on white cardstock and poured White Gold glitter over top.  It's such a luxurious color!   Then I adhered the panel to a black card base so the sparkle would really pop.

I pulled out an untouched stamp set called Wonderful Words: Together and stamped a small sentiment on a white Building Blocks die cut.  I glittered up a tiny heart die cut from Heart Prints using Yellow Barite.  It pulls out the bits of gold in the stripes.  I also wanted the heart to really stand out from the background.  I cut the word "together" out of black cardstock, doubling it for a little dimension.  Then I simply glued it all in place.


I really love how elegant this is, especially in person.  I hope my pictures capture the glorious sparkle.  It's a perfect wedding card, or perhaps an alternative to all the usual red and pink for Valentine's Day.  You can see other challenge cards here.


Stamps:  Wonderful Words: Together (Papertrey Ink)
Ink:  Tuxedo Black (Memento)
Paper:  White, True Black (Papertrey Ink)
Misc:  Wonderful Words: Together die, Building Blocks die, Heart Prints die (Papertrey Ink); White Gold glitter, Yellow Barite glitter (Martha Stewart); 1/2" Scor-Tape

Tuesday, February 10, 2015

PTI 8th Anniversary: Happy Moments

Woot!  This card catches me up on the Papertrey Ink eighth anniversary challenges!  The fourth day was a challenge to create a floral bouquet on a card using more than one floral stamp set.  I actually used four different sets for mine.


It looks deceptively simple, but there was a lot of fussy cutting involved.  I didn't have dies for one of the sets, so to keep them all somewhat uniform, I cut out all the flowers and leaves by hand.  I enjoy that sort of thing, so it wasn't any big deal.  It just took a little extra time.

I stamped the flowers in spring colors.  Yesterday was rainy and overcast.  Dull grey everywhere.  I was craving color, which definitely came out in both of the cards I made.  I didn't finish this one until late evening, so the picture had to wait until today.  My youngest daughter got braces put on her teeth this morning, and I took her "after"picture at the same time.  New adventures!  By then it had stopped raining, thankfully.  (still overcast though - I'm ready for some sun)

Once I was happy with an arrangement of the bouquet, I glued each piece down one at a time.  There's a few things I would tweak, seeing it with fresh eyes, but overall I think it turned out really nice.  I stamped my sentiment in the corner and adhered the panel to an Hawaiian Shores card base.  I love these pretty flowers!  Can spring come now?   :)

Stamps:  Bold Bouquet, Ruby Rose, Ruby Reprise, Happiness in Bloom (Papertrey Ink)
Ink:  Harvest Gold, Summer Sunrise, Dark Chocolate, Hawaiian Shores, Berry Sorbet, Winter Wisteria, Spring Moss, Simply Chartreuse, Ripe Avocado (Papertrey Ink); Tuxedo Black (Memento)
Paper:  White, Hawaiian Shores (Papertrey Ink)

Monday, February 9, 2015

PTI 8th Anniversary: Friends Make the World Beautiful

Oh my goodness, I am seriously in love with this card!  The color.  Oh, the color!  Today's anniversary challenge is to use an untouched stamp set.  Awesome!  I've been trying to do that anyway.  Pretty successfully, too.  :) 

I pulled out Friendship Jars: Spring Fillers this past weekend, thinking to use it for my Maile Belle-inspired card, but went in another direction instead.  This gorgeous tulip image was calling to me today.  It's my favorite flower, so I couldn't resist its lovely siren song.


I have used two of the Friendship Jar sets before, but never the Spring Fillers set.  It has some wonderful images, but these tulips are definitely the star of the show.  I embossed it with white embossing powder on a piece of watercolor paper.  In the spirit of "springing into action" per the challenge instructions, I added lots of pretty color with a waterbrush and some Distress Ink reinkers, which I had never used either.  Does that give me bonus points?  lol

I deliberately kept it a little messy and allowed myself to play.  I love the result.  LOVE.  The colors are so vibrant!  It's like a little burst of spring on this dreary winter day.  (It started to rain as I went outside to take the picture, so my daughter had to hold an umbrella to protect my card!)

The sentiment comes from Wonderful Words: Friends.  I had never used that stamp set before now, although I have used the die.  Two for one!  I selectively stamped the sentiment on two different Building Blocks die cuts and glued them in the lower right corner of the card.  I stacked three of the word die cuts together to add dimension and help it stand out from the background.  Once in place, the card was done!

The only thing that really took time for this card was allowing the watercolor to dry.  Otherwise, it was pretty quick.  I look forward to seeing what sets are used by other stampers for this challenge.  I have plenty of untouched sets to choose from myself!  :)

Stamps:  Friendship Jars: Spring Fillers, Wonderful Words: Friends (Papertrey Ink)
Ink:  Tuxedo Black (Memento); VersaMark
Reinkers:  Festive Berries, Mowed Lawn, Salty Ocean (Distress Ink)
Paper:  White (Papertrey Ink); watercolor paper
Misc:  Building Blocks dies, Wonderful Words: Friends die (Papertrey Ink); white embossing powder (Filigree); waterbrush 

PTI 8th Anniversary: Love Always Gift Tag & Bag

The third challenge for the Papertrey Ink 8th Anniversary festivities was to make a tag for a matching gift bag, either one you create or purchase.  I found this black and white gift bag in my stash.  Such a fun pattern!  I remembered that I had some leftover pieces from the Love You Always card I created for last month's blog hop, and immediately thought that it would be fun to create a coordinating tag.  I love it when inspiration strikes quickly!  So here is the complete set.


This gift bag would be darling on its own, of course.  I stamped some white tissue paper with Pure Poppy polka-dot hearts.  After stamping a tiny heart as well, I stamped XOXO in black ink.  All the images are from the Heart Prints stamp set.  Custom tissue paper really bumps a gift bag over the top.  I love how it looks!


I already had a piece of embossed cardstock in my scrap drawer, along with the flower and leaves.  I cut the white tag using Tag Sale #10 and trimmed the black piece to fit.  It was previously embossed with the Hugs & Kisses folder by Cuttlebug.  I cut the red heart using the Heart Prints dies.  Boy, do I wish I had that white lace-edged heart from the card in a smaller size!


I stamped the word "love" from the County Fair stamp set using VersaMark ink and embossed it in white.  I chose that stamp because it had a similar feel to the image I used on the original card.  I would love some mini versions of the large Wet Paint words!  Are you listening, Papertrey Ink?  :)


I selectively stamped the word "always" in black ink on a white Building Blocks die cut, added a rhinestone to the flower, and glued everything together in the same layout as my card.  Then I just tied it to my gift bag with some red and white baker's twine.


My daughter Emily loves it!  She said it would be cool to receive a gift in this bag.  She may have been dropping a hint for Valentine's Day, naturally, but she was pretty impressed.  I mainly make cards and this gift set had quite an impact.  I should do this more often!  I personally love how it all turned out anyway.   :)  


Stamps:  Wet Paint, Ruby Reprise, Heart Prints, County Fair (Papertrey Ink)
Ink:  Tuxedo Black (Memento); Pure Poppy, Simply Chartreuse (Papertrey Ink); VersaMark
Paper:  White, True Black, Pure Poppy (Papertrey Ink)
Misc:  Ruby Rose dies, Building Blocks die, Heart Prints die, Tag Sale #10 die (Papertrey Ink); Hugs & Kisses embossing folder (Cuttlebug); white embossing powder (Filigree); clear rhinestone; black and white gift bag; white tissue paper; red/white baker's twine 


Sunday, February 8, 2015

PTI 8th Anniversary: Happy Happy Birthday

I'm back to share my second challenge card for Papertrey Ink's eighth anniversary.  To celebrate Maile Belle's return as a stamp designer, we were to create a new card inspired by one of her creations.  She has a great clean and modern style!  I chose this card because of the cool background she created with a sentiment from Monthly Moments: October.  Click on the picture to go to her original blog post.

http://mailebelles.blogspot.com/2014/10/monthly-moments-october.html


I recreated that cool background using a birthday sentiment from Fillable Frames #1.  I chose Pure Poppy, Simply Chartreuse, and Blueberry Sky for my ink colors since they would work for either a boy or a girl.  First, I drew lines in pencil with a ruler so I could keep my spacing consistent.  Then I stamped my sentiment, rotating the colors, using my lines as a guide.  Once done, I simply erased the pencil lines.  It makes an awesome background!

I spent more time fussing over my focal point than I did the background.  I finally stamped the birthday circle from Around & About Sentiments on a Kraft circle, and popped up a cute little cupcake from Tiny Treats Valentine that I colored with Copic markers.  I added Diamond Stickles to the frosting.  If I had some green rhinestones, I would have added them near the circle like Maile did, but since I did not, I just left it plain.  Sometimes you have to call enough!  Nothing else I had was working.  Now that I've slept on it though, I like it the way it is.  Sometimes simple is best!  :)

As always, you can see other cards for this challenge here.

Stamps:  Tiny Treats Valentine, Around & About Sentiments, Fillable Frames #1 (Papertrey Ink)
Ink:  Pure Poppy, Simply Chartreuse, Blueberry Sky, Dark Chocolate (Papertrey Ink); Rich Cocoa (Memento)
Paper:  White, Kraft (Papertrey Ink)
Copic:  B91, B95, B97, R29, E41, E42, E55
Misc:  Diamond Stickles, 1-1/4" Circle punch (EK Success)

Saturday, February 7, 2015

PTI 8th Anniversary: Butterfly Friend

It's that time of year again!  Papertrey Ink is celebrating its eighth anniversary with daily challenges.  I'm a bit late getting started, but luckily we have several days to do them instead of just one like last year.  I've been battling an awful cold all week and not feeling too well.  Despite that, I've still been stamping! 

Here's my card for the first anniversary challenge, which is to choose one sketch and one color combo from those provided.


I created some stacked butterflies using Heart-2-Heart #10 and the matching dies.  The colors made some pretty combinations!  I bent the top butterfly layer and the antennae for some dimension.  I stamped flourishes in opposite corners of a white panel using Spring Rain ink and then distressed the edges.  I stamped a sentiment from Wet Paint using Smokey Shadow ink.  Finally, I embossed a narrow strip of Smokey Shadow cardstock with polka dots and adhered everything to a Smokey Shadow card base.

It turned out so soft and elegant!  You can see other cards for the challenge here.  I've got my next challenge card finished, but need to wait for daylight to take a picture.  Look for that tomorrow!   :)

Stamps:  Heart-2-Heart #10, Wet Paint, Fancy Flourishes (Papertrey Ink)
Ink:  Smokey Shadow, Spring Rain, Blueberry Sky, Ocean Tides, Aqua Mist (Papertrey Ink)
Paper:  White, Smokey Shadow (Papertrey Ink)
Misc:  Heart-2-Heart #10 dies (Papertrey Ink); Polka Dots embossing folder (Cuttlebug); distress tool

Friday, February 6, 2015

Unfrogettable

I made another card for the challenges at the Kraftin' Kimmie Krafty Friends group, this time using sketch #5 and the extra option to decorate the inside.


I adore this sassy girl with the frog on her head.  I colored her with Copic markers and then carefully cut her out.  In the close-up pic below, you can see the tiny white polka dots I added to her yellow dress with a white gel pen.  I used Wink of Stella on the barrettes in her hair.  The frog was also colored and cut out.  I used a colorless blender to create a mottled effect on his body.


I cut my hillside from a fun polka dot patterned paper using a Stitched Borders 1 die by Pretty Pink Posh.  I did the same thing for the inside, but cut it on a different angle.  The grass tufts were cut using the Grassy Edges dies by My Favorite Things.  I just cut it into smaller pieces.

The Soft Sky background was embossed using the Swirls folder by Tim Holtz.  I selectively stamped just one word of the sentiment from Unfrogettable by Stampin' Up on a skinny white strip of cardstock and then flagged the end using a square punch.  Inside the card, I stamped the whole sentiment just above the hillside.


I colored and cut out the frog from the top of the girl's head to use inside the card.  His expression is very mischievous, don't you think?  I really love how this card turned out.  I stayed pretty close to the sketch, just adapting a couple of things to fit my vision.  This girl has some spunk and is completely unfrogettable!  lol


Stamps:  Lilith (Kraftin' Kimmie); Unfrogettable (Stampin' Up)
Ink:  Tuxedo Black (Memento)
Paper:  White (Papertrey Ink); Soft Sky, Always Artichoke, Regals Collection DSP Patterns Stack (Stampin' Up)
Copic:  0, C1, E00, E30, E42, E55, E57, E59, R20, B91, B95, B97, B99, Y00, Y02, Y06, YG93, YG95, YG97
Misc:  Grassy Edges die (My Favorite Things); Stitched Borders 1 die (Pretty Pink Posh), white gel pen, 1/2" square punch (EK Success); Swirls embossing folder (Tim Holtz); clear Wink of Stella pen


Tuesday, February 3, 2015

Miss You

The Kraftin' Kimmie Stamps Krafty Friends group over on Facebook is celebrating its 2000 member milestone with six sketch challenges.  This is my card for the first sketch.  Distressing was an optional element, but of course I forgot to do it before gluing everything together.  Oops!  I was not about to tear it apart or start over.  :)


I started by choosing this pretty floral paper from the Sweet Sorbet pack by Stampin' Up.  When glancing through my inventory book, I decided that this Sakura stamp by Kraftin' Kimmie was a perfect match.  From there, I picked my colors of white, black, and Pool Party cardstock.  I used a couple of Blueprints 1 dies for my layers.

I colored the girl with Copic markers, choosing colors to coordinate with my decorative paper.  I tried to give the effect of gold accessories by adding some shimmery Wink of Stella over the golden-yellow color.  I also used a small die from Blueprints 7 with Sun Shimmer paper for the little tab.  (note to self...get some gold metallic paper!)  There's also a bit of shimmer on her eyelids.  You can see it all better in this close-up shot.


So yet again, I have used some untouched stuff for this card.  Yay me!  I have all the oriental girls from Kraftin' Kimmie Stamp's Moonlight Whispers line, but this is the first time one has seen ink.  I also used a tiny sentiment from Pretty Poppies by My Favorite Things.

I had an interesting conversation with my teenage son last night.  He asked if it was hard to cut into patterned papers since once they were gone, there wouldn't be any more.  I simply pointed out my shelf of hoarded paper packs.  Need I say more?  lol  But I also added that they don't do me any good sitting there and gathering dust, and I was trying to use the stuff I have.  I'm getting better at it!  So I finally cut into my pretty shimmer cardstock.  (gulp)  Of course, in the process of making this card, I added several things to my wishlist - a few additional Copic marker colors and a gold Wink of Stella pen.  It never ends!  :)

Stamps:  Sakura (Kraftin' Kimmie Stamps); Pretty Poppies (My Favorite Things)
Ink:  Tuxedo Black (Memento)
Paper:  White, True Black, Sun Shimmer (Papertrey Ink); Pool Party, Sweet Sorbet dsp (Stampin' Up) 
Copic:  0, C1, T1, T4, T6, E00, E30, E42, R20, Y02, Y06, BG11, BG13, BG15
Misc:  Blueprints 1 dies, Blueprints 7 die (My Favorite Things); clear Wink of Stella pen 

Monday, February 2, 2015

Sunshine Flowers

I still had some never-before-used stuff out on my desk from last week, so I made a card using these sweet Heart-2-Heart #7 flowers.  This is not my original design.  You can see the original card here.  I followed it pretty closely and just used what I had, layering the center piece instead of doing a frame.  I loved the pretty yellow flowers against the white and black.


For my version, I embossed the white panel using the Stripes folder by Stampin' Up.  I added embossed white polka dots to the black square using Polka Dot Basics II by Papertrey Ink.  It was not easy to line up that border on black cardstock using VersaMark ink!  This was my second attempt.  lol

I stamped black stems on a white square and then added black diecut leaves.  I stamped the flowers on their matching diecuts using Daffodil Delight ink and placed a black Candy Dot in the center of each one.  I cut a narrow strip of white cardstock for my sentiment and used a square punch to flag the ends.  The sentiment is from Luck of the Irish by Papertrey Ink.  So I actually used two different untouched sets on this card!  The flowers and sentiment are popped up for dimension.

I think this design would look great with any color for the flowers, but the sentiment I chose works perfectly with that sunny yellow!

Stamps:  Heart-2-Heart #7, Luck of the Irish, Polka Dot Basics II (Papertrey Ink)
Ink:  Tuxedo Black (Memento); Daffodil Delight (Stampin' Up); VersaMark
Paper:  White, True Black (Papertrey Ink)
Misc:   Heart-2-Heart #7 dies (Papertrey Ink); 1/2" square punch (EK Success); Stripes embossing folder (Stampin Up); white embossing powder (Filigree); neutral Candy Dots (Stampin' Up)