Showing posts with label Lawn Fawn. Show all posts

Thursday, November 26, 2020

Peas on Earth Tag

Here's my final set of Christmas tags for this year.  I wanted to use the adorable Peas on Earth stamp set from Lawn Fawn, and when I was searching for ideas, I saw a cute tag by Tammy Stark on the Lawn Fawn blog here.  I adapted it slightly to use stuff that I already had on hand.

This set of tags was pretty involved and they took the most time of all the tag sets I created.  It was fun though!  I love Lawn Fawn images.  I couldn't resist the punny sentiment either.  I cut a white tag base with the Tag Sale #10 die by Papertrey Ink and then cut another tag from their All Through the House patterned paper to glue on top.

For my little caroling scene, I sponged Broken China Distress Oxide ink on a white cardstock circle cut with the Tag Sale #12 dies from Papertrey Ink and then spritzed it with a little water.  I also cut a second circle, created a small hill using the In the Meadow dies from Papertrey Ink, and glued it on top of the inked circle.

I stamped and colored the peas from Peas on Earth with Copic markers on white cardstock, along with the Christmas tree and star from Yeti or Not by Lawn Fawn.  It's difficult to see in the photo, but I added clear Wink of Stella to the star for some sparkle.  I also added Glossy Accents to the light bulb garland on the tree.

I used the matching Peas on Earth dies to cut out the little caroling peas, but I hand cut the tree and star because I don't have the dies for that set.  (I wish it wasn't so expensive to get the dies for every stamp set I own.)  Anyway, I glued the Christmas tree directly to the circle with some cardstock behind it, so that it would stay level with the hill.  Then I popped up the two peas with foam tape.  I adhered the circle scene to a white scalloped circle cut using the Classic Scalloped Circles Small dies from Spellbinders and added it to the tag base with foam tape.  Oh, I did add a little grounding underneath the images with a light grey marker.

For the sentiment, I cut a banner using the Simple Wavy Banners dies from Lawn Fawn and Pinefeather cardstock.  I used white powder to emboss my sentiment from Peas on Earth, curving the stamp to fit the banner.  I then used foam tape to pop up the banner on the completed tag.  As a final step, I tied on some narrow white ribbon.

I love these tags so much!  They turned out super cute.  It's been so much fun to get back into my studio and create again.  The tags aren't all my original design, of course, but I needed to take the pressure off myself this year and just have fun making them.  What's amazing is that I got them all done before Thanksgiving!  Go me!

Hopefully, within the next two or three weeks, the basement remodel will get finished.  I can't wait to get my home back in order.  It's been a crazy two months.  This has been a welcome distraction from all the chaos.

Stamps:  Peas on Earth, Yeti or Not (Lawn Fawn) 
Ink:  Tuxedo Black (Memento); VersaMark; Broken China (Distress Oxide)
Paper:  White, Pinefeather, All Through the House (Papertrey Ink)
Dies:  Tag Sale #10, Tag Sale #12, In the Meadow (Papertrey Ink); Peas on Earth, Simple Wavy Banners (Lawn Fawn); Classic Scalloped Circles Small (Spellbinders)
Copic:  0, C1, C5, R29, R59, Y13, Y15, R20, YG05, YG09, G17, G28, B06, RV55, E59, E70, E71, E74
Misc:  white embossing powder (Filigree); Glossy Accents (Ranger); clear Wink of Stella pen, blending tool, water spritzer 


Wednesday, August 5, 2020

Tiny Cat Gift Boxes

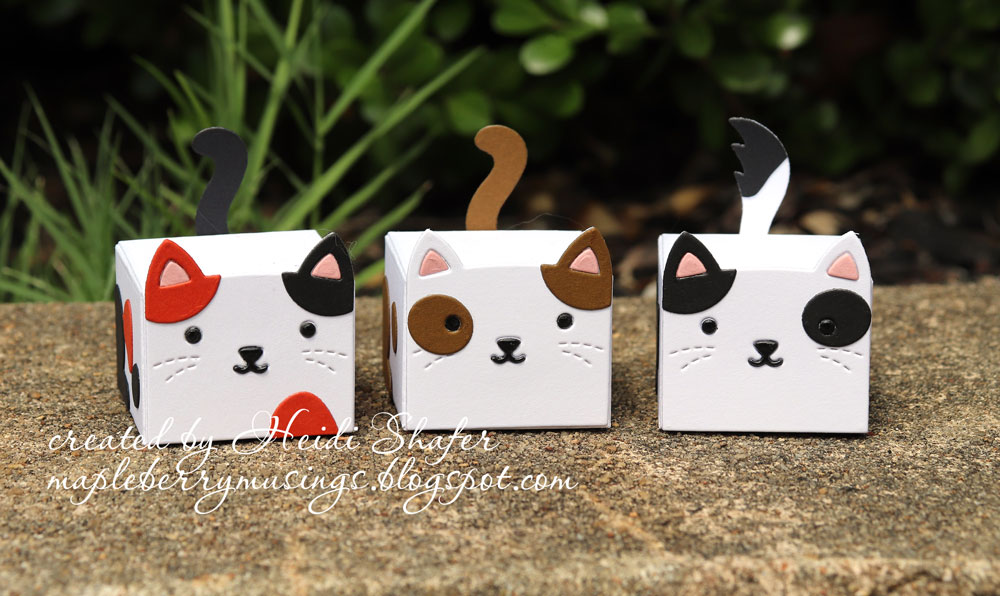
I needed some small gift boxes to hold the earrings I am giving to my friends this weekend, so I pulled out the Tiny Gift Box dies by Lawn Fawn.  They were the perfect size and since all three friends are cat owners, I decided to use the Cat Add-On dies to dress them up.  They turned out super cute!


I just love them!  I chose three different color-ways for the cat boxes and added Glossy Accents to the eyes/noses for a bit of shine.  Then, I used an oversized cotton ball for filler and laid the earrings on top inside the box.  I hope they make my girlfriends smile!  It's been a rough year for everyone.


Paper:  White, Cocoa Bean, True Black, Terracotta Tile, Pale Peony (Papertrey Ink)
Dies:  Tiny Gift Box, Tiny Gift Box Cat Add-On (Lawn Fawn)
Misc:  Glossy Accents (Ranger)

Thursday, January 17, 2019

Bell Tag

On to the third tag design!  I pulled out an old Papertrey Ink set called Bells and Boughs for this one.  I embossed the two bells in gold and stamped the bow in Pure Poppy ink.  I just had to use classic colors!


I used the Tag Sale #4 die by Papertrey Ink with Kraft cardstock for my base.  It's one of my favorite dies.  I sponged it with Sweet Tooth ink to soften the edges.  I stamped a sentiment from Winter Scripty Sayings by Lawn Fawn across the bottom in black ink.


For my greenery, I cut Pinefeather cardstock using the Funky Floral #1 dies by Tim Holtz.  I love this pine sprig and wish it had a twin that curved the other way.  I improvised by simply bending the paper to lay the way I wanted.  I tied on some gold ribbon to finish the tag.

Stamps:  Bells & Boughs (Papertrey Ink); Winter Scripty Sayings (Lawn Fawn)
Ink:  VersaMark; Onyx Black (VersaFine); Pure Poppy (Papertrey Ink); Sweet Tooth (My Favorite Things)
Paper:  Kraft, White, Pinefeather (Papertrey Ink)
Misc:  Bells & Boughs dies (Papertrey Ink); Funky Floral #1 dies (Tim Holtz Alterations); Tag Sale #4 die (Papertrey Ink); gold embossing powder

Wednesday, January 16, 2019

Snowflake Ornament Tag

This tag design was fun to make and didn't actually involve stamping at all.  I've had these Stitched Ornaments dies by Lawn Fawn for a while, so it was definitely time to break them in!


I cut the ornament from Hawaiian Shores cardstock and adhered a silver glitter paper topper.  I don't have the snowflake dies from Lawn Fawn that are sized perfectly for these ornament dies (yet), so I used a small die from Stylish Snowflakes by My Favorite Things.


I used the tiny silver glitter paper circle left from cutting the topper in the center of the snowflake and then added little dots of Frosted Lace Stickles around the central design.  White ribbon finished off the tag nicely.

Paper:  Hawaiian Shores, White (Papertrey Ink); Silver Glimmer (Stampin' Up)
Misc:  Stitched Ornaments dies (Lawn Fawn); Stylish Snowflakes dies (My Favorite Things); Frosted Lace (Stickles)

Wednesday, January 24, 2018

Fleece Navidad Tag

Well.  It's been a few months.  My computer failed and it took several weeks to purchase and set up the new computer.  That's November in a nutshell.  December was crazy due to Christmas and family schedules.  In January, I've been working on other big projects.  Today I finally got Photoshop Elements reinstalled on the new computer so I can edit my photos.  I made this adorable Christmas tag using Baaah Humbug by Lawn Fawn for Christmas last year.


I love this little sheep!  After stamping and coloring the face and feet with Copic markers, I added Hazy Grey Fun Flock for the sheep's fur.  It gives it a wonderful soft, fuzzy texture.


I used Copic markers to color the little Santa hat and gift.  All the pieces are hand-cut.  I added glitter to the hat trim and clear Wink of Stella to the gift box ribbon.  After layering patterned paper on Garden Green cardstock, I glued it to a Cherry Cobbler cardstock tag cut with a die by My Favorite Things.  I adhered my sheep with foam tape and stamped the sentiment directly on the tag with black ink.  Really simple, but oh so cute!


Stamps:  Baaah Humbug (Lawn Fawn)
Ink:  Tuxedo Black (Memento)
Paper:  White (Papertrey Ink); Cherry Cobbler, Garden Green, Trim the Tree dsp (Stampin' Up)
Copic: E41, E42, R20, R29, R59, R89, G24, G46
Misc:  Tag, You're It die (My Favorite Things); Hazy Grey Fun Flock (Stampendous), Sugar Cube glitter (Martha Stewart); clear Wink of Stella pen; green ribbon

Wednesday, September 14, 2016

Ink It Up with Leigh Penner: Happy Howlidays


It's time for the first September installment of Ink It Up!  Twice a month, on the second and fourth Wednesdays, Leigh Penner and I post a project using our uninked stamps.  I got this adorable Lawn Fawn set in the mail last week.  It's called Happy Howlidays and is a Stamptember exclusive over at Simon Says Stamp.  I simply could not resist!


Isn't that reindeer dog the cutest thing?  I stamped the images on white cardstock, cut them out with the matching dies, and colored them with Copic markers.  For the nose, I stamped it on white cardstock with Pure Poppy ink and hand cut it out.  (I didn't want the white border.)  The shine comes from Glossy Accents.  I put a black oval behind the dog to help it pop out more from the background.

I stamped the small candy cane image on white cardstock in a random pattern using black ink.  I colored the stripes with a red Copic marker and then added clear Wink of Stella over all of the images.  I had to have some sparkle!  Then I stamped some tiny snowflakes in silver ink.


I layered the candy cane piece on some Pure Poppy cardstock and angled them on striped patterned paper by Basic Grey.  Everything is adhered to a white card base.  I stamped my sentiment on a narrow strip of white cardstock and then matted it with Pure Poppy cardstock.  To fill the empty space on the left, I stamped a small pawprint.

So, now I have a new Christmas card to add to my stash!  This one was fun to make.  Hop over to Leigh's blog, To the Full, to see her Ink It Up card today.

Stamps:  Happy Howlidays (Lawn Fawn - Simon Says Stamp exclusive)
Ink:  Tuxedo Black (Memento); Pure Poppy (Papertrey Ink); Silver (Encore Ultimate Metallic)
Paper:  White, Pure Poppy (Papertrey Ink); Aspen Frost 6x6 pad (Basic Grey)
Copic: R59, E55, E57, E59, W5
Misc:  Happy Howlidays dies (Lawn Fawn - Simon Says Stamp exclusive); Classic Ovals Small die (Spellbinders); Glossy Accents (Ranger); clear Wink of Stella pen  

Wednesday, May 25, 2016

Time's a Dragon Without You

 
I'm squeaking in at the last minute with a mini card for the latest Lawnscaping Challenge to Sparkle It Up.  I don't know how I missed it before, because I love any excuse to add sparkle to my creations!  I colored this adorable dragon from Critters Ever After by Lawn Fawn over a month ago and it's been sitting on my desk ever since.
 

For the challenge, I added silver Wink of Stella to the dragon's horns and clear Wink of Stella to the wings.  I cut a piece of Dark Chocolate cardstock using the Stitched Hillside Borders dies by Lawn Fawn and covered it with Brushed Corduroy Distress Stickles.  It simulates the texture of dirt with some extra sparkle, grounding the dragon perfectly.  Love it!


As you can see, I was rapidly running out of daylight while taking these pictures.  (Stickles can take a while to dry.)  I snapped a couple of photos inside trying to capture the sparkle.  Hopefully you can see it in the close-up shot.


My son and daughter got a kick out of the sentiment!  It's from Dexter the Dragon by Kraftin' Kimmie.  I may slip this little card into my husband's suitcase the next time he takes a business trip.  I'm glad I finally got this cute dragon off my desk and onto a card.   He makes me smile!

Stamps:  Critters Ever After (Lawn Fawn); Dexter the Dragon (Kraftin' Kimmie)
Ink: Tuxedo Black (Memento)
Paper:  White, Dark Chocolate (Papertrey Ink); Regals Collection Pattern Stack dsp (Stampin' Up)
Copic:  G28, G40, G43, G46, E42, E44, N0, N2, N4
Misc:  Envie die (Avery Elle); Stitched Hillside Border die (Lawn Fawn); clear and silver Wink of Stella pens; Brushed Corduroy Distress Stickles


Saturday, April 30, 2016

Pizza My Heart

My daughter talked me into this Lawn Fawn set.  Well actually, it didn't require much arm-twisting.  It was already on my wish list.  She only encouraged me to buy it sooner!  lol  I love the sentiments and the build-your-own pizza design.  Naturally, I had to use it for a little card to tuck into her bag.


I stamped the heart-shaped pizza and added all the tiny toppings in different colors.  Love!  So quick and easy.  I used So Saffron and Close to Cocoa markers to color the crust and pizza cutter.  I hand-cut the pizza cutter and glued it in place.  You'd never know it was placed there to cover a smudge!  :)  Here's a close-up of the pizza cutter so you can see the pretty silver shimmer.  Wink of Stella pens are the best!


Did I mention how much I adore this new die by Avery Elle?  I will be using this one a lot.  I really love the striped paper I used for the envelope.  It's from the Brights Collection dsp by Stampin' Up.  I think it channels those old-fashioned striped awnings, perfect for a pizza parlor vibe!

Stamps:  Pizza My Heart (Lawn Fawn)
Ink:  Tuxedo Black (Memento); Gumball Green, Real Red, Crumb Cake, Daffodil Delight (Stampin' Up)
Paper:  White (Papertrey Ink); Brights Collection dsp (Stampin' Up)
Misc:   Envie die (Avery Elle); So Saffron marker, Close to Cocoa marker (Stampin' Up); silver Wink of Stella pen

Tuesday, December 15, 2015

Merry & Bright Tag

I love this sweet, wintry tag!  Of course, I'm partial to cardinals and the bright pop of red in a snowy landscape.  It's one of those projects that made feel giddy while creating it.   :)


I cut my base tag using the Tag Sale #4 die by Papertrey Ink.  I've used this one a lot, since it's one of my favorites.  Notice anything?  Your eyes aren't deceiving you.  I made one tag first and when I made the other three tags a week later, I used a different color of cardstock.  Oops!  I didn't even realize it until I was nearly finished.  The original tag is Spring Rain and the other tags are Aqua Mist.


I cut some pieces of white cardstock with the Stitched Hillside Borders dies by Lawn Fawn, cut them again with the Tag Sale #4 die, and then glittered them to mimic snow.  I love doing that!  Glitter makes me happy.  Sparkly too.  I went to church last Sunday with glitter on my skirt and probably my face as well.   lol   It's all over the house right now.


I stamped some small snowflakes from Tag-Its #8 by Papertrey Ink using VersaMark ink for a subtle snowy background.  After gluing the tag pieces together, I stamped a sentiment from the same set in black ink.  The tree trunk is Dark Chocolate cardstock cut with the Branch Out die by Reverse Confetti. 

After stamping the bird from Swanky Snowdudes on white cardstock, I colored it with Copic markers and glittered the white parts of the hat.  Naturally.  :)  Then I just adhered it to one of the branches.  Paper Smooches has such darling images.  I adore this little bird!  I added a bit of white ribbon for a final touch.  Love.  I had so much fun making these tags.


Stamps:  Swanky Snowdudes (Paper Smooches); Tag-Its #8 (Papertrey Ink)
Ink:  Tuxedo Black (Memento): VersaMark
Paper:  White, Aqua Mist, Spring Rain, Dark Chocolate (Papertrey Ink)
Copic:  R29, R59, G46
Misc:  Tag Sale #4 die (Papertrey Ink); Stitched Hillside Borders dies (Lawn Fawn); Branch Out die (Reverse Confetti); Crystal fine glitter (Martha Stewart); glue pen

Tuesday, November 12, 2013

Season's Tweetings

I stumbled across an adorable card by Kay Miller on her blog here, and just had to CASE it myself.  I knew my little Winter Sparrows set by Lawn Fawn would be perfect, and I also pulled out an old set by Stampin' Up called Snowflakes, one of my favorites.


Love it!  I kept the same layout and colors, substituting the dies and stamps I happen to have.  I stamped my little bird on white cardstock, colored it with Copic markers, and then cut it out.  I stamped the snowflake on a white circle using Spring Rain ink, and then added a branch for my bird using Rich Cocoa ink.  That's the only real change I made from the original design.  I felt my little bird needed grounding, and the branch in Winter Sparrows fit perfectly. 

I embossed white polka dots on the kraft circle using Polka Dot Basics.  (I really need Polka Dot Basics II.  I'd like a stamp with polka dots closer together.  Love my polka dots!)  There is an extra layer of hidden cardstock behind the snowflake to pop it up a bit.  I did the same thing behind the Dark Chocolate circle.  The white snowflake was cut with my Fancy Flakes die.

I used a die included in Blueprints 3 by My Favorite Things to cut the scalloped piece from Spring Rain cardstock, and then stamped it with Netting, a background stamp by Stampin' Up.  After stamping the sentiment, I glued everything together and added faux stitching lines with an Early Espresso marker.  The whole thing was adhered to a Dark Chocolate card base.

Stamps:  Winter Sparrows (Lawn Fawn); Snowflakes, Netting (Stampin' Up); Polka Dot Basics (Papertrey Ink)
Paper:  White, Dark Chocolate, Kraft, Spring Rain (Papertrey Ink)
Ink:  Rich Cocoa (Memento); Spring Rain (Papertrey Ink); VersaMark
Copic:  C1, C3, C5, Y11, B41, B45
Dies:  Circle STAX Set 2; Blueprints 3 (My Favorite Things); Fancy Flakes (Papertrey Ink)
Misc:  white embossing powder (Filigree); Early Espresso marker (Stampin' Up)