Tuesday, September 25, 2012

Packaging a Snowman

It's quite fun that every year the Papertrey Ink blog hop in September lands on my birthday.  What better way to celebrate than to spend the day in the studio?  I admit this month's challenge had me a bit stumped though.  Here it is:

This month it is all about wrapping it up.  Whether you are preparing early for the holidays or have an upcoming birthday or two, have fun experimenting with fabric & felt packaging ideas.  Use any of our Favor It dies with felt and a little hot glue gun action or stitching.  Use a pretty piece of fabric like you would wrapping paper and make a custom tag to coordinate with it.  Not into sewing or gluing?  Wrap a kitchen towel or cloth napkin around a special bottle of wine and top it off with a hand-stamped gift label.  Or rip a strip of fabric to use in place of ribbon and finish it with a pretty handmade gift card.  There are so many different things to try, you will love experimenting to see what you can come up with!  We look forward to seeing your projects!

What to make?  I didn't feel like digging out my sewing machine or hunting for bag patterns.  Nor did I have any presents to wrap.  So I thought I'd use my dies to make some kind of gift.  I remembered seeing a felt snowman ornament using the Shape Up Snowman die when it was released last year.  Voila!  I've been intending to make one of those myself!

How to wrap it?  I went scrounging in my fabric bin and found this aqua fleece which matched beautifully with the aqua I used for the tag and ornament.  (not that it looks like it in the picture!)  The soft fleece looks neat wrapped around the box and echoes the appearance of the felt ornament inside.  I used torn strips of muslin for the knotted bow.


I made a tag using the same colors as my snowman ornament, along with the matching Shape Up Snowman Accessories stamps.  I was surprised to realize that I don't have a Royal Velvet inkpad!  How did I miss that?  I thought I had all the available colors.  I had to substitute Plum Pudding instead.  I sponged around the snowman just a bit with Fine Linen ink.


Oh, you want to see inside?   :)  I stamped a sheet of white tissue paper with snowflakes in both Aqua Mist and Plum Pudding inks.  (same stamps I used on the tag)  Then I sprayed it with some Perfect Pearl Mist to give it a subtle shimmer.  Too subtle actually.  It's very difficult to see even in person.  lol


Underneath that lovely bit of tissue paper, you get your first look at my felt snowman ornament!  I spent several hours working on it.  I really enjoy handwork so it didn't seem long at all.  It's definitely not a quick mass production item, but it's so worth it!


First, I cut the snowman body from Vintage Cream felt.   Then I cut the hat from both Aqua Mist and Royal Velvet felt so I could do a two-color hat.  I cut the mittens from Royal Velvet felt and then hand-cut a strip of Aqua Mist felt for the scarf.  The twig arms are Dark Chocolate felt.

I sewed french knots with black embroidery thread for the eyes and mouth.  I also sewed on some small Royal Velvet buttons with ecru thread.  The nose is just a teeny bit of Terracotta Tile felt that I glued in place.  I glued down the scarf and arms/mittens as well.  I tacked the hat down with some thread underneath the Royal Velvet layer, but I also had to add some glue to the sides to hold it in place.

The most time-consuming part of this ornament is the blanket stitch edging.  I'd actually never done this stitch before, so thank goodness for the internet!  I found some detailed instructions here.   I did each section of the hat individually before gluing them together.  Then I stitched over halfway around the snowman body before adding a little bit of polyester stuffing.  At that point, I just added stuffing as I continued around each remaining section.


Isn't it adorable?  I may make a few more of these for Christmas presents.  Next time, I think I'll avoid blanket stitching right on the twig arms.  (although that does give some added security that they won't fall off)  Making this snowman ornament was a fun way to spend my birthday!


Hope you enjoyed your visit!  Enjoy the rest of the hop and try to come back to my blog once in a while.   I love to share!  :)

Stamps:  Shape Up Snowman Accessories, Snowfall, Rustic Snowflakes (Papertrey Ink)
Paper:  Royal Velvet, Aqua Mist, Rustic Cream (Papertrey Ink)
Ink:  Aqua Mist, Plum Pudding, Fine Linen (Papertrey Ink); Tuxedo Black (Memento)
Felt:  Royal Velvet, Aqua Mist, Vintage Cream, Dark Chocolate, Terracotta Tile (Papertrey Ink)
Misc:  ecru and black embroidery thread (DMC); Royal Velvet buttons (Papertrey Ink); Shape Up Snowman die, Tag Sale #4 die (Papertrey Ink); Standard Circles dies (Spellbinders); Perfect Pearl Mist (Ranger); YR18 (Copic); white tissue paper; polyester fiberfill


Monday, September 24, 2012

More Skeletons

I started flipping through a pad of Halloween paper I purchased a year or two ago and came across this skeleton paper.  I immediately thought of Mr. Bones and made another card using this adorable skeleton stamp.


Fun, huh?  One skeleton is peeking out from behind the center panel since two is always better than one.   :)  I used Smokey Shadow instead of black, because the shade blended better with the patterned paper.  I embossed the sentiment in white and used my herringbone folder to texture the strip of white cardstock.  I like the finished result!

Stamps:  Mr. Bones (Papertrey Ink)
Paper:  White, Smokey Shadow (Papertrey Ink); Halloween paper pad (Recollections)
Ink:  Tuxedo Black (Memento); VersaMark
Misc:  Labels Twenty-Two die (Spellbinders); Herringbone embossing folder (Cuttlebug); white embossing powder (Filigree)

Saturday, September 15, 2012

Don't Worry, Bee Happy

Anyone else got that song stuck in their head now?  :D  I made a pair of cards using the hexagon coverplate die from Papertrey Ink.  Since I used yellow and kraft colors, I just had to pull out my Honey Bees stamp set.  I mean, it was a downright necessity!  It just works perfectly with all those lovely hexagons.  The colors screamed honeycomb.  Who am I to disagree?   :D


Sweet as honey!  lol  I cut the hexagon coverplate out of both the kraft cardstock and yellow patterned paper.  Each card has a kraft card base and the outline portion of the hexagon was adhered first.  (not easy to do with all those skinny lines)

For the "Sweet as Honey" card, I adhered each little yellow hexagon in the open spaces.  (a little tedious, but it looks cool)  Then I glued a few kraft hexagons over top, some plain and some stamped with the honeycomb pattern.  It's difficult to tell in the photo, but those hexagons are slightly raised above all the others as a result.  I stamped the bee and cut it out, placing it over the honeycomb.  (the bee is already hard at work there!)  Then I just added a slightly distressed sentiment and added a wee bit of sponging around the edges.

For the "Bee Happy" card, I stamped the honeycomb pattern inside each open hexagon using Classic Kraft ink.  This one went a lot faster!  lol  Then I stamped the bee on a kraft Labels Four diecut and added my sentiment on two patterned paper flags.  I can't even read it without the song's melody running through my mind.  lol

Simple, but cute.  The hardest part of these cards was figuring out what to add without covering up the background too much.  I like how they both turned out!

Stamps:  Honey Bees (Papertrey Ink)
Paper:  Kraft, White (Papertrey Ink); Delicate Dots (Stampin' Up)
Ink: Tuxedo Black (Memento); Classic Kraft, Harvest Gold (Papertrey Ink)
Misc:  Cover Plate: Hexagon, Double-Ended Banner die (Papertrey Ink); Labels Four die (Spellbinders); distressing tool  

Tuesday, September 11, 2012

Happy Birthday

Here's a card for the September SFYTT sketch challenge.  (photo linked below)  This month's sponsor is Kraftin' Kimmie Stamps and I really love their Moonlight Whispers line.  Since my youngest daughter's birthday was this past Sunday, I used this cute Francesca image holding a stack of cupcakes to make a card for her.


Pink.  Lots of pink.  Her favorite color, of course.   :)   She loves the card and that's really all that matters.  The colors match much better than the picture shows.  It's pretty cute in person!

I raided my paper scraps and found the scalloped vellum piece, strip of lighter pink, and the two pieces of Razzleberry Lemonade paper.  Very convenient!  I kept it simple with very little layering.  Francesca was colored with Copic markers, cut out, and then mounted on an embossed white Labels Eight die cut using pop-dots.  It's difficult to see, but I filled in the cupcake sprinkles with a glitter gel pen for some sparkle.  I stamped the background with a cupcake using a VersaMark inkpad to fill in the empty space.  Then I just stamped the sentiment over top.

Stamps:  Francesca (Kraftin' Kimmie); Eat Cake (Stampin' Up)
Paper:  White, Hibiscus Burst, Vellum (Papertrey Ink); Melon Mambo, Razzleberry Lemonade (Stampin' Up)
Ink:  Tuxedo Black (Memento); VersaMark
Copic:  0, C1, T1, E000, E00, E30, E42, E55, E57, E59, R20, RV13, RV17, Y15, YG25, B41, B91, B95, B97
Misc:  Polka Dots embossing folder (Cuttlebug); Labels Eight die (Spellbinders); Scallop border punch (Stampin' Up); glitter gel pen, pop-dots

Monday, September 10, 2012

Love You

I whipped up this cute little card today.  Seriously.  I got it done and photographed in less than an hour!  lol  Actually, that is pretty fast for me.  I usually deliberate over every little thing.  This time, I had a clear idea from the start and it came together very quickly.

I used the latest sketch from the CPS Card Sketches blog.  (CPS 282)  It really caught my eye with its simple design and double circle.  I pulled out one of my favorite Pure Innocence images from My Favorite Things and got to work right away.


Isn't she adorable?  I colored her with Copic markers and paper-pieced her dress with a print from the Basic Grey Nordic Holiday collection.  Both the Kraft and Pure Poppy layers were embossed using Cuttlebug folders.  For the sentiment, I bent it slightly on my acrylic block to fit around the curve of the bottom circle layer.

I really love this card.  I can see myself making a series of this design using different Pure Innocence girls and embossed textures.  So many possible variations!

Stamps:  Love You With All My Heart (My Favorite Things)
Paper:  Kraft, White, Pure Poppy (Papertrey Ink); Nordic Holiday 6x6 pad (Basic Grey)
Ink:  Tuxedo Black (Memento)
Copic:  0, C1, E000, E00, E30, E42, R20, E55, E57, E59, R24, R29, R59
Misc:  Distressed Stripes, Swiss Dots embossing folders (Cuttlebug); Standard Circles dies (Spellbinders)

Sunday, September 9, 2012

Halloween Greetings

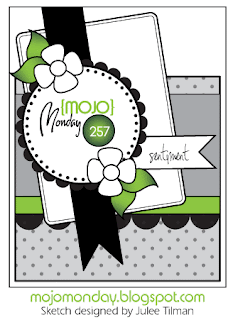
Boy, this was a challenge!  I decided to try my hand at the latest Mojo Monday sketch.  I always look at the sketches every week, but don't often participate because all the layering is a little intimidating.  (at least for me)  This post, however, is something special and I wanted to stretch myself a bit.

Drum roll please....

Today marks the 100th post on this blog.  To quote one of my all-time favorite movies, "Inconceivable!"  :)  It may seem like a small thing, but it's a big accomplishment to me.  It is the result of pushing past fears, feelings of inadequacy, and perfectionism.  The result of allowing myself to play and make mistakes.  To let it all go and just create.  It's wonderful to have a place to share the process.

I'm pretty proud of this card.  It was not an easy sketch and I considered quitting several times.  To push past all that and end up with this fabulous card (if I do say so myself) is something definitely worthy of a one hundredth post!  :)


This card actually pairs really well with the small gift bag I posted last month.  You can see it here.  It's one of those happy coincidences since I didn't plan it at all.  In fact, I started with completely different papers and stamps.  When I couldn't get it to work, I turned to the Basic Grey Eerie pad I happened to have out on my desk and everything evolved from there.

I used three different patterns and layered everything with black for contrast.  The only exception is the Kraft inverted scalloped circle, since my patterned paper was already black and it needed to pop against the web-textured black layer.  Speaking of, I rubbed my VersaMark Dazzle Frost inkpad over the raised web lines to add some subtle sparkle and definition.

I colored the pumpkins with Copics and used them in place of the flowers on the sketch.  I added some grey shading to the ghosts as well.  The leaves were hand cut using a scrap of Ripe Avocado cardstock.  Everything was mounted on an Orange Zest card base to add a great big splash of Halloween color.

Once I figured out what I was doing with all the patterns and layers, this card was quite fun to make.  I may add a little something to the inside, maybe a couple strips of the Eerie papers, but I am very satisfied with the finished card.

So happy I persevered!  I'm giving myself that proverbial pat on the back.  Both for the card and making it to 100 posts!   :)

Stamps:  Boo to You (Verve)
Paper:  Orange Zest, Black, Kraft, White, Ripe Avocado (Papertrey Ink); Eerie 6x6 pad (Basic Grey)
Ink:  Tuxedo Black (Memento); VersaMark Dazzle Frost
Copic:  0, T1, T4, YR12, YR15, YR18, E57, E59
Misc:  Spiderweb embossing folder (Cuttlebug); Standard Circles, Lg Classic Inverted Scalloped Circles (Spellbinders); Double-Ended Banners die (Papertrey Ink); Scallop edge punch (Stampin' Up); 7/8" square punch (EK Success); pop-dots


Wednesday, September 5, 2012

Pumpkin Smiles

You know how you get an idea in your head and try to translate it to paper?  Yeah, it doesn't usually work for me either.  lol  This card isn't quite what I envisioned, but I like it nonetheless.  I just kept messing with it until I was satisfied.   :)


I cut the pumpkin base out of Canyon Clay cardstock.  Believe it or not, the pumpkin sections started as white cardstock.  I sponged them liberally with Canyon Clay ink and then stamped over it with text, using the negative cutout as a stencil.  Some parts stamped darker than others, which gave it a cool mottled look.  Then I glued the sections to the pumpkin base and added a stem.  The face was cut separately and sponged with Dark Chocolate ink

I cut two pieces of grass edging and layered them for fullness.  I cut a spiderweb out of vellum and then stamped a spider below, adding a trail with a white gel pen.  Note to self:  don't stamp the spider over a seam next time!!!  Oops.  Then I just added my sentiment in the opposite corner.  (sponged, of course)  I also sponged the card base with some Fine Linen ink to soften it up.  What can I say?  There's a lot of sponging on this card!

I'm adding this to the Mr. Bones' Halloween Spook Out over at Papertrey Ink.  It's the last day so go check out the rest of the projects linked up.  Too fun!   :)

Stamps:  Spooky Sweets, Background Basics: Text Style (Papertrey Ink)
Paper:  Vintage Cream, Canyon Clay, Dark Chocolate, White, Ripe Avocado (Papertrey Ink)
Ink:  Dark Chocolate, Fine Linen, Canyon Clay (Papertrey Ink)
Misc:  Shape Up Pumpkin die, Shape Up Pumpkin Sections die, Double-Ended Banners die, Spiderweb Trio die (Papertrey Ink); Fresh Cut Grass die (My Favorite Things); white gel pen; 1-1/4" square punch (EK Success)

Tuesday, September 4, 2012

Back to School

I participated in a speed scrap over at the Stuff to Scrap forum last night.  I couldn't pass up the cute kit being offered for doing it.  I nearly forgot about it, but thankfully, we were given two hours to get it done and posted.  Here's my layout:


There were specific instructions to follow about placement, element clusters, and that sort of thing.  I didn't have much time to search through my digital kit stash, but I had recently downloaded several mini kits as part of the Back to School blog hop, so I used those with first day of school pictures of my kids. Don't they look thrilled?   :)

Digital Kits:  Back to School (Scrappin Serenity); Back to School (Queen Bee Scraps); Back to School Paper Pack (The Scrappy Kat); Back to School (Scraps by Andrea)
Font:  Cooper Black 

Monday, September 3, 2012

Dancing Skeletons

I'm popping in to share another Halloween card.  Remember, I did warn you!  lol  I'm also linking it to the Mr. Bones' Halloween Spook Out over on the Papertrey Ink blog.

This card is the result of sheer experimentation.  I had no real plan in my head at all.  I started with embossed diecut skeletons and didn't align them very well, so I used them as masks instead.  I spritzed some pearl spray over the skeleton masks on some black cardstock and ended up with a cool shadow look.  Then I embossed some skeletons in the unspritzed areas.  That's where I got stuck.  lol  I wasn't sure what to do with it!


I ended up matting it with black on a white card base, and then added a black piece from a Top Note diecut on the right side.  (got it out of my scraps!)  After adding some embossed spiders in the left corner, I used my white Distress Marker to add web trails.
  

Last spring, I picked up a set of uppercase alphabet dies at a used sale for a great price.  I wanted them to make my own chipboard letters.  About time I used them, huh?  I covered the letters with graphite glitter to add lots of sparkle.  It looks very different than the spritzed piece, but they complement each other nicely.  One is more subtle, the other not so much!  :)


For having no real vision at the start, the card turned out great.  I really love these skeletons.  So cute!  I will definitely be using them again.   :)

Stamps:  Mr. Bones (Papertrey Ink)
Paper:  True Black, White (Papertrey Ink)
Ink:  VersaMark
Misc:  Mr. Bones dies (Papertrey Ink); Top Note die (Stampin' Up); Fun Serif Uppercase dies (Sizzix); white embossing powder (Filigree); black embossing powder (Embossing Arts Co), Perfect Pearl mist (Ranger); Graphite glitter (Martha Stewart); Picket Fence Distress Marker (Ranger)

Saturday, September 1, 2012

Ghostly Greetings

Confession time.  I have a thing for Halloween stamps.  My collection of Halloween images rivals my Christmas collection, which leads to another confession.  I haven't used them very much.  I'll pause now for a collective gasp.  Yes, it's true.  Therefore, I have decided to change all that.  My new (unofficial) goal is to use every Halloween set I own to make a card.  Ambitious, I know.  I thought it was only fair to warn you!  Expect lots of adorable ghosts, witches, and other assorted creatures over the next two months.  :)


This one's pretty simple and self-explanatory.  I die cut a few ghosts, added a splash of patterned paper, and embossed the sentiment.  (speaking of, I think my VersaMark inkpad is dying since the embossing turned out patchy - kind of works with the ghostly thing anyway)  I decorated the inside of the card to match.  I'm not sure what purple I used for the ghost.  I used a piece from my scrap drawer and can't seem to find the match.  Oops.

I'm linking this to the Mr. Bones Halloween Spook Out here.  Check it out if you dare!  lol

Stamps:  Happy Haunting (Papertrey Ink)
Paper:  True Black, White, Simply Chartreuse, Orange Zest (Papertrey Ink); Spooky Treat digital paper (Betty Lynns Design)
Ink:  Tuxedo Black (Memento); Fresh Snow (Papertrey Ink); VersaMark
Misc:  Happy Haunting die (Papertrey Ink); white embossing powder (Filigree)