Tuesday, December 31, 2013

Looking Back: Some Favorite Projects From 2013

It's time for an annual look-back at the year to showcase a few of my favorite creations.  This was my blog's third year, but I posted quite a bit less than last year.  (although still more than the first year!)  I had some mojo droughts, so to speak, where I didn't create much at all, and also some heart-wrenching experiences that put my creativity in deep freeze for a while.  Life has a way of doing that sometimes.  My unofficial word for the year was "change" and change definitely happened in both expected and unexpected ways.  I'm ready to put this year behind me and move on.  Still, despite less output than originally planned, I love what I made.

I'm going to show the pictures of my thirteen favorite projects in honor of the year 2013.  (in no particular order)  Click on them to go to the original post for more info about each one.

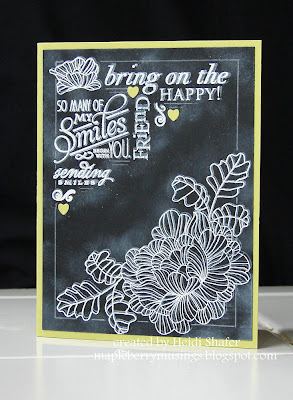
It was fun to try the chalkboard technique for this card, plus I just adore that gorgeous Limeade Ice color.

http://mapleberrymusings.blogspot.com/2013/01/chalkboard-bloom.html

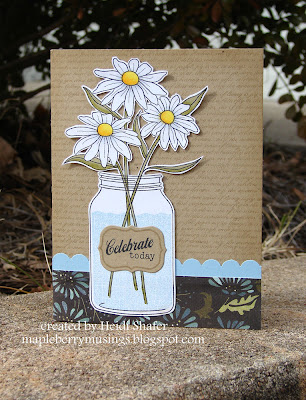
I got back into reading books this year and this sweet Bella stamp is just adorable.

http://mapleberrymusings.blogspot.com/2013/02/bookwormabella-with-touch-of-bling.html

Pink and black, what's not to love?  I need to make a whole set of these for myself.

http://mapleberrymusings.blogspot.com/2013/02/peonies-and-monograms.html

I made this for a Splitcoaststampers challenge.  It was a true labor of love, and it makes me smile every time I look at it.

http://mapleberrymusings.blogspot.com/2013/02/welcome-to-neighborhood.html

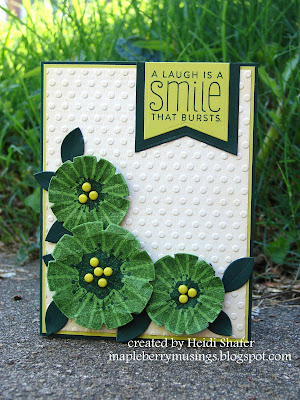
Love these greens!  Polka dots and chartreuse brads put it over the top.

http://mapleberrymusings.blogspot.com/2013/05/smile-its-pti-blog-hop.html

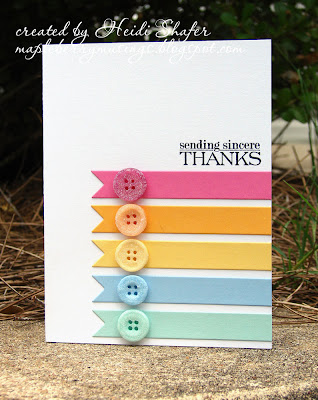
Glitter buttons!  So much fun and such a simple card.

http://mapleberrymusings.blogspot.com/2013/08/pti-fast-food-blog-hop-challenge.html

This card brings fond memories of Kool-Aid dyeing watercolor paper butterflies with my daughter for the PTI Stamp-a-Faire back in August.  Plus, we won Top Chef!  :D

http://mapleberrymusings.blogspot.com/2013/08/stamp-faire-2013-staining-techniques.html

I love the soft colors and ridiculous amounts of glitter in this card.

http://mapleberrymusings.blogspot.com/2013/08/stamp-faire-sweet-sugar-coated.html

I made this birthday card for my sister.  Love the pretty patterned papers!

http://mapleberrymusings.blogspot.com/2013/08/may-this-year-be-your-best-ever.html

This card was a CASE using my own supplies, but I still really love it.   :)

http://mapleberrymusings.blogspot.com/2013/11/seasons-tweetings.html

Love this color combo, plus I really love snowflakes.

http://mapleberrymusings.blogspot.com/2013/11/joyeux-noel.html

Love the bright pink against the black and that sassy little PI girl.

http://mapleberrymusings.blogspot.com/2013/11/hey-sassy-pants.html

This was a commissioned birthday card I made earlier this year and it's still one of my top fave cards I've ever made.

http://mapleberrymusings.blogspot.com/2013/01/daisy-jar.html

So there you have it!  Just a sampling of my 47 posts this year.  I made a new card today that I will post once the sun comes up tomorrow and I have better light for photographs.  Now, it's time to sign off and go welcome in the new year with friends and family.  The table is spread and the wassail is simmering.   Cheers!

Monday, December 30, 2013

Christmas tags

I got sick the week of Christmas.  Totally not in the plans.  Of course, who ever plans on being sick?  Thankfully, we could just laze around the house.  My husband took the week off, my kids took care of themselves, and I slept a lot.  Seriously.  I can't remember the last time I took so many naps.  I made these tags for this year's Christmas gifts.  Last minute, naturally, but at least it was before I got sick!  :) 

I kept the tags very simple.  I pulled out my new Snow Day set for the snowman tags.  (which incidentally were the last set I made)  I embossed the snowman using white embossing powder and stamped the face using StazOn ink.  The little carrot noses were stamped separately and cut out.  The sentiment is from a PTI set called Tiny Treats: Christmas.  It fit perfectly in the space left on the tag.


This next set uses Watercolor Winter, a set released last year, and finally got to see some ink.  I love the two-step sketchy style of the images.  The sentiment is from a PTI set called Rustic Snowflakes.


My third set of tags uses an old Stampin' Up set called Peace On Earth in companion with another set called Peaceful Wishes.  I used Copic markers to color the globe ornament.  The word "peace" comes from a PTI set called Holiday Tree.


My last set of tags are actually the first ones I made.  I stamped the wreath image from Glad Tidings and colored it with Copics.  I added red Stickles to the berries for extra sparkle.  Quick and easy!


Stamps:  Snow Day (Stampin' Up); Tiny Treats: Christmas (Papertrey Ink)
Paper:  Spring Rain, White (Papertrey Ink)
Ink:  Oyster White (ColorBox); Pumpkin Pie (Stampin' Up); Dark Chocolate (Papertrey Ink); Jet Black (StazOn)
Misc:  Tag Sale #3 die (Papertrey Ink); white embossing powder (Filigree)

Stamps:  Watercolor Winter (Stampin' Up); Rustic Snowflakes (Papertrey Ink)
Paper:  White (Papertrey Ink); Real Red (Stampin' Up)
Ink:  Tuxedo Black (Memento)
Misc:  Real Red, Handsome Hunter markers (Stampin' Up); Tag Sale #1 die (Papertrey Ink)

Stamps:  Peace On Earth, Peaceful Wishes (Stampin' Up); Holiday Tree (Papertrey Ink)
Paper:  White (Papertrey Ink)
Ink:  Tuxedo Black (Memento); Handsome Hunter (Stampin' Up)
Copic:  0, C1, B41, B45, G24, G28, YR23
Misc:  Tag Sale #5 die (Papertrey Ink); Basic Black marker (Stampin' Up)

Stamps:  Glad Tidings (Verve)
Paper:  White (Papertrey Ink)
Ink:  Tuxedo Black (Memento)
Copic:  G46, R29
Misc:  Tag Sale #4 die (Papertrey Ink); Xmas Red Stickles


Wednesday, November 20, 2013

Hey, Sassy Pants

I print tons of sketches with good intentions of using them to make cards.  I like to think about them... mull over how to use them...and usually the deadlines pass before I do.  Only a few sketches actually get made into cards.  The newest weekly sketch for My Favorite Things was posted this morning.  Today was one of those rare occasions where I used it immediately.  I had an idea and got right into the studio.


http://www.mftstamps.com/blog/stamp-and-win-with-this-weeks-card-sketch-151/

For the polka dots on the sketch, I stamped a strip from the Distressed Diamonds set and embossed it a vibrant pink.  I love how it pops against the black background!  I pulled out an adorable Pure Innocence girl for my main image.  Her little attitude makes me smile.  I colored her with Copic markers and paper-pieced her dress using a pattern from the retired Razzleberry Lemonade pack by Stampin' Up.  Since the sentiment stamp is photopolymer, I curved it on my acrylic block to fit the circle.  So much fun and just a bit sassy!

Stamps:  Cute-a-tude (My Favorite Things)
Paper:  White, True Black (Papertrey Ink); Razzleberry Lemonade (Stampin' Up)
Ink:  Tuxedo Black (Memento); VersaMark
Copic:  0, C1, E000, E00, E30, E42, E55, E47, E59, R20, RV13, RV14, RV17
Misc:  Melon Mambo embossing powder (Stampin' Up); Standard Circles Large and Small dies (Spellbinders)

Monday, November 18, 2013

Winged Love

I made this card using Freshly Made Sketches #112.  It's a simple sketch design consisting of three off-set lines.  I kept my card very simple as well.  I originally prepared three sets of hearts, but soon realized that they were too big for what I had in mind.  The large sentiment caught my eye and plan B was born!  :)  Since it uses a common shape (the heart), I'm adding to the Verve Diva Dare too.
http://freshlymadesketches.blogspot.com/2013/11/freshly-made-sketches-112.html

I stamped the word LOVE three times to create the top and bottom horizontal lines.  It's part of a larger sentiment, but I selectively inked to use just the one word.  For the middle line, I stamped and cut out a large wavy line heart using Real Red ink.  The two wings were stamped in Smoky Slate ink, cut out, and then glittered using Stickles.  Simple, but very striking!

Stamps:  Wings of Love (Verve)
Paper:  Real Red (Stampin' Up); White (Papertrey Ink)
Ink:  Real Red, Smoky Slate (Stampin' Up); Tuxedo Black (Memento)
Misc:  Frosted Lace Stickles; pop-dots

Saturday, November 16, 2013

Joyeux Noel

Have I mentioned before how much I love snowflakes?  I have a snow-themed Christmas tree with white lights and it makes me smile every Christmas season.  I can't wait to set it up in two weeks!  It's hard to pass up snowflake stamps in their infinite variety.  I love the unique designs!

I already had this Verve set out on my desk from my last card, since I used a sentiment from it, and wanted to make a card with the set before putting it away.  I love the pretty snowflakes!  I recently got the new Smoky Slate color from Stampin' Up.  The markers for Smoky Slate and Soft Sky were laying side by side in my bag, and it struck me how pretty the two colors were together, and just how perfect they would be for a wintry card.


I used the latest Deconstructed sketch (found here).  I'm also posting it for the Verve Diva Dare challenge to use a common shape.  What could be more common than squares?  :)  The snowflakes could count for a common shape too.  They certainly are some of my favorite shapes!  :D


I embossed the Smoky Slate cardstock with a pretty tile pattern by Cuttlebug.  I stamped the Soft Sky cardstock with smaller versions of the snowflake, and for the angled lines in the sketch, I used Scor-Tape to make pretty strips of glitter.  I topped it all off with a large snowflake stamped in Soft Sky and enhanced with glittery Stickles.  Snowflakes and glitter naturally go together!  (any excuse, right?)

Stamps:  Glad Tidings (Verve)
Paper:  Soft Sky, Smoky Slate (Stampin' Up); White (Papertrey Ink)
Ink:  Soft Sky, Smoky Slate (Stampin' Up)
Misc:  Decorative Tile embossing folder (Cuttlebug); Frosted Lace Stickles; Carrara Marble glitter (Martha Stewart); Scor-Tape, pop-dots

Thursday, November 14, 2013

Razzleberry Mittens

The colors for this week's ColourQ challenge caught my eye.  I had previously pulled out my Make a Mitten stamp set to use for a card and it was sitting on my desk, so when I saw the color challenge, I knew the warm rich colors were just perfect for a fall sweater-type look.  Of course, sometimes the vision in my head doesn't always come out easily.  I refuse to admit how long I spent on this card.  It looks simple and we'll just leave it at that.  :)

http://colourq.blogspot.com/2013/11/colourq-challenge-215.html
photo linked


I used the knit heart border in all four colors directly on my white card base to create a knitted sweater-style background.  I stamped the lines border on a piece of Rich Razzleberry cardstock.  The border strip was created with layers of Pumpkin Pie, Bravo Burgundy, and Crushed Curry cardstock that were distressed along the edges.  A small motif from the Make a Mitten set was also stamped using Crushed Curry ink.

I stamped the mittens in Rich Razzleberry ink and then cut them out.  I added a short piece of natural twine to mimic old-fashioned mittens attached by a cord.  I remember having a pair of those when I was a kid!  I stamped my sentiment in black on a white circle, added faux stitching lines with a Crushed Curry marker, and then placed the mittens using pop-dots for dimension.  The whole thing was matted with a Crushed Curry circle and then raised up just slightly by adding extra layers of cardstock behind.  I wanted a little separation but not quite as much as pop-dots would add.

The weather here turned quite cold two days ago.  In fact, we had a short snow flurry!  My daughter was super excited.  Very wet snowflakes and no sticking, but still cool nonetheless.  We don't get snow often in North Carolina.  (except for the mountains, of course)  It makes me wonder if we are in for a harsh winter.  Only time will tell.  Either way, this card is a great way to send some warm winter wishes!

Stamps:  Make a Mitten (Stampin' Up); Glad Tidings (Verve)
Paper:  Bravo Burgundy, Pumpkin Pie, Rich Razzleberry, Crushed Curry (Stampin' Up); White (Papertrey Ink)
Ink:  Bravo Burgundy, Pumpkin Pie, Rich Razzleberry, Crushed Curry (Stampin' Up); Tuxedo Black (Memento)
Misc:  Standard Circles Large & Small dies (Spellbinders); Crushed Curry marker (Stampin' Up); solid natural twine (The Twinery); distress tool, pop-dots

Tuesday, November 12, 2013

Season's Tweetings

I stumbled across an adorable card by Kay Miller on her blog here, and just had to CASE it myself.  I knew my little Winter Sparrows set by Lawn Fawn would be perfect, and I also pulled out an old set by Stampin' Up called Snowflakes, one of my favorites.


Love it!  I kept the same layout and colors, substituting the dies and stamps I happen to have.  I stamped my little bird on white cardstock, colored it with Copic markers, and then cut it out.  I stamped the snowflake on a white circle using Spring Rain ink, and then added a branch for my bird using Rich Cocoa ink.  That's the only real change I made from the original design.  I felt my little bird needed grounding, and the branch in Winter Sparrows fit perfectly. 

I embossed white polka dots on the kraft circle using Polka Dot Basics.  (I really need Polka Dot Basics II.  I'd like a stamp with polka dots closer together.  Love my polka dots!)  There is an extra layer of hidden cardstock behind the snowflake to pop it up a bit.  I did the same thing behind the Dark Chocolate circle.  The white snowflake was cut with my Fancy Flakes die.

I used a die included in Blueprints 3 by My Favorite Things to cut the scalloped piece from Spring Rain cardstock, and then stamped it with Netting, a background stamp by Stampin' Up.  After stamping the sentiment, I glued everything together and added faux stitching lines with an Early Espresso marker.  The whole thing was adhered to a Dark Chocolate card base.

Stamps:  Winter Sparrows (Lawn Fawn); Snowflakes, Netting (Stampin' Up); Polka Dot Basics (Papertrey Ink)
Paper:  White, Dark Chocolate, Kraft, Spring Rain (Papertrey Ink)
Ink:  Rich Cocoa (Memento); Spring Rain (Papertrey Ink); VersaMark
Copic:  C1, C3, C5, Y11, B41, B45
Dies:  Circle STAX Set 2; Blueprints 3 (My Favorite Things); Fancy Flakes (Papertrey Ink)
Misc:  white embossing powder (Filigree); Early Espresso marker (Stampin' Up)
 

Monday, November 11, 2013

Remember

On this Veteran's Day, I want to say thank you to all who serve in our military, both past and present.  Thank you for the sacrifices you make in my behalf.  It was my privilege to perform the music of the Andrews Sisters for three years, and during that time, I met many veterans of World War II and subsequent wars, as well as many soldiers currently in service.  My father served as an Army officer for twenty-one years.  My father-in-law served in the Navy.  I know the sacrifices the families make too.   

Thank you.  I will never forget.


Stamps:  Pretty Poppies (My Favorite Things); Remember (Papertrey Ink)
Paper:  White, Kraft, True Black (Papertrey Ink)
Ink:  Real Red, Old Olive (Stampin' Up); Tuxedo Black (Memento)
Misc:  Poppies & Leaves dies (My Favorite Things); Basic Black marker (Stampin' Up)

Thursday, October 31, 2013

Happy Halloween!

I wanted to pop in and post a picture of the Halloween tags in action.  I made some molded candy pretzel broomsticks to give my seminary students.  I used a Wilton kit that I purchased at Michaels.  It came with this fun broomstick candy mold as well as a witch hat mold.  Those little candy spiders were included too.  Aren't they just too fun?


You'll have to pardon the indoor pics.  I took them before the sun comes up since seminary class starts at 6am.  A light tent would sure be nice for moments like that.  Check the two previous posts for details about the stamped tags.  I just had to post a pic today of the finished product.  After all, it is Halloween!   :)

Monday, October 28, 2013

Another Halloween Tag

I made another Halloween tag since I need six of them.  This time I used a large spider from Spooky Sweets.  It's a natural choice since the web is already there.  :)


Yes, I hand cut the spider.  That was a bit tricky with those skinny legs!  Thankfully the spiderweb itself is a die!  :)


This tag makes a great addition to the set of five tags that I posted last Friday.  (just scroll down to the previous post)

Stamps:  Spooky Sweets, Trick or Treat (Papertrey Ink)
Paper:  Orange Zest, White, True Black (Papertrey Ink)
Ink:  Tuxedo Black (Memento)
Misc:  Spider Web Trio die (Papertrey Ink); pop-dots, Copic YR18 marker

Friday, October 25, 2013

Halloween Tags

It's time for the monthly Papertrey Ink blog hop!  The challenge was to make a set of five tags.  All of the tags in the inspiration photo were for Christmas, but I really wanted to make some Halloween tags.  I plan to give my seminary students a little treat next week and these tags will be perfect.  :)

Warning:  lots of photos ahead.  I went a little crazy with the camera.


Aren't they cute?  I got my inspiration from tags done by Audrey Tokach and posted on her blog Pink Ink Originals here.  She used stamps by Mama Elephant, but I pulled out several of my Halloween sets by Papertrey Ink.  As I was putting these all together, I was squealing over the cuteness.  I really love how they turned out!  Here are closeups of each tag.


So much fun!  I mixed up images from five different stamp sets.  I may have a weakness for Halloween sets.  Just sayin'.  :D  I popped up parts of them for dimension.


The tags are pretty straightforward.  I diecut the spiderwebs and adhered them in the upper right corner.  I diecut and stamped my various Halloween images, although the bats and skeleton were hand cut.  I used Copic markers to color one of the pumpkins and also to add a little color to the sentiment on each tag.

It felt so good to be creating again.  This year has been tough on me and studio time has been rather sporadic.  I really need to be in there more often.  It's my happy place!  :)


You can find the other blog hop entries here.  Plenty of great ideas for Christmas!  I appear to be the only rebel.  lol

Stamps:  Mr. Bones, Polka Dot Parade #7, Polka Dot Parade #8, Spooky Sweets, Trick or Treat (Papertrey Ink)
Paper:  White, Limeade Ice, Orange Zest, True Black, Dark Chocolate (Papertrey Ink)
Ink:  Tuxedo Black (Memento); Orange Zest (Papertrey Ink)
Dies:  Tag Sale #3, Mr. Bones, Polka Dot Parade #7, Polka Dot Parade #8, Spider Web Trio (Papertrey Ink)
Copic:  YG11, YR12, YR15, YR18, E57, E59
Misc:  black and white baker's twine, pop-dots

Wednesday, September 25, 2013

Christmas Wreath

I'm quickly popping in to post my card for this month's Papertrey Ink blog hop.
The challenge for September is wreaths, so I created one using Happiness in Bloom Leaves dies and bright red Stickles.  My original plan was to use the leaf dies for an autumn wreath, but quickly realized that they were too big for what I had in mind.  I switched gears and made a Christmas wreath instead.


It's quite simple.  I layered the two sizes of pine-style fronds using Pinefeather cardstock, and added dots of red Stickles for berries.  The bottom piece of Dark Chocolate cardstock is stamped with the matching ink using Background Basics: Text Style.  I stamped the sentiment on a Labels Four diecut and added more pine fronds behind.  I added lines with a marker to fill some of the white space.

I had one minor setback in the process when I accidently smeared some of the Stickles berries before they were dry.  Oops!  Thankfully not too badly.  lol

Stamps: Background Basics: Text Style, Vintage Ornaments (Papertrey Ink)
Paper:  White, Dark Chocolate, Pinefeather (Papertrey Ink)
Ink:  Dark Chocolate (Papertrey Ink)
Misc:  Christmas Red Stickles glitter glue, Labels Four die (Spellbinders); Happiness in Bloom Leaves dies (Papertrey Ink); Chocolate Chip marker (Stampin' Up)