I wanted to pop in and post a picture of the Halloween tags in action. I made some molded candy pretzel broomsticks to give my seminary students. I used a Wilton kit that I purchased at Michaels. It came with this fun broomstick candy mold as well as a witch hat mold. Those little candy spiders were included too. Aren't they just too fun?
You'll have to pardon the indoor pics. I took them before the sun comes up since seminary class starts at 6am. A light tent would sure be nice for moments like that. Check the two previous posts for details about the stamped tags. I just had to post a pic today of the finished product. After all, it is Halloween! :)
Thursday, October 31, 2013
Monday, October 28, 2013
Another Halloween Tag
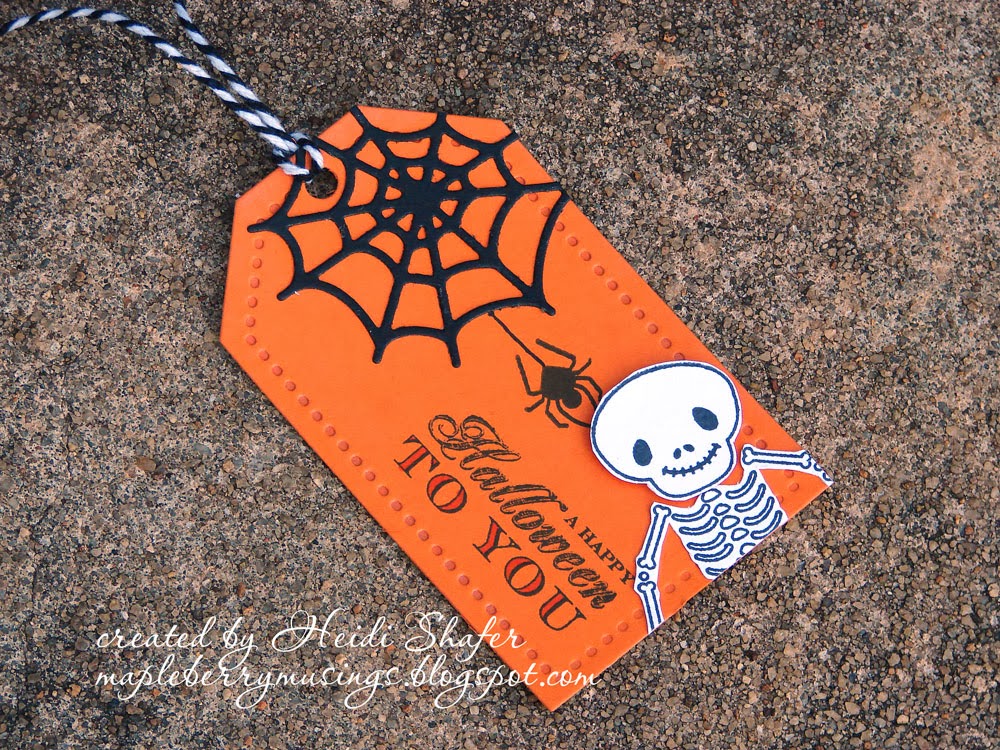
I made another Halloween tag since I need six of them. This time I used a large spider from Spooky Sweets. It's a natural choice since the web is already there. :)
Yes, I hand cut the spider. That was a bit tricky with those skinny legs! Thankfully the spiderweb itself is a die! :)
This tag makes a great addition to the set of five tags that I posted last Friday. (just scroll down to the previous post)
Stamps: Spooky Sweets, Trick or Treat (Papertrey Ink)
Paper: Orange Zest, White, True Black (Papertrey Ink)
Ink: Tuxedo Black (Memento)
Misc: Spider Web Trio die (Papertrey Ink); pop-dots, Copic YR18 marker
Yes, I hand cut the spider. That was a bit tricky with those skinny legs! Thankfully the spiderweb itself is a die! :)
This tag makes a great addition to the set of five tags that I posted last Friday. (just scroll down to the previous post)
Stamps: Spooky Sweets, Trick or Treat (Papertrey Ink)
Paper: Orange Zest, White, True Black (Papertrey Ink)
Ink: Tuxedo Black (Memento)
Misc: Spider Web Trio die (Papertrey Ink); pop-dots, Copic YR18 marker
Labels:
Halloween,
Papertrey Ink,
Tags
Friday, October 25, 2013
Halloween Tags
It's time for the monthly Papertrey Ink blog hop! The challenge was to make a set of five tags. All of the tags in the inspiration photo were for Christmas, but I really wanted to make some Halloween tags. I plan to give my seminary students a little treat next week and these tags will be perfect. :)
Warning: lots of photos ahead. I went a little crazy with the camera.
Aren't they cute? I got my inspiration from tags done by Audrey Tokach and posted on her blog Pink Ink Originals here. She used stamps by Mama Elephant, but I pulled out several of my Halloween sets by Papertrey Ink. As I was putting these all together, I was squealing over the cuteness. I really love how they turned out! Here are closeups of each tag.
So much fun! I mixed up images from five different stamp sets. I may have a weakness for Halloween sets. Just sayin'. :D I popped up parts of them for dimension.
The tags are pretty straightforward. I diecut the spiderwebs and adhered them in the upper right corner. I diecut and stamped my various Halloween images, although the bats and skeleton were hand cut. I used Copic markers to color one of the pumpkins and also to add a little color to the sentiment on each tag.
It felt so good to be creating again. This year has been tough on me and studio time has been rather sporadic. I really need to be in there more often. It's my happy place! :)
You can find the other blog hop entries here. Plenty of great ideas for Christmas! I appear to be the only rebel. lol
Stamps: Mr. Bones, Polka Dot Parade #7, Polka Dot Parade #8, Spooky Sweets, Trick or Treat (Papertrey Ink)
Paper: White, Limeade Ice, Orange Zest, True Black, Dark Chocolate (Papertrey Ink)
Ink: Tuxedo Black (Memento); Orange Zest (Papertrey Ink)
Dies: Tag Sale #3, Mr. Bones, Polka Dot Parade #7, Polka Dot Parade #8, Spider Web Trio (Papertrey Ink)
Copic: YG11, YR12, YR15, YR18, E57, E59
Misc: black and white baker's twine, pop-dots
Warning: lots of photos ahead. I went a little crazy with the camera.
Aren't they cute? I got my inspiration from tags done by Audrey Tokach and posted on her blog Pink Ink Originals here. She used stamps by Mama Elephant, but I pulled out several of my Halloween sets by Papertrey Ink. As I was putting these all together, I was squealing over the cuteness. I really love how they turned out! Here are closeups of each tag.
So much fun! I mixed up images from five different stamp sets. I may have a weakness for Halloween sets. Just sayin'. :D I popped up parts of them for dimension.
The tags are pretty straightforward. I diecut the spiderwebs and adhered them in the upper right corner. I diecut and stamped my various Halloween images, although the bats and skeleton were hand cut. I used Copic markers to color one of the pumpkins and also to add a little color to the sentiment on each tag.
It felt so good to be creating again. This year has been tough on me and studio time has been rather sporadic. I really need to be in there more often. It's my happy place! :)
You can find the other blog hop entries here. Plenty of great ideas for Christmas! I appear to be the only rebel. lol
Stamps: Mr. Bones, Polka Dot Parade #7, Polka Dot Parade #8, Spooky Sweets, Trick or Treat (Papertrey Ink)
Paper: White, Limeade Ice, Orange Zest, True Black, Dark Chocolate (Papertrey Ink)
Ink: Tuxedo Black (Memento); Orange Zest (Papertrey Ink)
Dies: Tag Sale #3, Mr. Bones, Polka Dot Parade #7, Polka Dot Parade #8, Spider Web Trio (Papertrey Ink)
Copic: YG11, YR12, YR15, YR18, E57, E59
Misc: black and white baker's twine, pop-dots
Labels:
Halloween,
Papertrey Ink,
Tags
Wednesday, September 25, 2013
Christmas Wreath
I'm quickly popping in to post my card for this month's Papertrey Ink blog hop.
The challenge for September is wreaths, so I created one using Happiness in Bloom Leaves dies and bright red Stickles. My original plan was to use the leaf dies for an autumn wreath, but quickly realized that they were too big for what I had in mind. I switched gears and made a Christmas wreath instead.
It's quite simple. I layered the two sizes of pine-style fronds using Pinefeather cardstock, and added dots of red Stickles for berries. The bottom piece of Dark Chocolate cardstock is stamped with the matching ink using Background Basics: Text Style. I stamped the sentiment on a Labels Four diecut and added more pine fronds behind. I added lines with a marker to fill some of the white space.
I had one minor setback in the process when I accidently smeared some of the Stickles berries before they were dry. Oops! Thankfully not too badly. lol
Stamps: Background Basics: Text Style, Vintage Ornaments (Papertrey Ink)
Paper: White, Dark Chocolate, Pinefeather (Papertrey Ink)
Ink: Dark Chocolate (Papertrey Ink)
Misc: Christmas Red Stickles glitter glue, Labels Four die (Spellbinders); Happiness in Bloom Leaves dies (Papertrey Ink); Chocolate Chip marker (Stampin' Up)
The challenge for September is wreaths, so I created one using Happiness in Bloom Leaves dies and bright red Stickles. My original plan was to use the leaf dies for an autumn wreath, but quickly realized that they were too big for what I had in mind. I switched gears and made a Christmas wreath instead.
It's quite simple. I layered the two sizes of pine-style fronds using Pinefeather cardstock, and added dots of red Stickles for berries. The bottom piece of Dark Chocolate cardstock is stamped with the matching ink using Background Basics: Text Style. I stamped the sentiment on a Labels Four diecut and added more pine fronds behind. I added lines with a marker to fill some of the white space.
I had one minor setback in the process when I accidently smeared some of the Stickles berries before they were dry. Oops! Thankfully not too badly. lol
Stamps: Background Basics: Text Style, Vintage Ornaments (Papertrey Ink)
Paper: White, Dark Chocolate, Pinefeather (Papertrey Ink)
Ink: Dark Chocolate (Papertrey Ink)
Misc: Christmas Red Stickles glitter glue, Labels Four die (Spellbinders); Happiness in Bloom Leaves dies (Papertrey Ink); Chocolate Chip marker (Stampin' Up)
Labels:
Christmas,
Papertrey Ink
Friday, August 30, 2013
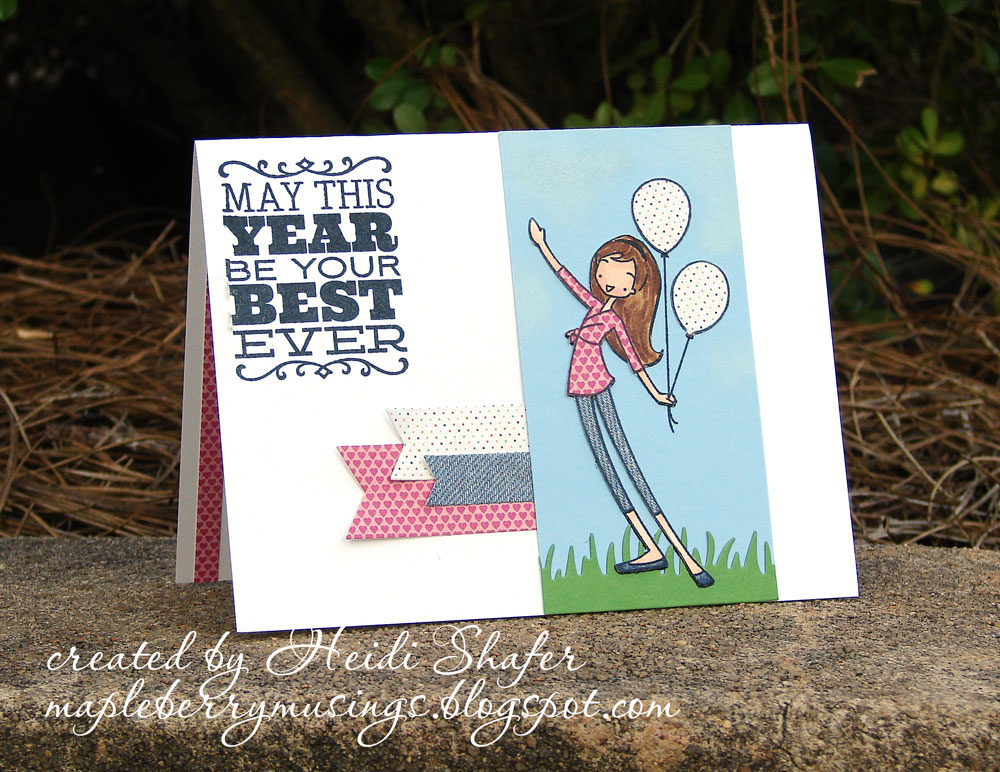
May this year be your best ever
I have a confession to make. I'm not too great at sending birthday cards. I have good intentions! Just not the greatest follow-through. I missed both my sister's and mom's birthdays this summer. {hangs head in shame} Luckily, I get to see both of them this weekend when I head out to take my oldest daughter to college. I found a great card in my stash for my mom. (previously posted here) This card is the one I just made for my sister. Love it!
It's a very simple design and came together quickly, except for the paper piecing, which took time to cut out. Several of those pieces are quite narrow! I used some pretty patterned paper from Basic Grey's Knee Highs line.
Inside the card, I used another narrow strip of patterned paper and stamped my belated birthday sentiment. (since my card is, you know, over two months late)
So happy with this card! I hope my sister really likes it. Of course, it will help that a present accompanies it. lol :)
Stamps: Big Birthday Wishes, Birthday Sentiments (My Favorite Things)
Paper: White, Spring Rain, Leaf Green (Papertrey Ink); Knee Highs 6x6 pad (Basic Grey); denim paper (K&Company)
Ink: Tuxedo Black (Memento)
Copic: E000, E00, E30, E42, R20, C5, BV29, E55, E57, E59
Misc: Fishtail Flags STAX dies, Fishtail Flags Layers STAX dies, Grassy Edges die (My Favorite Things)
I used the newest sketch from Freshly Made Sketches which you can see on their blog here. I love their CAS style sketches. They're great for jump-starting a card design.
It's a very simple design and came together quickly, except for the paper piecing, which took time to cut out. Several of those pieces are quite narrow! I used some pretty patterned paper from Basic Grey's Knee Highs line.
Inside the card, I used another narrow strip of patterned paper and stamped my belated birthday sentiment. (since my card is, you know, over two months late)
So happy with this card! I hope my sister really likes it. Of course, it will help that a present accompanies it. lol :)
Stamps: Big Birthday Wishes, Birthday Sentiments (My Favorite Things)
Paper: White, Spring Rain, Leaf Green (Papertrey Ink); Knee Highs 6x6 pad (Basic Grey); denim paper (K&Company)
Ink: Tuxedo Black (Memento)
Copic: E000, E00, E30, E42, R20, C5, BV29, E55, E57, E59
Misc: Fishtail Flags STAX dies, Fishtail Flags Layers STAX dies, Grassy Edges die (My Favorite Things)
Labels:
Birthday,
My Favorite Things,
Sketch Challenge
Tuesday, August 27, 2013
Seriously. Geeking. Out.
Can you believe it??!! There are no words to describe how excited Emily and I are about this announcement. We started jumping up and down like crazy people when we saw THIS.
You can see the announcement on Nichole Heady's blog right here. How cool is that??!!
It was a personal goal of mine to complete all ten Stamp-a-faire challenges. Lack of enough sleep wasn't going to stop me. :) I was already feeling great for achieving my goal. It sure wasn't easy! I didn't expect to win Top Chef.
Seriously. Geeking. Out.
Thanks to Papertrey Ink for a fun weekend of challenges, inspiration, and stamping! I can't wait to spend that gift certificate. :)
You can see the announcement on Nichole Heady's blog right here. How cool is that??!!
It was a personal goal of mine to complete all ten Stamp-a-faire challenges. Lack of enough sleep wasn't going to stop me. :) I was already feeling great for achieving my goal. It sure wasn't easy! I didn't expect to win Top Chef.
Seriously. Geeking. Out.
Thanks to Papertrey Ink for a fun weekend of challenges, inspiration, and stamping! I can't wait to spend that gift certificate. :)
Labels:
Papertrey Ink,
Stamp-a-Faire
Monday, August 26, 2013
Stamp-a-Faire: Sweet Sugar Coated Embellishments
Woohoo! Last card for the Stamp-a-Faire challenges! I managed to do every single one. (by the skin of my teeth) It was definitely a challenge to do so many projects in one weekend. I wasn't entirely sure I would make it by the deadline today. I'm not a fast stamper, plus it takes time to photograph each project, upload and edit the pictures, and write the blog posts. Whew!
Glitter was the star of this challenge. I actually used glitter on quite a few of my Stamp-a-Faire cards. For this one, I decided to create a snowy winter scene.
Check out all that sparkle! I first stamped and diecut my pine tree. For the snow, I added raised globs of liquid glue (a la Dawn McVey) to the branch edges and then shook on a healthy dose of glitter. I did the same thing to my white hill edges and snowman. This was all done last night so it could dry while I was sleeping.
I love the look! In hindsight, I should have used white glitter on my tree because the glue dried transparent (duh!) and my crystal glitter just doesn't look snowy enough with the dark green showing through. There are some flecks of Carrara Marble glitter, because I shook it on afterwards, which does help a bit. Next time I do a tree, I'll use that one instead. The crystal glitter looks great on the snowman and hills though!
If you look closely, you can see that I deliberately added my glue in a jagged manner. It looks more like real snow that way. Love all the sparkle!!
For the sentiment, I just diecut a piece of Aqua Mist cardstock (so it would blend with my brackground) and stamped it in black. Isn't that the perfect sentiment for this card? Oh, and I embossed teeny white snowflakes on my Aqua Mist card base before gluing everything down.
So happy with this card! It almost makes me long for winter. Almost. I admit to singing "Winter Wonderland" during the process. Just couldn't help it! :)
My daughter Emily also made a card for this challenge using some pretty pink glitter and diecut flowers.
This was quick and easy. She stamped her leaves, glued on the flowers, added a yellow butterfly leftover from our Kool-Aid experiment, stamped her sentiment, and put it all on a Hibiscus Burst card base. Done! She says I take too long. lol Love my sweet girl! It was so fun to stamp with her this weekend.
Stamps: In the Meadow (Papertrey Ink)
Paper: White, Aqua Mist (Papertrey Ink)
Ink: Tuxedo Black (Memento); VersaMark
Misc: In the Meadow dies, In the Meadow Silhouettes dies (Papertrey Ink); Fishtail Flags Layers STAX dies (My Favorite Things); Crystal fine glitter, Carrara Marble glitter (Martha Stewart)
Stamps: Turning a New Leaf, Floral Frenzy, Polka Dot Basics (Papertrey Ink)
Paper: White, Hibiscus Burst (Papertrey Ink); watercolor paper
Ink: Smokey Shadow, Ripe Avocado (Papertrey Ink); VersaMark
Misc: Beautiful Blooms II #1 dies; Heart-2-Heart #10 die (Papertrey Ink); Cotton Candy glitter (Martha Stewart)
Glitter was the star of this challenge. I actually used glitter on quite a few of my Stamp-a-Faire cards. For this one, I decided to create a snowy winter scene.
Check out all that sparkle! I first stamped and diecut my pine tree. For the snow, I added raised globs of liquid glue (a la Dawn McVey) to the branch edges and then shook on a healthy dose of glitter. I did the same thing to my white hill edges and snowman. This was all done last night so it could dry while I was sleeping.
I love the look! In hindsight, I should have used white glitter on my tree because the glue dried transparent (duh!) and my crystal glitter just doesn't look snowy enough with the dark green showing through. There are some flecks of Carrara Marble glitter, because I shook it on afterwards, which does help a bit. Next time I do a tree, I'll use that one instead. The crystal glitter looks great on the snowman and hills though!
If you look closely, you can see that I deliberately added my glue in a jagged manner. It looks more like real snow that way. Love all the sparkle!!
For the sentiment, I just diecut a piece of Aqua Mist cardstock (so it would blend with my brackground) and stamped it in black. Isn't that the perfect sentiment for this card? Oh, and I embossed teeny white snowflakes on my Aqua Mist card base before gluing everything down.
So happy with this card! It almost makes me long for winter. Almost. I admit to singing "Winter Wonderland" during the process. Just couldn't help it! :)
My daughter Emily also made a card for this challenge using some pretty pink glitter and diecut flowers.
This was quick and easy. She stamped her leaves, glued on the flowers, added a yellow butterfly leftover from our Kool-Aid experiment, stamped her sentiment, and put it all on a Hibiscus Burst card base. Done! She says I take too long. lol Love my sweet girl! It was so fun to stamp with her this weekend.
Stamps: In the Meadow (Papertrey Ink)
Paper: White, Aqua Mist (Papertrey Ink)
Ink: Tuxedo Black (Memento); VersaMark
Misc: In the Meadow dies, In the Meadow Silhouettes dies (Papertrey Ink); Fishtail Flags Layers STAX dies (My Favorite Things); Crystal fine glitter, Carrara Marble glitter (Martha Stewart)
Stamps: Turning a New Leaf, Floral Frenzy, Polka Dot Basics (Papertrey Ink)
Paper: White, Hibiscus Burst (Papertrey Ink); watercolor paper
Ink: Smokey Shadow, Ripe Avocado (Papertrey Ink); VersaMark
Misc: Beautiful Blooms II #1 dies; Heart-2-Heart #10 die (Papertrey Ink); Cotton Candy glitter (Martha Stewart)
Labels:
Papertrey Ink,
Stamp-a-Faire
Subscribe to:
Posts (Atom)