Thursday, December 25, 2014

Stamped Art: Snow Frame

I'm popping in to post the second stamped frame art from the workshop.  Did you like the Santa one?  It's fun and festive, but I think this snow-themed one is my personal favorite.  I love the soft colors and that pretty glitter snowflake!


Again, this project uses multiple stamp sets and a variety of embellishments.  The patterned papers are from the All is Calm designer paper in the Stampin' Up holiday mini.  It's a good thing I made this at home because it took me many hours.  I thoroughly enjoyed every minute!


The present image in the first square is from last year's Color Me Christmas set.  I colored it with markers and glittered the Soft Sky stripes.  I threaded a button with twine to place next to it.


I love this darling snowman with the singing birds.  It's from the Snow Much Fun stamp set.  I colored the image with markers and glittered the Soft Sky shading on the snowman.  I added a rhinestone to the center of the metal charm.


I wish I could remember the name of this set!  I'm pretty sure I own it too, but I can't seem to find the name in my inventory list or even the set itself.  {face palm}  edited to add:  It's called Punch Pals!  I colored the penguin with Smoky Slate and Pumpkin Pie markers, making his scarf Soft Sky this time and glittering it like before.  I surrounded him with silver sequins and a "snowflake" cut from silver glitter paper.


This little car is from White Christmas.  I colored it with markers and glittered the windows.  I added touches of "snow" on the tree with a white gel pen.  The road is a strip of All is Calm designer washi tape.  The final touch is a snowflake sequin.


These trees are from Punch Pals.  I colored them with markers, and then glittered the swirls and star.  I added tiny dots of glitter to the Soft Sky square.  Subtle, but so pretty in person, like teeny snowflakes.


The large snowflake was cut from silver glitter paper.  I think it's a Stampin' Up die, but I'm not totally sure.  A rhinestone brad was put through the center.  Don't you love how my demo cut the patterned square?  It lines up perfectly with the snowflake.


This tree is from Color Me Christmas.  I colored it with markers, added two sizes of rhinestones, and a silver glitter paper star.


For the large sentiment, I colored the stamp with Lost Lagoon and Pear Pizzazz markers before stamping.  I knotted a piece of ribbon around the square.


The little bear and banner are from White Christmas.  Naturally, the bear is glittered!  Again, I cut the banner pieces apart to make it easier to arrange them how I wanted.


For this snowman (from Punch Pals), I added shading with a Soft Sky marker and colored the hat.  I added dots of white enamel for berries.  Glitter is added over the shading on the snowman.


This stocking from Color Me Christmas was colored with markers and the white sections were glittered.  A small faceted acrylic button was threaded with twine for an accent.


This tree was punched from designer paper with the Tree punch that matches the Festival of Trees set.  I wrapped it with silver tinsel twine and topped it with a silver glitter paper star.


All of the stamped images were popped up with dimensionals, as well as each layered square.  There are so many little details in this project!  I love the finished result.


Stamps:  Color Me Christmas, Snow Much Fun, White Christmas, Punch Pals (Stampin' Up)
Ink:  Tuxedo Black (Memento)
Paper:  Whisper White, Lost Lagoon, Pear Pizzazz, Soft Sky, Smoky Slate, All is Calm dsp, silver glitter (Stampin' Up)
Markers:  Lost Lagoon, Pear Pizzazz, Soft Sky, Smoky Slate, Pumpkin Pie (Stampin' Up)
Misc:  Crystal fine glitter (Martha Stewart); various ribbon/embellishments (Stampin' Up); white gel pen; white shadowbox frame

Wednesday, December 24, 2014

Stamped Art: Santa Frame

Good grief, it has been one heck of a busy month!  Here it is Christmas Eve and I'm just now getting on to post some of my Christmas projects.  I went to a workshop at my Stampin' Up demo's house to make tags, which will be posted as soon as I take pics.  I thought I already had, oops!  They are on presents under the tree and it's currently raining, so that's not going to happen today.  While I was there, I stamped the images for two stamped art frames.  Since I couldn't attend that particular workshop, my demo made up a kit for me with all the papers/embellishments and I assembled them at home as I had time.  Here's the red and green Santa-themed one.


It turned out super cute!  The patterned papers are from the Trim the Tree stack and the images come from several different stamp sets.


There are so many little details.  This project took multiple hours, but I enjoyed every minute.  I love doing stuff like this!  I followed my demo's design pretty closely and only changed a couple of things.

Each of the images were stamped on Whisper White card stock and then cut out by hand.  The only images stamped directly on a white square were the cardinal and the sentiment.  The images are also popped up with dimensionals on each layered square.


The Santa in the first square is from a set called Color Me Christmas.  I used Stampin' Markers to color him in and then added crystal fine glitter to the fur.  I used garnet glitter on the candy cane, one of my little changes to add more sparkle.


This little car is from White Christmas.  I colored it with markers, added white "snow" to the tree with a gel pen, and added glitter to the windows.  A small strip of chevron ribbon makes a road for the car.


I colored the penguin from Punch Pals and added glitter to his scarf.  A snowflake sequin is placed in the corner.


This tree is from Color Me Christmas as well.  I used red and gold Stickles on the ornaments, and added glitter to the star.


The sentiment was stamped after coloring the stamp with markers in two colors.  I wrapped the square with some green ribbon and tied a snowflake charm to it with baker's twine.  The rhinestone     in the center of the charm was colored with a Copic marker.


This stocking is also from Color Me Christmas.  It was colored with markers and the white portions were glittered.  Baker's twine was threaded through a button and then tied into a bow.


I colored the two trees from Punch Pals with markers and added glitter to the little swirls and the star.  There are some tiny strips of foam tape under those trunks! 


The present is another Color Me Christmas image.  I added glitter to the white stripes and a rhinestone brad was placed on the patterned paper square.


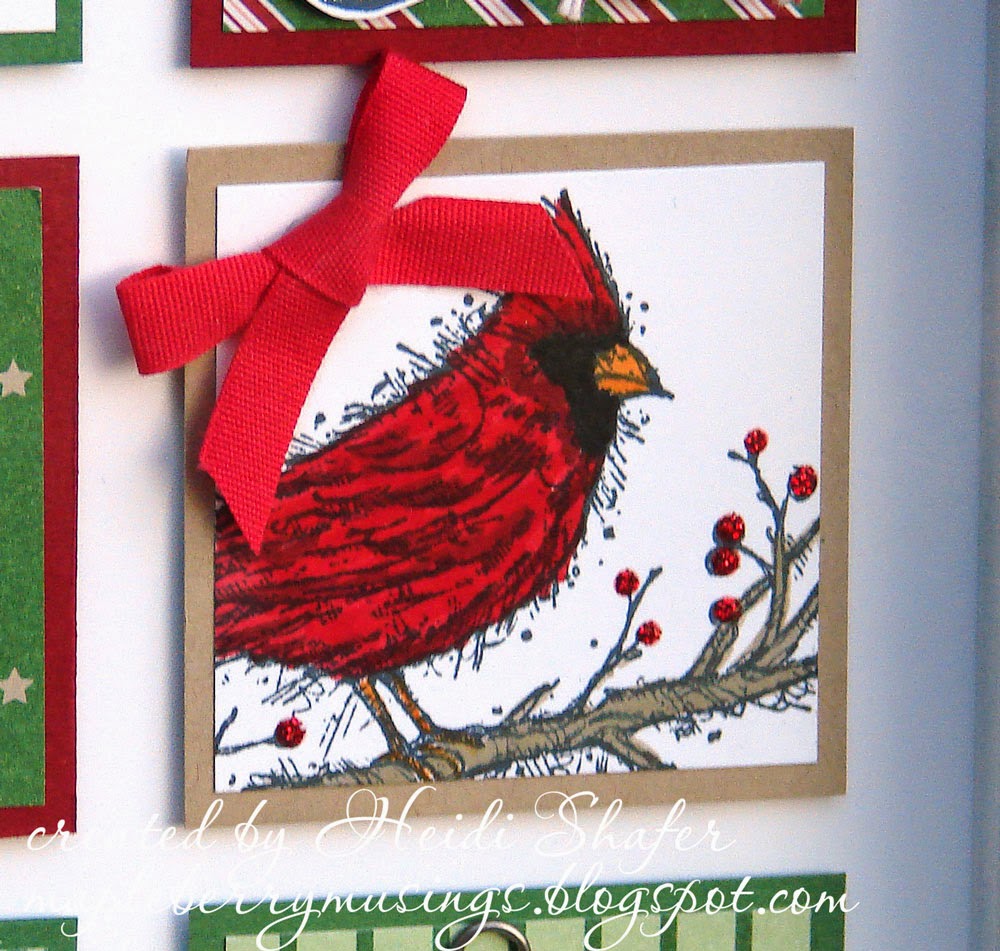
This cardinal from Beauty of the Season was stamped directly on the white square and colored with markers.  I added red Stickles to the branches for berries and a red bow in the corner.


I love this adorable little snowman from Punch Pals.  I added color with markers and then glittered the shading on the snowman.  I also added red Stickles to the berries on his hat, and used black enamel for the eyes and buttons.


The deer and banner are from White Christmas.  After coloring the banner, I cut out the two pieces separately for easier placement.  The deer is glittered (naturally) and a strip of red polka dot ribbon was added to the square.


This fun Santa suit is from Get Your Santa On.  I cut it out, glittered the fur, and then glued it to a tiny metal hanger.  The sentiment was trimmed down and placed on top.


So much fun!  It looks awesome in person.  I have the frame sitting in a stand in my kitchen.  I got several compliments for it during my open house this past Sunday.  :)

Stamps:  Color Me Christmas, White Christmas, Get Your Santa On, Punch Pals (Stampin' Up)
Ink:  Tuxedo Black (Memento)
Paper:  Whisper White, Garden Green, Cherry Cobbler, Crumb Cake, Trim the Tree dsp stack (Stampin' Up)
Markers:  Real Red, Cherry Cobbler, Garden Green, Basic Black, Crumb Cake, Blushing Bride, Pumpkin Pie, Daffodil Delight (Stampin' Up)
Misc:  R89 Copic marker; Xmas Red Stickles, Golden Rod Stickles; Crystal fine glitter, Garnet glitter (Martha Stewart); various embellishments/ribbon (Stampin' Up); white gel pen, white shadowbox frame


Tuesday, November 25, 2014

Winter Wishes


I wasn't sure I'd be able to get a card done for this month's Papertrey Ink blog hop, but I managed to do it despite dinner planning, shopping, and house cleaning in preparation for Thanksgiving company this week.  Woot woot!


The theme was snow, so I pulled out my Damask Snowflakes dies and a few other wintry-themed things.  I glued a piece of blue snowy paper to a white card base for my background.  I die cut a snowflake from silver glitter paper and centered it over a double-ended banner that was embossed with phrases from Rustic Snowflakes and Snowfall.  I embossed a snowflake medallion from 2008 Holiday Tags Collection and punched it out with a 1-3/4" circle punch, centering it on the large snowflake.  As a final touch, I added a small rhinestone in the middle.

I love how it turned out!  Unfortunately, the sun was down when I got the card done, so you get an indoor picture.  I'll get a better one tomorrow.  Hopefully you can still see all the pretty shimmer.  Go here to see other projects in the blog hop.  I adore snowflake images, so this was a fun theme for me.  :)

Stamps:  2008 Holiday Tags Collection, Snowfall, Rustic Snowflakes (Papertrey Ink)
Ink:  VersaMark
Paper:  White (Papertrey Ink); silver glitter (Stampin' Up); Jack Frost 6x6 pad (American Crafts)
Misc:  Damask Snowflakes die; Double-Ended Banner die (Papertrey Ink); 1-3/4" circle punch (EK Success); silver embossing powder, rhinestone

Sunday, November 23, 2014

Merry Poinsettias

I made a card using a recent Clean & Simple Stamping sketch.  I really liked the sketch layout with its possibilities for smaller images, and knew exactly what stamps I wanted to pull out.


I made a fun framed bingo card using Jolly Bingo Bits a few years ago.  (posted here, and yes, I now own the stamps myself)  :)  At first, I thought I would do something similar using different images for each circle, but then my eye was drawn to the poinsettia and I thought it would look good repeated on all the circles instead.

I used my Spellbinders dies to cut white circles and red scalloped circles.  On each white circle, I stamped a poinsettia in Pure Poppy ink, adding glittery dot centers with a glue pen and Wink of Stella shimmer to each petal.

I embossed the white panel with Stampin' Up's Petals-a-Plenty folder and adhered it to a Pure Poppy card base.  I arranged my scalloped circles according to the sketch.  Then I cut the word "merry" using a die by Papertrey Ink and glittered the heck out of it.  I love the sparkle!  I stamped the word "christmas" on a small strip of cardstock and glittered the edges so it would stand out better from the background and visually connect it with the larger word.  The sentiment ended up a little higher than the sketch, but it fit better around the circles this way.  I didn't want the "y" hanging off the card, nor did I want to block the poinsettia circles.


Hopefully, you can see the shimmer better in the close up above.  I love my Wink of Stella pen.  I ended up using foam tape to raise the sentiment, although with all that glitter, I'm sure it stands out from the background anyway!

Stamps:  Jolly Bingo Bits (Stampin' Up); Wonderful Words: Joy (Papertrey Ink)
Ink:  Pure Poppy (Papertrey Ink); Tuxedo Black (Memento)
Paper:  White, Pure Poppy (Papertrey Ink)
Misc:  Yellow Barite glitter (Martha Stewart); glue pen; Standard Circles Small die, Classic Scalloped Circles Small die (Spellbinders); Petals-a-Plenty embossing folder (Stampin' Up); Wink of Stella clear pen; foam tape

Saturday, November 15, 2014

Holly & Stars


I'm squeaking in at the last minute to post one last card for the Waltzingmouse Pajama Party challenges.  This time it's a sketch.  Pretty straightforward, but my card required a lot of tweaking before I was happy with it.


I'll add more info in just a bit.  I've got to get this linked before time runs out!   :)

Okay, I'm back.  I made it with six minutes to spare.  lol  You'll have to pardon the indoor lighting.  The sun is well and truly down here on the east coast.  I'll get a better picture tomorrow.  (edited to add new pics above)

I used an oldie but goodie stamp set by Waltzingmouse.  I purchased Oven Fresh Gingerbread Joy along with its companion set when they were first released several years ago.  I love the adorable gingerbread men, but this time I reached for the holly and berry images for my card.  I stamped them randomly around the oval in Handsome Hunter and Real Red ink.  Then I added two sizes of gold stars from the same stamp set.

The images looked a little flat, so I took my Wink of Stella pen and added a sheer layer of glitter to each star.  I used Glossy Accents on the berries to add shine and dimension.

I cut two ovals from white and green cardstock using Spellbinders dies.  On the white oval, I added a gold border with a paint pen.  Love the look!  I also went over it with my Wink of Stella pen to match the stars.  In the center, I stamped a sentiment from Ornate Ornaments and a small flourish underneath from Vintage Labels 4.  I added one tiny glittery star above.

I stamped and cut out two more sprays of holly and adhered them to each side of the oval, again adding Glossy Accents to the berries.  The whole centerpiece was popped up with foam tape on the card.  Whew!  It didn't turn out half bad!  Thank goodness.   :)

Stamps:  Oven Fresh Gingerbread Joy, Ornate Ornaments, Vintage Labels 4 (Waltzingmouse)
Ink:  Tuxedo Black (Memento); Handsome Hunter, Real Red (Stampin' Up); Gold (Encore! Ultimate Metallic)
Paper:  White (Papertrey Ink); Handsome Hunter (Stampin' Up)
Misc:  Standard Ovals Small and Large dies (Spellbinders); Glossy Accents (Ranger); clear Wink of Stella pen; foam tape  

Sweetest Christmas Wishes


I'm popping in to post a card for another of the Waltzingmouse Pajama Party challenges, this time to use an older Christmas set.  The DT used Candy Jar Christmas, which I do have (and also haven't used yet), so I pulled it out to make this card.


I stamped the candy canes with black ink, colored in sections with a red marker, and then used a glue pen to add sparkly red glitter.  I hand cut the candy canes, completely forgetting that I had the dies!  {smack forehead}  I remembered when I considered using the jar image and pulled out the matching dies.  Ooops!  I did use a die for the bow.  :)

After stamping, I colored the bow with Copic markers to add shading and then coated it in glitter.  Love the sparkle!  I stamped a Vintage Labels 4 image on another diecut in Hawaiian Shores ink, and then the sentiment in Pure Poppy ink.  I love how the bow fits nicely around the sentiment.

I embossed the Hawaiian Shores panel with a Decorative Dots folder from Stampin' Up.  It almost looks like falling snow.  I glued it to a white card base and then added the layered candy cane piece.  It makes a very sweet Christmas card!  (pun intended)  :)

Stamps:  Candy Jar Christmas, Candy Jar Christmas Fillers, Vintage Labels 4 (Waltzingmouse)
Ink:  Pure Poppy, Hawaiian Shores (Papertrey Ink); Tuxedo Black (Memento)
Paper:  White, Hawaiian Shores (Papertrey Ink)
Copic:  0, C1, C3
Misc:  Cherry Cobbler marker, Decorative Dots embossing folder (Stampin' Up); Labels 4 die (Spellbinders); Jar Fillers die (Waltzingmouse); Sugar Cube glitter, Garnet glitter (Martha Stewart); glue pen

Friday, November 14, 2014

Scandinavian Tag


I could not resist the Waltzingmouse Pajama Party challenge for this month to make a Scandinavian-style tag using red and white.  I have had the Folk Art Medallion stamp set for quite some time without using it, and I just knew it would look cool embossed in white on a red tag.  I had to try it out!  Here's the result.


Quite simple, although it took several steps.  Each part of the medallion was stamped and embossed separately.  First the large leafy circle medallion, and then the smaller bits inside.  I stamped my sentiment on a diecut flag and popped it up.  Yes, that is an eyelet!  lol  I've had these flower eyelets for years and completely forgot about them until I started searching through my embellishments today.  They were still in the box!  It echoes the floral shapes in the medallion so it adds a nice touch. Besides, using what I have is the goal!  :)

You can see other projects for the challenge here on the Waltzingmouse blog.

Stamps:  Folk Art Medallion, Ornate Ornaments (Waltzingmouse)
Ink:  Pure Poppy (Papertrey Ink); VersaMark
Paper:  White, Pure Poppy (Papertrey Ink)
Misc:  white embossing powder (Filigree); flower eyelet (Making Memories); Tag Sale #1 die (Papertrey Ink); Fishtail Flags Layers STAX die (My Favorite Things); baker's twine; foam tape