This is a cute little tag. There were two of them originally, but I used one in a package sent to my missionary son.
I think a die was used for the red piece, but I'm not sure since it was already cut for the workshop. I stamped the reindeer from Color Me Christmas inside and colored him with markers. Once home, I decided to add red glitter to his nose. After all, Rudolph's nose is supposed to glow! :)
Stamps: Color Me Christmas, unknown sentiment (Stampin' Up)
Ink: Tuxedo Black (Memento)
Paper: Very Vanilla, Cherry Cobbler (Stampin' Up)
Markers: Cherry Cobbler, unknown colors (Stampin' Up)
Misc: natural/old olive two-tone trim (Stampin' Up); unknown die (Stampin' Up); Xmas Red Stickles
Sunday, December 28, 2014
Workshop Tags: Pinecone
Here's the next set of tags from the workshop. I used an old retired Stampin' Up set called Peaceful Wishes, one of my favorites, and Tags Till Christmas.
I think this color is Pear Pizzazz. I don't have a list of supplies, unfortunately, so I'm just guessing. I stamped the pine branches in Pear Pizzazz and the pinecones in Early Espresso. I used the matching markers to stamp the smaller tag in two colors.
I added glitter to the branch and pinecone on the smaller tag, which was popped up to add dimension. The upper corners of the tag were done with an old SU punch. Some pretty Pear Pizzazz seam binding ribbon was tied into a bow as a last step.
Stamps: Peaceful Wishes, Tags Till Christmas (Stampin' Up)
Ink: Pear Pizzazz, Early Espresso (Stampin Up)
Paper: Whisper White, Pear Pizzazz (Stampin' Up)
Misc: Pear Pizzazz, Early Espresso markers (Stampin' Up); Decorative Label punch, unknown punch (Stampn' Up); Pear Pizzazz ribbon (Stampin' Up); Crystal fine glitter (Martha Stewart)
Labels:
Christmas,
Stampin' Up,
Tags
Saturday, December 27, 2014
Workshop Tags: Santa's List
Here's another Santa tag I made at the workshop. This time I used Santa's List from last year's holiday mini.
The Santa image was stamped in black and colored with a Real Red marker. The sentiment was stamped to the side. I stapled a bit of red chevron ribbon to the scalloped oval, and then added glitter to Santa's fur.
I actually made another tag using this image, but I didn't really like how it turned out so I'm not posting it. I did use it on a present though! lol Waste not, want not.
Stamps: Santa's List, unknown sentiment (Stampin' Up)
Ink: Basic Black (Stampin' Up)
Paper: Whisper White (Stampin' Up)
Misc: scalloped oval die; Crystal fine glitter (Martha Stewart); red chevron ribbon, staple
Labels:
Christmas,
Stampin' Up,
Tags
Workshop Tags: Santa
I finally took some pictures of all the tags I made at a workshop put on by my Stampin' Up demo. They really came in handy for presents this year. I'll post them over the next few days. This first set uses the cute Santa from the Get Your Santa On stamp set in the holiday mini.
I started with a white scalloped oval, stamping the Santa image in black. I colored him with markers and then added glitter to the fur. I stamped a layered oval tag with "to..from" and tied it with gold cord. It was then tied to the red ribbon threaded through the main tag. Really simple, but very cute!
You can really see the dimension the glitter adds in the close-up. I made these and all the other tags at the workshop, but due to time constraints, I did all the glittering at home.
Stamps: Get Your Santa On, unknown sentiment (Stampin' Up)
Ink: Basic Black (Stampin' Up)
Paper: Whisper White, Real Red (Stampin' Up)
Misc: scalloped oval dies; red ribbon; gold cord; Crystal fine glitter (Martha Stewart)
Labels:
Christmas,
Stampin' Up,
Tags
Friday, December 26, 2014
Christmas Tags
Every year I make Christmas tags with no name for my children's gifts under the tree. I make a set of four of each design. One is saved for Santa to use on Christmas Eve. This way, the kids don't know which gifts are belong to them. It's quite fun and has become a family tradition. They love to guess which tags are theirs. My oldest son is on a church mission right now, so I made three different tags this year.
I borrowed the Color Me Christmas set from my demo since I had to re-stamp a couple of images for the stamped art projects I posted earlier this week. Since I had it out, I used the cute Santa for one set of tags.
I colored Santa with Real Red, Basic Black, and Blushing Bride markers, and then added crystal fine glitter to the fur. I used garnet glitter on the candy cane. Underneath, I stamped the "believe" sentiment from Tree Trimming Trio. I used my Tag Sale #5 die, layering a plaid patterned paper from the Trim the Tree stack underneath the white tag. The last touch was some silver ribbon.
For my second set of tags, I pulled the candy cane image from Friendship Jar Holiday Fillers. I colored the red stripes and then cut out each set of candy canes by hand. I added garnet glitter for lots of sparkle!
The white tags were cut using the Tag Sale #3 die. To frame the candy canes, I used a Basic Black marker to fill in the impressed dots. I stamped the sentiment from Candy Jar Christmas and embossed it in white on a red banner flag. The candy canes were popped up for dimension, and then silver ribbon was added at the top.
I used Snow Much Fun for my last set of tags. I adore this snowman image with the singing birds! I just had to color them like cardinals.
I shaded the snowman lightly with a Copic marker, and used Stampin' Up markers for the rest. Naturally, glitter was added to the shading. What can I say? I love the sparkle! The little "fa la la" sentiment comes from Tag-Its #8.
I used the two pieces of my Tag Sale #8 die to cut the snowman piece and the Spring Rain frame. I used a VersaMark Dazzle inkpad to add snowflakes both on the frame and the backing. The same silver ribbon was used for the final touch.
My kids loved these tags. My youngest daughter even guessed whose was whose correctly! :) Clever little girl. Maybe next year I'll get the tags done earlier. lol I'm such a last-minute stamper.
Stamps: Color Me Christmas (Stampin' Up); Tree Trimming Trio (Papertrey Ink)
Ink: Tuxedo Black (Memento)
Paper: White (Papertrey Ink); Trim the Tree dsp stack (Stampin' Up)
Misc: Cherry Cobbler, Basic Black, Real Red markers (Stampin' Up); glue pen; Crystal and Garnet glitter (Martha Stewart); silver ribbon, Tag Sale #5 die (Papertrey Ink)
Stamps: Friendship Jar Holiday Fillers (Papertrey Ink); Candy Jar Christmas (Waltzingmouse)
Ink: Tuxedo Black (Memento); VersaMark
Paper: White, Pure Poppy (Papertrey Ink)
Misc: Tag Sale #3 die (Papertrey Ink); Real Red, Basic Black markers (Stampin' Up); glue pen; Garnet glitter (Martha Stewart); white embossing powder (Filigree)
Stamps: Snow Much Fun, Snow Burst (Stampin' Up); Tag-Its #8 (Papertrey Ink)
Ink: Tuxedo Black (Memento); VersaMark Dazzle Frost
Paper: White, Spring Rain (Papertrey Ink)
Misc: Tag Sale #8 die (Papertrey Ink); Crystal fine glitter (Martha Stewart); Copic C1 marker; Smoky Slate, Real Red, Pumpkin Pie, Marina Mist markers (Stampin' Up); glue pen
Labels:
Christmas,
Papertrey Ink,
Stampin' Up,
Tags
Thursday, December 25, 2014
Stamped Art: Snow Frame
I'm popping in to post the second stamped frame art from the workshop. Did you like the Santa one? It's fun and festive, but I think this snow-themed one is my personal favorite. I love the soft colors and that pretty glitter snowflake!
Again, this project uses multiple stamp sets and a variety of embellishments. The patterned papers are from the All is Calm designer paper in the Stampin' Up holiday mini. It's a good thing I made this at home because it took me many hours. I thoroughly enjoyed every minute!
The present image in the first square is from last year's Color Me Christmas set. I colored it with markers and glittered the Soft Sky stripes. I threaded a button with twine to place next to it.
I love this darling snowman with the singing birds. It's from the Snow Much Fun stamp set. I colored the image with markers and glittered the Soft Sky shading on the snowman. I added a rhinestone to the center of the metal charm.
I wish I could remember the name of this set! I'm pretty sure I own it too, but I can't seem to find the name in my inventory list or even the set itself. {face palm} edited to add: It's called Punch Pals! I colored the penguin with Smoky Slate and Pumpkin Pie markers, making his scarf Soft Sky this time and glittering it like before. I surrounded him with silver sequins and a "snowflake" cut from silver glitter paper.
This little car is from White Christmas. I colored it with markers and glittered the windows. I added touches of "snow" on the tree with a white gel pen. The road is a strip of All is Calm designer washi tape. The final touch is a snowflake sequin.
These trees are from Punch Pals. I colored them with markers, and then glittered the swirls and star. I added tiny dots of glitter to the Soft Sky square. Subtle, but so pretty in person, like teeny snowflakes.
The large snowflake was cut from silver glitter paper. I think it's a Stampin' Up die, but I'm not totally sure. A rhinestone brad was put through the center. Don't you love how my demo cut the patterned square? It lines up perfectly with the snowflake.
This tree is from Color Me Christmas. I colored it with markers, added two sizes of rhinestones, and a silver glitter paper star.
For the large sentiment, I colored the stamp with Lost Lagoon and Pear Pizzazz markers before stamping. I knotted a piece of ribbon around the square.
The little bear and banner are from White Christmas. Naturally, the bear is glittered! Again, I cut the banner pieces apart to make it easier to arrange them how I wanted.
For this snowman (from Punch Pals), I added shading with a Soft Sky marker and colored the hat. I added dots of white enamel for berries. Glitter is added over the shading on the snowman.
This stocking from Color Me Christmas was colored with markers and the white sections were glittered. A small faceted acrylic button was threaded with twine for an accent.
This tree was punched from designer paper with the Tree punch that matches the Festival of Trees set. I wrapped it with silver tinsel twine and topped it with a silver glitter paper star.
Stamps: Color Me Christmas, Snow Much Fun, White Christmas, Punch Pals (Stampin' Up)
Ink: Tuxedo Black (Memento)
Paper: Whisper White, Lost Lagoon, Pear Pizzazz, Soft Sky, Smoky Slate, All is Calm dsp, silver glitter (Stampin' Up)
Markers: Lost Lagoon, Pear Pizzazz, Soft Sky, Smoky Slate, Pumpkin Pie (Stampin' Up)
Misc: Crystal fine glitter (Martha Stewart); various ribbon/embellishments (Stampin' Up); white gel pen; white shadowbox frame
Again, this project uses multiple stamp sets and a variety of embellishments. The patterned papers are from the All is Calm designer paper in the Stampin' Up holiday mini. It's a good thing I made this at home because it took me many hours. I thoroughly enjoyed every minute!
The present image in the first square is from last year's Color Me Christmas set. I colored it with markers and glittered the Soft Sky stripes. I threaded a button with twine to place next to it.
I love this darling snowman with the singing birds. It's from the Snow Much Fun stamp set. I colored the image with markers and glittered the Soft Sky shading on the snowman. I added a rhinestone to the center of the metal charm.
I wish I could remember the name of this set! I'm pretty sure I own it too, but I can't seem to find the name in my inventory list or even the set itself. {face palm} edited to add: It's called Punch Pals! I colored the penguin with Smoky Slate and Pumpkin Pie markers, making his scarf Soft Sky this time and glittering it like before. I surrounded him with silver sequins and a "snowflake" cut from silver glitter paper.
This little car is from White Christmas. I colored it with markers and glittered the windows. I added touches of "snow" on the tree with a white gel pen. The road is a strip of All is Calm designer washi tape. The final touch is a snowflake sequin.
These trees are from Punch Pals. I colored them with markers, and then glittered the swirls and star. I added tiny dots of glitter to the Soft Sky square. Subtle, but so pretty in person, like teeny snowflakes.
The large snowflake was cut from silver glitter paper. I think it's a Stampin' Up die, but I'm not totally sure. A rhinestone brad was put through the center. Don't you love how my demo cut the patterned square? It lines up perfectly with the snowflake.
This tree is from Color Me Christmas. I colored it with markers, added two sizes of rhinestones, and a silver glitter paper star.
For the large sentiment, I colored the stamp with Lost Lagoon and Pear Pizzazz markers before stamping. I knotted a piece of ribbon around the square.
The little bear and banner are from White Christmas. Naturally, the bear is glittered! Again, I cut the banner pieces apart to make it easier to arrange them how I wanted.
For this snowman (from Punch Pals), I added shading with a Soft Sky marker and colored the hat. I added dots of white enamel for berries. Glitter is added over the shading on the snowman.
This stocking from Color Me Christmas was colored with markers and the white sections were glittered. A small faceted acrylic button was threaded with twine for an accent.
This tree was punched from designer paper with the Tree punch that matches the Festival of Trees set. I wrapped it with silver tinsel twine and topped it with a silver glitter paper star.
All of the stamped images were popped up with dimensionals, as well as each layered square. There are so many little details in this project! I love the finished result.
Stamps: Color Me Christmas, Snow Much Fun, White Christmas, Punch Pals (Stampin' Up)
Ink: Tuxedo Black (Memento)
Paper: Whisper White, Lost Lagoon, Pear Pizzazz, Soft Sky, Smoky Slate, All is Calm dsp, silver glitter (Stampin' Up)
Markers: Lost Lagoon, Pear Pizzazz, Soft Sky, Smoky Slate, Pumpkin Pie (Stampin' Up)
Misc: Crystal fine glitter (Martha Stewart); various ribbon/embellishments (Stampin' Up); white gel pen; white shadowbox frame
Labels:
Christmas,
Stampin' Up,
Winter
Wednesday, December 24, 2014
Stamped Art: Santa Frame
Good grief, it has been one heck of a busy month! Here it is Christmas
Eve and I'm just now getting on to post some of my Christmas projects. I
went to a workshop at my Stampin' Up demo's house to make tags, which will be posted as soon as I take pics. I thought I already had, oops! They are on presents under the tree and it's currently raining, so that's not going to happen today. While I was there, I stamped the images for two stamped art frames. Since I couldn't attend that particular workshop, my demo made up a kit for me with all the papers/embellishments and I assembled them at home as I had time. Here's the red and green Santa-themed one.
It turned out super cute! The patterned papers are from the Trim the Tree stack and the images come from several different stamp sets.
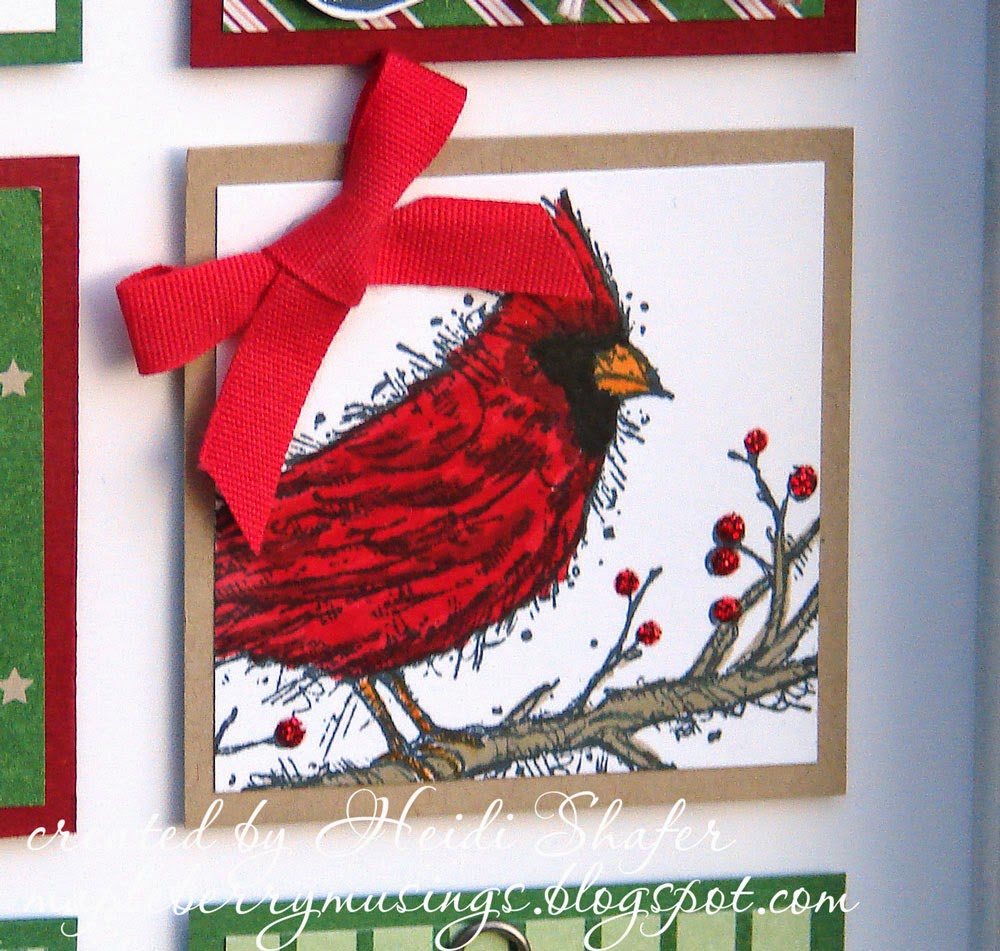
Each of the images were stamped on Whisper White card stock and then cut out by hand. The only images stamped directly on a white square were the cardinal and the sentiment. The images are also popped up with dimensionals on each layered square.
The Santa in the first square is from a set called Color Me Christmas. I used Stampin' Markers to color him in and then added crystal fine glitter to the fur. I used garnet glitter on the candy cane, one of my little changes to add more sparkle.
This little car is from White Christmas. I colored it with markers, added white "snow" to the tree with a gel pen, and added glitter to the windows. A small strip of chevron ribbon makes a road for the car.
I colored the penguin from Punch Pals and added glitter to his scarf. A snowflake sequin is placed in the corner.
This tree is from Color Me Christmas as well. I used red and gold Stickles on the ornaments, and added glitter to the star.
The sentiment was stamped after coloring the stamp with markers in two colors. I wrapped the square with some green ribbon and tied a snowflake charm to it with baker's twine. The rhinestone in the center of the charm was colored with a Copic marker.
This stocking is also from Color Me Christmas. It was colored with markers and the white portions were glittered. Baker's twine was threaded through a button and then tied into a bow.
I colored the two trees from Punch Pals with markers and added glitter to the little swirls and the star. There are some tiny strips of foam tape under those trunks!
The present is another Color Me Christmas image. I added glitter to the white stripes and a rhinestone brad was placed on the patterned paper square.
This cardinal from Beauty of the Season was stamped directly on the white square and colored with markers. I added red Stickles to the branches for berries and a red bow in the corner.
I love this adorable little snowman from Punch Pals. I added color with markers and then glittered the shading on the snowman. I also added red Stickles to the berries on his hat, and used black enamel for the eyes and buttons.
The deer and banner are from White Christmas. After coloring the banner, I cut out the two pieces separately for easier placement. The deer is glittered (naturally) and a strip of red polka dot ribbon was added to the square.
This fun Santa suit is from Get Your Santa On. I cut it out, glittered the fur, and then glued it to a tiny metal hanger. The sentiment was trimmed down and placed on top.
So much fun! It looks awesome in person. I have the frame sitting in a stand in my kitchen. I got several compliments for it during my open house this past Sunday. :)
Stamps: Color Me Christmas, White Christmas, Get Your Santa On, Punch Pals (Stampin' Up)
Ink: Tuxedo Black (Memento)
Paper: Whisper White, Garden Green, Cherry Cobbler, Crumb Cake, Trim the Tree dsp stack (Stampin' Up)
Markers: Real Red, Cherry Cobbler, Garden Green, Basic Black, Crumb Cake, Blushing Bride, Pumpkin Pie, Daffodil Delight (Stampin' Up)
Misc: R89 Copic marker; Xmas Red Stickles, Golden Rod Stickles; Crystal fine glitter, Garnet glitter (Martha Stewart); various embellishments/ribbon (Stampin' Up); white gel pen, white shadowbox frame
It turned out super cute! The patterned papers are from the Trim the Tree stack and the images come from several different stamp sets.
There are so many little details. This project took multiple hours, but I enjoyed every minute. I love doing stuff like this! I followed my demo's design pretty closely and only changed a couple of things.
The Santa in the first square is from a set called Color Me Christmas. I used Stampin' Markers to color him in and then added crystal fine glitter to the fur. I used garnet glitter on the candy cane, one of my little changes to add more sparkle.
This little car is from White Christmas. I colored it with markers, added white "snow" to the tree with a gel pen, and added glitter to the windows. A small strip of chevron ribbon makes a road for the car.
I colored the penguin from Punch Pals and added glitter to his scarf. A snowflake sequin is placed in the corner.
This tree is from Color Me Christmas as well. I used red and gold Stickles on the ornaments, and added glitter to the star.
The sentiment was stamped after coloring the stamp with markers in two colors. I wrapped the square with some green ribbon and tied a snowflake charm to it with baker's twine. The rhinestone in the center of the charm was colored with a Copic marker.
This stocking is also from Color Me Christmas. It was colored with markers and the white portions were glittered. Baker's twine was threaded through a button and then tied into a bow.
I colored the two trees from Punch Pals with markers and added glitter to the little swirls and the star. There are some tiny strips of foam tape under those trunks!
The present is another Color Me Christmas image. I added glitter to the white stripes and a rhinestone brad was placed on the patterned paper square.
This cardinal from Beauty of the Season was stamped directly on the white square and colored with markers. I added red Stickles to the branches for berries and a red bow in the corner.
I love this adorable little snowman from Punch Pals. I added color with markers and then glittered the shading on the snowman. I also added red Stickles to the berries on his hat, and used black enamel for the eyes and buttons.
The deer and banner are from White Christmas. After coloring the banner, I cut out the two pieces separately for easier placement. The deer is glittered (naturally) and a strip of red polka dot ribbon was added to the square.
This fun Santa suit is from Get Your Santa On. I cut it out, glittered the fur, and then glued it to a tiny metal hanger. The sentiment was trimmed down and placed on top.
So much fun! It looks awesome in person. I have the frame sitting in a stand in my kitchen. I got several compliments for it during my open house this past Sunday. :)
Stamps: Color Me Christmas, White Christmas, Get Your Santa On, Punch Pals (Stampin' Up)
Ink: Tuxedo Black (Memento)
Paper: Whisper White, Garden Green, Cherry Cobbler, Crumb Cake, Trim the Tree dsp stack (Stampin' Up)
Markers: Real Red, Cherry Cobbler, Garden Green, Basic Black, Crumb Cake, Blushing Bride, Pumpkin Pie, Daffodil Delight (Stampin' Up)
Misc: R89 Copic marker; Xmas Red Stickles, Golden Rod Stickles; Crystal fine glitter, Garnet glitter (Martha Stewart); various embellishments/ribbon (Stampin' Up); white gel pen, white shadowbox frame
Labels:
Christmas,
Stampin' Up
Subscribe to:
Posts (Atom)


